14
Continuous Deployment of Jupyter Notebooks
This is a guide on how to use AWS CodePipeline to continuously deploy Jupyter notebooks to an S3-backed static website.
Since I started using EMR Studio, I've been making more use of Jupyter notebooks as scratch pads and often want to be able to easily share the results of my research. I hunted around for a few different solutions and while there are some good ones like nbconvert and jupytext, I wanted something a bit simpler and off-the-shelf. This post from Mikkel Hartmann about making a static website from Jupyter Notebooks led me to MkDocs and luckily, I came across mknotebooks, which offers a simple plugin for MkDocs. 😅
So, by using a simple static site generator that's geared toward project documentation, and a plugin that renders Jupyter notebooks quite well, and a few fancy code pipelines...I can easily push my notebooks to production. Let's go!
This is the architecture we'll be implementing. This will all be built using the AWS Cloud Development Kit (CDK).

We'll be creating the following:
- 2 S3 buckets to store our logs and website artifacts
- A CodeCommmit repository that holds our site and notebooks
- A CodeBuild project that generates the static site
- A CodePipeline that is triggered by new commits, builds the site, and deploys it to S3
- A CloudFront Distribution that serves the site
- And optionally an ACM certificate if you want an alternate domain name
I won't go into the details of the entire CDK stack, but instead will show how to deploy the CD pipeline.
You'll need to have CDK installed (>= v1.107.0) and Python >= 3.9.
I use nodenv and virtualenv for my respective environments.
# I use node 14.5.0
nodenv shell 14.5.0

# And Python3
virtualenv -p python3.8 .venv
source .venv/bin/activateThe source code is available in dacort/jupyter-static-website. In order to get started, we just need to clone that repo and deploy our CDK stack!
This project is a two-phased deploy due to the fact that CloudFront certificates need to be in us-east-1. If you do not need a custom domain, you can skip the first part.
First, clone the project and install the necessary requirements.
git clone https://github.com/dacort/jupyter-static-website.git
cd jupyter-static-website
pip install -r requirements.txt
You'll also need to bootstrap your AWS CDK environment in the account and region you want to deploy Part 2 in.
cdk bootstrap aws://ACCOUNT-NUMBER-1/REGION-1If you are not using a custom domain, skip to Part 2
This project only supports using the default CloudFront certificate and a DNS-validated CNAME. In order to generate the certificate, you'll need to run the command below, go into the AWS Certificate Manager console and make sure you follow the validation instructions.
cdk deploy CloudfrontCertificateStack -c domain_name=notebooks.example.comOnce the domain is validated, the stack should finish provisioning.
One of the outputs from this stack will be CloudfrontCertificateStack.certificatearn - you'll need the value of this for the next phase.
If you are not using a custom domain, you can omit both of the -c options below.
If you want to deploy to a different region, make sure you set the AWS_DEFAULT_REGION environment variable.
cdk deploy EmrStudioPublisherStack \
    -c domain_name=notebooks.example.com \
    -c certificate_arn=arn:aws:acm:us-east-1:012345678912:certificate/f07b01a4-3e8c-4639-8a22-b7a20a832de3
Once this stack finishes, you should have a CodeCommit repository you can make changes to, a CloudFront distribution, and a publicly accessible URL (found in the EmrStudioPublisherStack.cloudfrontendpoint output) that has a pre-populated example site.
The site will take a few minutes to deploy - you'll be able to keep an eye on the status in the CodePipeline console.
Usage is pretty straight-forward. git clone the repository, add a new notebook, and push it back up! If you're using EMR Studio, you can add your CodeCommit repository and make your changes to your Jupyter notebooks there.
I made a video about connecting to Git in EMR Studio that you might find useful.
Any new notebooks added in the site/docs/notebooks/ directory will automatically be published.
You can add links to the notebooks by updating the nav section of the mkdocs.yml file.
nav:
  - Home: index.md
  - Notebooks:
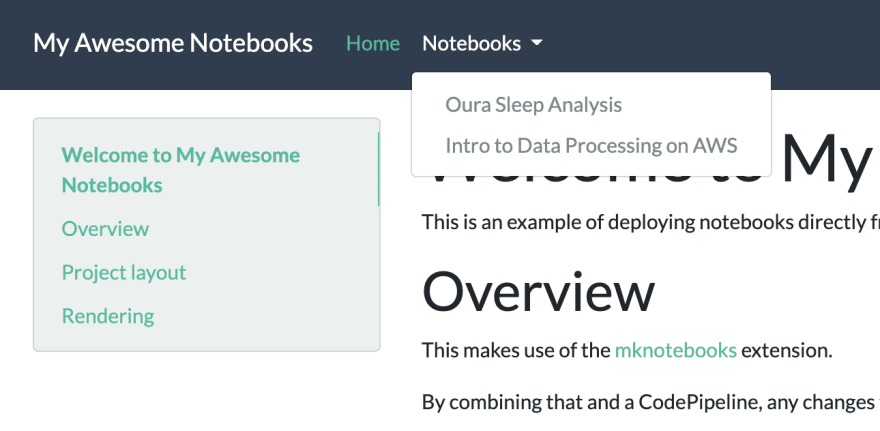
    - Oura Sleep Analysis: notebooks/damons_sleep.ipynb
    - Intro to Data Processing on AWS: notebooks/intro_data_processing_aws.ipynb
This YAML config will generate a nav dropdown like so.

Note that not all images or libraries render nicely when converting to HTML. This is why, for example, in my plotly example I had to use fig.show(renderer="jupyterlab")
In addition, if you paste multiple images into your notebook's Markdown, mknotebooks only renders one of them. In order to work around this, I added a pre-build step that uniquify's all the image attachments in Markdown cells.
14
