
44
Send React Web3 Transactions via MetaMask with useDapp
Today we're going to send real transactions via our React Dapp, both reading from & writing to an Ethereum smart-contract written in Solidity. If you followed the last tutorial Build a Web3 Dapp in React & Login with MetaMask, you'll already know how to connect an Ethereum account to a dapp - now we're getting to the good stuff: interacting with and changing the state of the Ethereum network!
By the end of today's tutorial you will know the following:
- How to write a basic smart contract in Solidity
- How to deploy that contract to a test network
- How to import that contract into a frontend
- How to read from & write to that contract
In addition to the tech we used last time:
- react ^17.0.2
- typescript ^4.2.1
- @usedapp/core ^0.4.1
- @chakra-ui/react ^1.6.5
We'll also be making use of Solidity >0.5 and the Remix Solidity online editor.
NOTE: Before we start, make sure you have MetaMask installed and you are connected to the Ropsten test network.
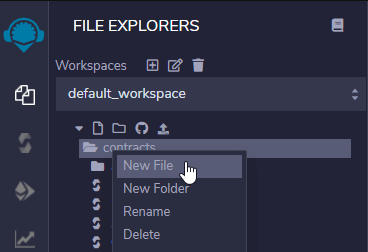
We're going to create a simple smart contract using the online editor Remix: https://remix.ethereum.org/. Make sure you're connected to the Ropsten network (via MetaMask), then navigate to the File Explorer tab, click on contracts and create a new file called SimpleContract.sol:
We're not going to spend too much time on explaining Solidity - it's essentially an object-oriented language with JavaScript-like syntax, where class is contract. There are many more subtle differences, but they are beyond the scope of this tutorial! (I'll add some links for learning more about Solidity at the end of this tutorial).
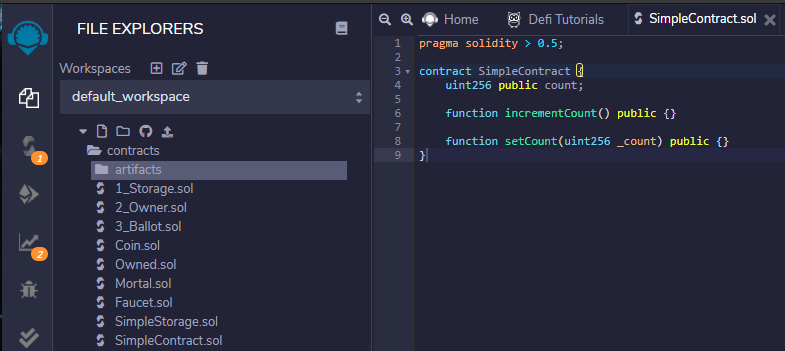
Inside SimpleContract.sol, add the following code:
pragma solidity >0.5; // pragma is always required

contract SimpleContract {
  uint256 public count;

  function incrementCount() public {}

  function setCount(uint256 _count) public {}
}
In the above code we are initializing a variable called count as a uint256 integer type. When we declare this variable it is automatically set to 0.
You may notice that both our variable & function definitions include the keyword "public"; this is to give external accounts the ability to interact with them (other keywords include private, internal & external).
Another thing to note is that when we declare a public variable as we have with count, Solidity will automatically create a "getter" function with the same name for that variable - this contract now includes a function called count that we can use to read the count variable.
Lastly, you will see a notification on the Solidity compiler tab in Remix - Remix is automatically compiling the contracts that we write in the online editor, saving us a step (that we would normally have to initiate in our local development environment):
Next, let's add some logic to the two functions we created in SimpleContract.sol:
pragma solidity > 0.5;

contract SimpleContract {
    uint256 public count;

    function incrementCount() public {
        count++;
    }

    function setCount(uint256 _count) public {
        require(_count > 0);
        count = _count;
    }
}
This is really all we need to get started - the incrementCounter function will increment the count variable when we call it, and the setCounter function lets us set the count variable.
Notice the line require(_count > 0); - require is a Solidity function that is essentially a conditional, whereby the condition _count > 0 must be true for the program flow to continue - if the condition is not true, the program execution will halt with an error.
You might see the compiler complaining here about a missing license definition - to fix that, simply add the following license identifier at the top of SimpleContract.sol:
// SPDX-License-Identifier: MITNow we have a contract that we will be able to read from & write to - but in order to do that we will want to deploy the contract to the Ropsten test network (we use Ropsten for test purposes and also because we can use test ETH that does not cost us real-world money!).
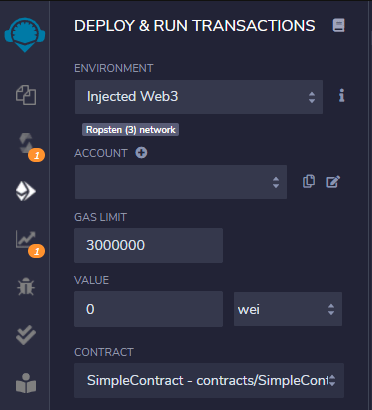
Click the "Deploy & Run Transactions" tab in Remix, and change the "Environment" dropdown to "Injected Web3":
This will prompt your MetaMask extension to open, and show the "Connect With MetaMask" screen. Here you can select the account that you would like to connect with:
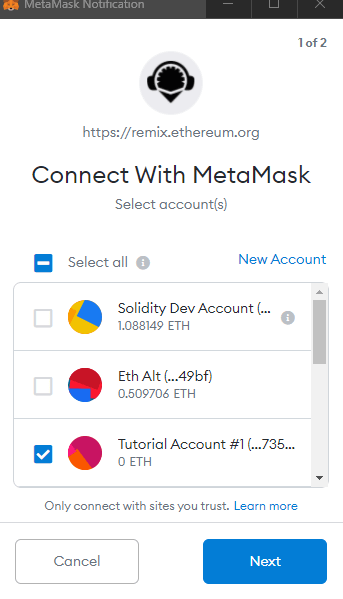
Click "Next", and then "Connect" on the next screen, where MetaMask asks if you would like to allow this site to "View the addresses of your permitted accounts". Once you do that, you will see that your Ethereum account is now connected to the Remix dapp:

You're going to need some test ETH to deploy the contract, so run over to the Ropsten testnet faucet, enter the account address that you've connected with, and request some test ETH. This should take a few seconds, but may take a little longer depending on how busy the faucet is.
So now we have a smart-contract written & compiled, and our Ethereum account connected to Remix. Let's now deploy our contract to Ropsten. While on the "Deploy & Run Transactions" tab, click the orange "Deploy" button - this is going to prompt your MetaMask to open, and this time you will need to spend some test ETH:
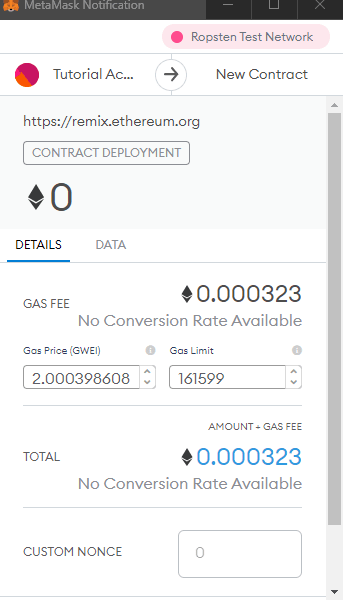
Scroll down and click "Confirm" to pay the gas required to deploy our SimpleContract. In the Remix console you'll see that the contract creation is pending:

This may take up to a minute, but soon you'll see a confirmation that the contract has been deployed!

Now, down the bottom of the Deploy & Run Transactions tab we can see some details about our deployed contract:
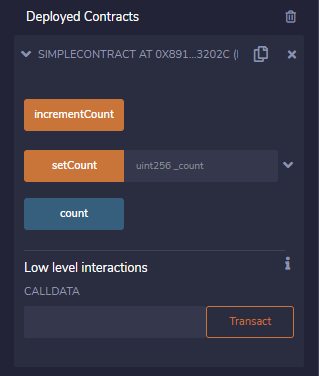
Here you can use the provided inputs to play with the contract, and test if it's working (in a professional workflow we would test our contracts during the creation process, but for this tutorial we won't need to go through that process).
Click "Count" - you'll see that it triggers our automatically created "getter" function, and will show us the current state of the count variable. In the Remix console you'll also see that a CALL was made to our deployed contract, triggering the function and returning the variable value!
NOTE: When you deploy a contract, it will have an Ethereum address that cannot be changed*. We will need to store this address as we will use it in our frontend dapp. Contracts deployed to the Ethereum network are immutable - once they are deployed they cannot be changed. If you need to change something within a contract, you'll need to deploy a new version, which will also use a brand new contract address.
*There are "Upgrades Plugins" provided by OpenZeppelin, but I don't currently know enough about them to understand how they work, so for all intents & purposes we will regard our contracts as completely immutable.
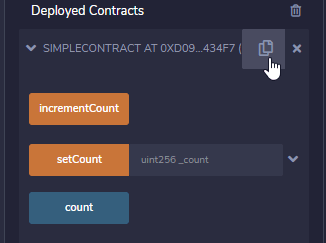
You can copy the deployed contract's address from the Remix interface:
You can also view additional information about the address on the network it has been deployed on using Etherscan: https://ropsten.etherscan.io/address/[YOUR_CONTRACT_ADDRESS]
Before you continue testing the contract, it's also useful to know: reading from a contract is free, writing to a contract costs ETH. While on a test network this isn't an issue, you just have to make sure you have test ETH from the faucet - but writing to contracts on the mainnet is going to cost you real money.
If you click "incrementCount" you'll be prompted by MetaMask to confirm the fee - you're changing the state of the contract (and therefore the state of the entire Ethereum network), and this will cost you a gas fee. The transaction will then be pending, and eventually processed:

If you now click "count" again, you'll see that the count variable has indeed been incremented :)
Let's try the setCount function - add the number 99 in the field then click "setCount" - once again, MetaMask will open since we are writing to the smart contract state and therefore need to pay for the computation. After the transaction has been processed by the network, reading the count variable will now return 99 - everything is working as expected.
Remember that we set a require statement in our setCount function? Trying sending the number 0 as input to setCount and see what happens..
We've now completed Part 1 of this tutorial - writing & deploying a smart contract to to Ethereum network, and interacting with the contract. In Part 2 we're going to create a simple dapp with a custom UI that allows us to interact with our contract.
To get into the good stuff, we'll start by creating a new branch from the UI we built in the previous tutorial. If you haven't already, clone that repo:
git clone https://github.com/jacobedawson/connect-metamask-react-dappThen cd into connect-metamask-react-dapp
Run the following command to create a new branch:
git checkout -b send-transactionsThen run:
yarn installSo we are now in our React dapp repo called connect-metamask-react-dapp, on a branch called send-transactions. Run the following command to start up the project:
yarn startMake sure that you're on Ropsten Test Network, and that you have ETH in your account. Connect to the dapp and you should be seeing something like this (with your account & balance):

Our goals now are the following:
- Connect the
SimpleContractcontract to our React UI - Read the count
variableand display it in our interface - Add some inputs to our interface
- Send transactions to update the
countvariable
We're using the useDapp framework in our app to provide a clean abstraction for interacting with the Ethereum network, and they provide the useContractCall and useContractCalls hooks to make custom calls to a smart contract.
In order to interact with a smart contract from our Dapp, we need two things: the contract address and an ABI (application binary interface).
Let's create a new folder in our src directory called contracts, and then create an index.ts file in that folder (remember, we are using TypeScript, not pure JavaScript).
Go to Remix and copy the address of the smart contract that you have deployed to the Ropsten network, and export it from the index.ts file:
export const simpleContractAddress = "0x5711aCCC813db3E27091acD1cae9Cc483721717C";Now we want to get the ABI of our contract from Remix. First, create a new folder in src called abi, and inside that create a new .json file called SimpleContract.json. In Remix, go to the "Compile" tab, and down below "Compilation Details" you will see a copy icon next to "ABI". Click it to copy the ABI, then paste it into abi/SimpleContract.json. It should look like this:
[
    {
        "inputs": [],
        "name": "incrementCount",
        "outputs": [],
        "stateMutability": "nonpayable",
        "type": "function"
    },
    {
        "inputs": [
            {
                "internalType": "uint256",
                "name": "_count",
                "type": "uint256"
            }
        ],
        "name": "setCount",
        "outputs": [],
        "stateMutability": "nonpayable",
        "type": "function"
    },
    {
        "inputs": [],
        "name": "count",
        "outputs": [
            {
                "internalType": "uint256",
                "name": "",
                "type": "uint256"
            }
        ],
        "stateMutability": "view",
        "type": "function"
    }
]
We can now import our contract address and ABI into any other file in our React project. Now we're going to create the component to display our "count" variable. In our components directory, create a file called Count.tsx - this is also where we'll add our inputs. Let's add a basic layout:
import { Flex, Text, Button } from "@chakra-ui/react";

export default function Count() {
  return (
    <Flex direction="column" align="center" mt="4">
      <Text color="white" fontSize="8xl"></Text>
      <Button colorScheme="teal" size="lg">
        Increment
      </Button>
    </Flex>
  );
}
And import Count into App:
import Count from "./components/Count";

// ...other code
<Layout>
  <ConnectButton handleOpenModal={onOpen} />
  <AccountModal isOpen={isOpen} onClose={onClose} />
  <Count />
</Layout
We should now see the following:

Our "Increment" button doesn't do anything yet, and we also aren't pulling in any data from our smart contract. In order to do this we're going to create a hook. Create a folder called hooks inside the src directory, and then create the file index.ts inside the hooks folder. Inside hooks/index.ts we'll import our contract address & ABI, as well as a useContractCall hook from useDapp and a utils object from Ethers:
// hooks/index.ts
import { ethers } from "ethers";
import { useContractCall } from "@usedapp/core";
import simpleContractAbi from "../abi/SimpleContract.json";
import { simpleContractAddress } from "../contracts"

const simpleContractInterface = new ethers.utils.Interface(simpleContractAbi);

export function useCount() {
  const [count]: any = useContractCall({
    abi: simpleContractInterface,
    address: simpleContractAddress,
    method: "count",
    args: [],
  }) ?? [];
  return count;
}
If you're not familiar with the double question mark syntax (known formally by its very catchy name "Nullish coalescing operator"), if the left-hand side operand is null or undefined, it will return the right-hand operand, so if our useContractCall is undefined, the count variable we destructure will be undefined (since the right-hand operand is an empty array).
We're using the Interface constructor from Ethers to create a new Interface instance, which we'll need to pass to the useDapp hook useContractCall. Let's import the hook into our Count.tsx file:
// Count.tsx
import { Flex, Text, Button } from "@chakra-ui/react";
import { useCount } from "../hooks";

export default function Count() {
  const count = useCount();
  return (
    <Flex direction="column" align="center" mt="4">
      <Text color="white" fontSize="8xl">
        {count ? count.toNumber() : 0}
      </Text>
      <Button colorScheme="teal" size="lg">
        Increment
      </Button>
    </Flex>
  );
}
If the count variable is undefined, we'll show 0, otherwise we'll display the count variable. Notice that we're converting the value returned by useCount into a regular JavaScript number using the .toNumber method - our smart contract function is actually returning a BigNumber object, so we need to transform it so that React can display it.

Depending on current state of your contract, the number that you'll now see on the screen will differ. To check that we're reading up-to-date information directly from our contract, go to Remix and use the "setCount" function to set the count to something distinctive. Send the transaction and in a few seconds you will see the React UI display the updated count:

We're making good progress now! We're importing our contract, reading a value from it and displaying it in our UI. The next step is to be able to send transactions from our UI and update the state of the smart contract.
First we'll add a new hook into our hooks/index.ts file. We're also going to import useContractFunction from useDapp, and the Contract constructor from ethers. The imports in hooks/index.ts should look like this:
import { ethers } from "ethers";
import { Contract } from "@ethersproject/contracts";
import { useContractCall, useContractFunction } from "@usedapp/core";
import simpleContractAbi from "../abi/SimpleContract.json";
import { simpleContractAddress } from "../contracts";
We're going to use the Contract constructor to create an instance of our contract, and to do that we need to pass in both our contract address and our newly created interface:
// hooks/index.ts
const contract = new Contract(simpleContractAddress, simpleContractInterface);
Now let's create our hook (we'll call it "useIncrement"), which makes use of useDapp's useContractFunction hook:
export function useIncrement() {
  const { state, send } = useContractFunction(contract, "incrementCount", {});
  return { state, send };
}
The useContractFunction hook takes in our contract instance, the name of the method that we'd like to call, and an options object. It returns an object with two variables - state and send, which we are destructuring from the function call. Lastly, we export our useIncrement hook so that we can use it anywhere in our dapp.
That's all we need for now, so let's move over to Count.tsx, import the new useIncrement hook, and create a "handleIncrement" function, which we'll add to our Button component's onClick handler:
// Count.tsx
import { Flex, Text, Button } from "@chakra-ui/react";
import { useCount, useIncrement } from "../hooks";

export default function Count() {
  const count = useCount();
  const { state, send: incrementCount } = useIncrement();

  function handleIncrement() {
    incrementCount();
  }

  return (
    <Flex direction="column" align="center" mt="4">
      <Text color="white" fontSize="8xl">
        {count ? count.toNumber() : 0}
      </Text>
      <Button
        colorScheme="teal"
        size="lg"
        onClick={handleIncrement}>
        Increment
      </Button>
    </Flex>
  );
}
Now we're ready to test out our "Increment" button. Make sure that the dapp is running, and the click "Increment". Your MetaMask extension should open up with a prompt, where you can set a gas price for the transaction and then confirm you want to send the transaction:

Once you confirm the transaction it will be signed using our private key and sent to the Ethereum network, where it will be processed (mined) quickly by a node, added to a block, broadcast to the network and added to the updated network state - after all of that, we should see our interface increment the count variable by 1. It may seem like a lot of work just to see a number increase by 1, but actually we've now covered most of the basics of web3 development - connecting to an account, reading values and sending transactions!
We're almost done - let's take this opportunity to go one step further and send a value input by the user to our smart contract...
For the last part of today's tutorial, we're going to accept user input in our UI and send it to our setCount smart contract function.
We'll start by adding another hook to hooks/index.ts called "useSetCount":
// hooks/index.ts
export function useSetCount() {
  const { state, send } = useContractFunction(contract, "setCount", {});
  return { state, send };
}
This is essentially the same as our existing useIncrement hook - the only difference is the method name. That gives us an opportunity to create a more generic hook that takes a method name and returns { state, send } - let's create a single hook "useContractMethod" that will replace both useIncrement and useSetCount:
// hooks/index.ts
export function useContractMethod(methodName: string) {
  const { state, send } = useContractFunction(contract, methodName, {});
  return { state, send };
}
Now we can delete useIncrement and useSetCount and import useContractMethod into our Count.tsx component:
// Count.tsx
import { useCount, useContractMethod } from "../hooks";

// pass method names to useContractMethod
const { state, send: incrementCount } = useContractMethod("incrementCount");
const { state: setCountState, send: setCount } = useContractMethod("setCount");
Notice how we are also changing the variable names for some of the destructured values from useContractMethod. Now that we've imported the methods, we'll import useState to hold the input state, add an input component and another button in order to collect user input, and send it to the setCount method. Here's the final, complete code for Count.tsx:
// Count.tsx
import { useState } from "react";
import {
Box,
Flex,
Text,
Button,
NumberInput,
NumberInputField,
} from "@chakra-ui/react";
import { useCount, useContractMethod } from "../hooks";
export default function Count() {
const count = useCount();
const { state, send: incrementCount } = useContractMethod("incrementCount");
const { state: setCountState, send: setCount } =
useContractMethod("setCount");
const [input, setInput] = useState("");
function handleIncrement() {
incrementCount();
}
function handleSetCount() {
const _count = parseInt(input);
if (_count) {
setCount(_count);
}
}
function handleInput(valueAsString: string, valueAsNumber: number) {
setInput(valueAsString);
}
return (
<Flex direction="column" align="center" mt="4">
<Text color="white" fontSize="8xl">
{count ? count.toNumber() : 0}
</Text>
<Button colorScheme="teal" size="lg" onClick={handleIncrement}>
Increment
</Button>
<Box mt={4}>
<NumberInput
mb={2}
min={1}
value={input}
onChange={handleInput}
color="white"
clampValueOnBlur={false}
>
<NumberInputField />
</NumberInput>
<Button isFullWidth colorScheme="purple" onClick={handleSetCount}>
Set Count
</Button>
</Box>
</Flex>
);
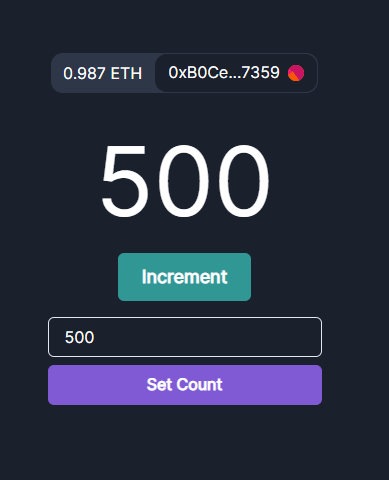
}At this point we should have our entire UI for this tutorial ready to go:

Our "NumberInput" will only accept numbers, and we've coded logic into our component to only fire the setCount method if our count value is 1 or more. Let's test it out by setting the count to 500 and clicking "Set Count":
All good! That's it - well done if you've made it this far - we've managed to achieve all of our goals for this tutorial:
- How to write a basic smart contract in Solidity
- How to deploy that contract to a test network
- How to import that contract into a frontend
- How to read from & write to that contract
Hopefully this tutorial has shown you how easy it is to get started with dapp development. If you spot any bugs or have any questions, leave a comment below and I'll get back to you asap!
In the next tutorial, we'll learn how to import a pre-existing 3rd party contract and build an alternate interface for it..
Thanks for playing ;)
Follow me on Twitter: https://twitter.com/jacobedawson
44