56
Part 1: Setup Snowpack
Hi! I'm Marcus.
This is my first article in my Front End series.
Each article will be written to read in 5 mins per purpose itself. I'll make a video for more understanding if possible.
Table of contents:
- Part 1: Setup Snowpack
- Part 2: Installing TypeScript and Setting Up Development
Today I'll guide you on how to create a snowpack
template project.
![](https://res.cloudinary.com/practicaldev/image/fetch/s--p2SR3Xk9--/c_limit%2Cf_auto%2Cfl_progressive%2Cq_auto%2Cw_880/https://dev-to-uploads.s3.amazonaws.com/uploads/articles/0n989rfks1yty9f4zwan.png)
Or create in terminal
mkdir frontend
This command will create an empty folder, which contains our source code.
cd frontend
![](https://res.cloudinary.com/practicaldev/image/fetch/s--9POOCZC_--/c_limit%2Cf_auto%2Cfl_progressive%2Cq_auto%2Cw_880/https://dev-to-uploads.s3.amazonaws.com/uploads/articles/fd1ukwnu2sc1kfku1q87.png)
npm init -y
This command will create a package.json
file which contains dependencies
, command
, ..etc.
![](https://res.cloudinary.com/practicaldev/image/fetch/s--DJ-gPCDz--/c_limit%2Cf_auto%2Cfl_progressive%2Cq_auto%2Cw_880/https://dev-to-uploads.s3.amazonaws.com/uploads/articles/9hh1x28cp77hfzhtmdte.png)
npm i snowpack -D
With flag -D
it means we only need this dependency in the development environment.
After installed done we need to adjust scripts
in package.json
.
![](https://res.cloudinary.com/practicaldev/image/fetch/s--LrfMh2PN--/c_limit%2Cf_auto%2Cfl_progressive%2Cq_auto%2Cw_880/https://dev-to-uploads.s3.amazonaws.com/uploads/articles/rknvfcgqstuw72cz2xfr.png)
"scripts": {
"snowpack": "snowpack",
"start": "snowpack dev"
}
![](https://res.cloudinary.com/practicaldev/image/fetch/s--svWWEL4W--/c_limit%2Cf_auto%2Cfl_progressive%2Cq_auto%2Cw_880/https://dev-to-uploads.s3.amazonaws.com/uploads/articles/th87zafl0woygt504ln4.png)
npm run snowpack init
touch index.html
For now, our source code should be looked like this
![](https://res.cloudinary.com/practicaldev/image/fetch/s--nPQs4aNf--/c_limit%2Cf_auto%2Cfl_progressive%2Cq_auto%2Cw_880/https://dev-to-uploads.s3.amazonaws.com/uploads/articles/kvl3rwxih0npih31d0lx.png)
npm run start
![](https://res.cloudinary.com/practicaldev/image/fetch/s--mqs6Jkga--/c_limit%2Cf_auto%2Cfl_progressive%2Cq_auto%2Cw_880/https://dev-to-uploads.s3.amazonaws.com/uploads/articles/ba1t8rz9jetltno2g9a7.png)
Then open your browser to show the result
![](https://res.cloudinary.com/practicaldev/image/fetch/s--JKMRXioc--/c_limit%2Cf_auto%2Cfl_progressive%2Cq_auto%2Cw_880/https://dev-to-uploads.s3.amazonaws.com/uploads/articles/ifremz9ycwav4kxqbio9.png)
Tada! Ok you can stop dev server
by Ctrl + C
or terminate that process on terminal
npm i react react-dom
Then we need adjust source code structure a little bit
mkdir src
mkdir public
Move index.html
to public
directory
mv index.html public/
![](https://res.cloudinary.com/practicaldev/image/fetch/s--H_Mc6xkX--/c_limit%2Cf_auto%2Cfl_progressive%2Cq_auto%2Cw_880/https://dev-to-uploads.s3.amazonaws.com/uploads/articles/a7qhlc1wlz2j94q4ee7g.png)
Create index.jsx
file inside src
![](https://res.cloudinary.com/practicaldev/image/fetch/s--2yoS_BzC--/c_limit%2Cf_auto%2Cfl_progressive%2Cq_auto%2Cw_880/https://dev-to-uploads.s3.amazonaws.com/uploads/articles/2th47rvknkrefepjt2ph.png)
Edit index.html
![](https://res.cloudinary.com/practicaldev/image/fetch/s--z0qEzHjf--/c_limit%2Cf_auto%2Cfl_progressive%2Cq_auto%2Cw_880/https://dev-to-uploads.s3.amazonaws.com/uploads/articles/vdepay0ckgiia53dw7nn.png)
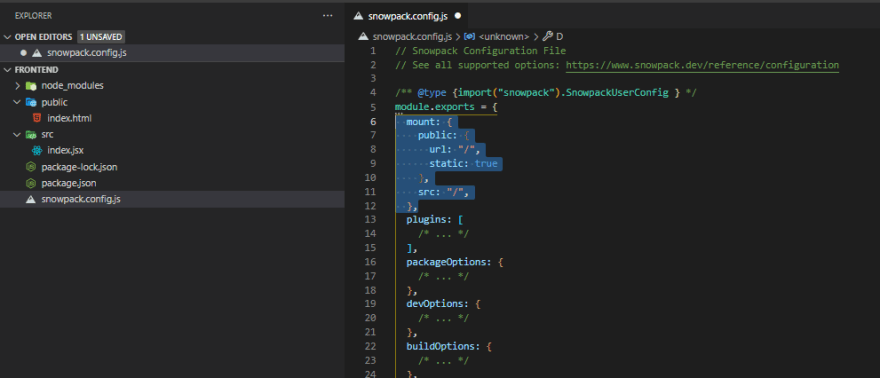
and snowpack.config.js
![](https://res.cloudinary.com/practicaldev/image/fetch/s--ydNAXjBR--/c_limit%2Cf_auto%2Cfl_progressive%2Cq_auto%2Cw_880/https://dev-to-uploads.s3.amazonaws.com/uploads/articles/7pbcan0mi13459sx859r.png)
mount: {
public: {
url: "/",
static: true
},
src: "/"
}
OK! Let's serve the app again.
npm run start
![](https://res.cloudinary.com/practicaldev/image/fetch/s--w4GNdcG_--/c_limit%2Cf_auto%2Cfl_progressive%2Cq_auto%2Cw_880/https://dev-to-uploads.s3.amazonaws.com/uploads/articles/9dvc3e39ppzu93k5i9qk.png)
Thanks for your reading, see you in next article
Part 2: Installing TypeScript and Setting Up Development
56