38
Todo API with Express Js and MongoDB
In this article, I’ll be walking through APIs and then showing you how to build an API which in this case a Todo API with basic CRUD (Create, Read, Update, Delete) features using the Express js framework and the MongoDB NoSQL database.

To take fully understand this article, you should have some knowledge of the following:
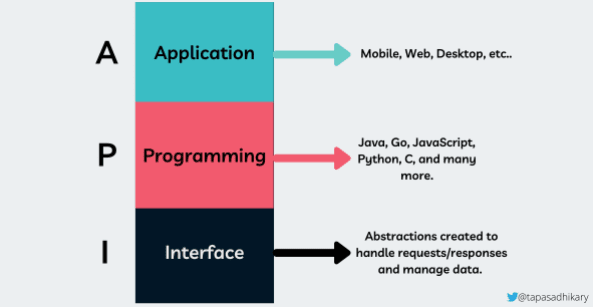
API is an acronym for Application Programming Interface. The expansion of the term API may sound a bit complex initially. You may wonder what precisely the Application Programming Interface means? In layman terms, API is a service that allows two or more applications to talk to each other even when they don't speak the same language. An API is an abstraction that allows a way to exchange data between applications written in any language.

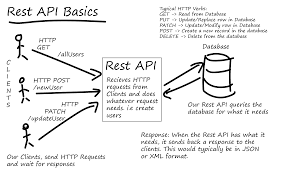
As API abstracts the data underneath(stored in a database, file-system), we can design it to send only the information required by the client. The image below shows an example of the web API where multiple web clients use API services to interact with the data stored in different storage types. The best part is, the client doesn't have to know where the data resides as long as it maintains the rules to use the APIs.
We are going to discuss the types of APIs briefly before we go on with our Todo API.
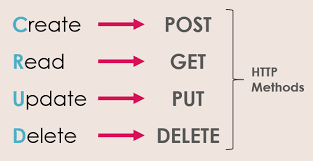
REST stands for Representational State Transfer. It is an architecture built for web applications to access and transfer data over HTTP/HTTPS protocols. With REST APIs, we can make requests using the GET, PUT/PATCH, POST, and DELETE methods. These are already available methods for HTTP and HTTPS.
These methods are used to create, read, update, and delete a resource.
A resource in the REST API architecture refers to the object that we create, read, update, or delete. It can be anything like student information, book, movies, user, todo etc.

GraphQL is a query language and server-side runtime for application programming interfaces (APIs) that prioritizes giving clients exactly the data they request and no more.
GraphQL is designed to make APIs fast, flexible, and developer-friendly. It can even be deployed within an integrated development environment (IDE) known as GraphiQL. As an alternative to REST, GraphQL lets developers construct requests that pull data from multiple data sources in a single API call.
API developers use GraphQL to create a schema to describe all the possible data that clients can query through that service. A GraphQL schema is made up of object types, which define the kind of object you can request and what fields it has.
As queries or mutations come in, GraphQL validates them against the schema. GraphQL then executes the validated queries or mutations. If we were to think about them in terms of the create, read, update and delete (CRUD) model, a query would be equivalent to read. All the others (create, update, and delete) are handled by mutations.
Real-time APIs have gained lots of popularity in the last decade. This is because applications want to make the clients updated when new data becomes available in the back-end services behind the API.
Here are some popular communication protocols and methodologies that help in developing real-time APIs.
We are going to create our Todo app with basic CRUD features, but first, we need to initialise our app and install the dependencies for the App
npm initThis will prompt some questions asked, you can answer them appropriately, and when this is done, a package.json file is created for you.
Next, we need to install the required dependencies. Type the following in your terminal:
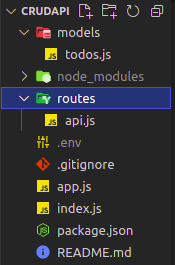
npm install express dotenv mongooseNow, we need to structure our App. Below is the structure of our App will look like.

const express = require('express'),
    config = require('./app'),
    path = require("path");
    app = express(),
    dotenv = require('dotenv').config();

app = config(app);
app.set("port", process.env.PORT || 5000);

// Connect mongo
const mongoose = require('mongoose');
mongoose.connect(process.env.MONGODB_URI, {
  useUnifiedTopology: true,
  useNewUrlParser: true,
});
mongoose.connection.on("open", function () {
  console.log("Mongoose Connected Successfully!");
});
mongoose.connection.on("error", function(err) {
    console.log("Could not connect to mongo server!");
    return console.log(err.message);
  });

//  Server
const server = app.listen(app.get("port"), function () {
  console.log("Server up: http://localhost:" + app.get("port"));
});const createError = require('http-errors');
const express = require('express');
const path = require('path');
const cookieParser = require('cookie-parser');
const logger = require('morgan');
const app = express();
// view engine setup
module.exports = function(app) {
app.use(logger('dev'));
app.use(express.json());
app.use(express.urlencoded({ extended: true }));
const api = require('./routes/api');
app.use('/api/v1', api);
// catch 404 and forward to error handler
app.use(function(req, res, next) {
next(createError(404));
});
// error handler
app.use(function(err, req, res, next) {
// set locals, only providing error in development
res.locals.message = err.message;
res.locals.error = req.app.get('env') === 'development' ? err : {};
// render the error page
res.status(err.status || 500);
res.render('error');
});
return app;
};MONGODB_URI=Mongodb URI connection stringWe are going to create our Todo model for our MongoDB database.
In our models folder which was shown above, we have a todos.js file which is where we’ll define our Todo model. Paste the code below to help with that.
In our models folder which was shown above, we have a todos.js file which is where we’ll define our Todo model. Paste the code below to help with that.
const mongoose = require('mongoose');
const Schema = mongoose.Schema;

//create schema for todo
const TodoSchema = new Schema({
  todo: {
    type: String,
    required: [true, 'The todo text field is required']
  }
})

//create model for todo
const Todos = mongoose.model('todo', TodoSchema);
module.exports = Todos;In this API, we are going to define four routes which are:
To create the Routes, in our routes folder like above, we create an api.js file where we’ll define all our routes and type the following:
const express = require('express');
const router = express.Router();
const Todo = require('../models/todos')

// Get all Todos
router.get('/todos', async (req, res) => {
  //this will return all the data, exposing only the id and todo field to the client
  try {
    const todos = await Todo.find({}, 'todo')
    if (!todos) {
      return res.status(400).json({
        success: false,
        message: 'Todos not retrieved',
        todos: []
      })
    }
    return res.status(200).json({
      success: true,
      message: 'Todos retrieved successfully',
      todos: todos
    })
  } catch (error) {
    return res.status(400).json({
      success: false,
      message: error.message
    })
  }
});

// Create a Todo
router.post('/todos', async (req, res) => {
  try {
    const { todo } = req.body
    const todos = await Todo.create({todo})
    if (!todos) {
      return res.status(400).json({
      success: false,
      message: 'Problem creating Todo',
      todo: null
      })
    }
    return res.status(200).json({
      success: true,
      message: 'Successfully created Todo',
      todo: todos
    })
  } catch (error) {
    return res.status(400).json({
      success: false,
      message: error.message
    })
  }
})

// Update a Todo
router.patch('/todos/:id', async (req, res) => {
  try {
    const { todo } = req.body
    const update = await Todo.findOneAndUpdate({_id: req.params.id}, {todo})
    if (!update) {
      return res.status(400).json({
        success: false,
        message: 'Not successfully updated'
      })
    }
    return res.status(200).json({
      success: true,
      message: 'Todo successfully updated'
    })
  } catch (error) {
    return res.status(400).json({
      success: false,
      message: error.message
    })
  }
})

// Delete a Todo
router.delete('/todos/:id', async (req, res) => {
  try {
    const deleteTodo = await Todo.findOneAndDelete({_id: req.params.id})
    if (!deleteTodo) {
      return res.status(400).json({
        success: false,
        message: 'Todo not deleted'
      })
    }
    return res.status(200).json({
      success: true,
      message: 'Todo successfully deleted'
    })
  } catch (error){
    return res.status(400).json({
      success: false,
      message: error.message
    })
  }
})

module.exports = router;Now, we test our API endpoints using postman below:


In this article, we took a good look into APIs, learnt a few and eventually built a Todo API with Express Js and MongoDB which has CRUD (Create, Read, Update, Delete) features. We connected to our MongoDB database using the mongoose ODM to be able to add, find, update and delete from our MongoDB database.
We finally tested our endpoints and made sure they worked the way we wanted them to.
38
