
37
How to create excel file in C#
In this Tutorial, I will teach you about Creating Excel File using C# programming Language. This tutorial consists of step by step guide, specially designed for beginners and Intermediate developers. Expert can skip the project creation part, and directly jumps to Code Part. I will use IronXL Library for creating Excel files.
I will cover following topics:
- What is Excel File.?
- What is IronXL.?
- Step By Step Guide to Create Excel File.
- Step - 1 : Create Visual Studio Project
- Step -2: Install NuGet Package
- Step -3: Create Excel Workbook
- Step -4: Set a Default Worksheet
- Step -5: Set Cell Values
- Set Cell Values Manually
- Set Cell Values Dynamically
- Set Cell Values from the Database
- Summary
Excel is a spreadsheet application developed and published by Microsoft. It is part of the Microsoft Office suite of productivity software.
Excel is a tool for organizing and performing calculations on data. It can analyze data, calculate statistics, generate pivot tables, and represent data as charts or graphs.
For example, you could create an Excel spreadsheet that calculates a monthly budget, tracks associated expenses, and interactively sorts the data by criteria.
Unlike a word processor, such as Microsoft Word, Excel organizes data in columns and rows. Rows and columns intersect at a space called a cell. Each cell contains data, such as text, a numerical value, or a formula.
What is IronXL.?
IronXL is an intuitive C# & VB Excel API that allows you to read, edit & create Excel spreadsheet files in .NET with lightning fast performance. There is no need to install MS Office or even the Excel InterOp. This library can also be used for manipulating excel documents.
IronXL fully supports .NET Core, .NET Framework, Xamarin, Mobile, Linux, MacOS and Azure.
In very first step, we have to create new Visual Studio Project. I will use Console Application template for the demonstration. You can use any according to your requirement and choice.
You may also use your existing project in which you want to add the feature of creating excel file.
Open Microsoft Visual Studio 2019 or any version. Latest version is recommended. Click on Create New Project. Select C# Console Application for the application template. Click on Next Button.
Give the name of your Project. I have named it as "Excel Tutorial". You may name it according to your choice. Click on Next Button, Set the Target Framework. I have set my target framework to ".Net 5.0" latest stable version. Click on Create Button, New Project will be created for you.
Step # 2: Install NuGet Package in Visual Studio:
Now, our next step is to Install IronXL NuGet Package for our project. Click on Tools from the Menu bar Option. New Drop down Menu will appear. Click on "NuGet Package Manager" and then "Manage Nuget Packages for Solution" as shown below.

Click on Browse and Search IronXL in search bar.

Click on IronXL.Excel and press on Installed Button. This will install IronXL in your project. Now you are free to use any of the function in your project.
IronXL Library has been installed, so Let's move towards next step.
First of all add the namespace of IronXL in your project.
using IronXL;It cannot be simpler to create a new Excel Workbook using IronXL! It is one line of code! Yes, really:
WorkBook workbook = WorkBook.Create(ExcelFileFormat.XLSX);Both XLS (older Excel file version) and XLSX (current and newer file version) file formats can be created with IronXL.
Let's create Excel spreadsheet. I have just created onw. you can create as many excel spreadsheets as you need.
var sheet = workbook.CreateWorkSheet("Result Sheet");"Sheet" in the above code snippet represents the worksheet and you can use it to set cell values and almost everything Excel can do.
In case you are confused about the difference between a Workbook and a Worksheet, let me explain:
A Workbook contains Worksheets. This means that you can add as many Worksheets as you like into one Workbook. In a later article, I will explain how to do this. A Worksheet contains Rows and Columns. The intersection of a Row and a Column is called a Cell, and this is what you will manipulate whilst working with Excel.
To save the xlsx format Workbook, use the following code:
workbook.SaveAs("Budget.xlsx");Run the Program to see the output.
This program will create a new workbook . you can find it in your bin folder of the project. You can also specify the path in Save As Function. Open your excel document with Microsoft Excel. Below is the Excel sheet worksheet which we have just created.

Now, our workbook is created and saved. Let's add some data in the cell.
To set cell values manually, you simply indicate what cell you are working with, and set its value, as in the following example:
WorkBook workbook = WorkBook.Create(ExcelFileFormat.XLSX);
            var sheet = workbook.CreateWorkSheet("Result Sheet");
// Set Cell Values Manually
            sheet["A1"].Value = "Object Oriented Programming";
            sheet["B1"].Value = "Data Structure";
            sheet["C1"].Value = "Database Management System";
            sheet["D1"].Value = "Agile Development";
            sheet["E1"].Value = "Sofware Design and Architecture";
            sheet["F1"].Value = "Software Requirement Engineering";
            sheet["G1"].Value = "Computer Programming";
            sheet["H1"].Value = "Software Project Management";
            sheet["I1"].Value = "Software Construction";
            sheet["J1"].Value = "Software Quality Engineering";
            sheet["K1"].Value = "Software ReEngineering";
            sheet["L1"].Value = "Advance Database Management System";
// Save Workbook
            workbook.SaveAs("Result Sheet.xlsx");
Here, I have populated Columns A to L, and the first row of each to a name of a Different Courses related to Software Engineering.
Run the Program to see the output:

Setting values dynamically is almost similar to the previous code segment. The nice thing about this is that you do not have to hard-code the cell location. In the next code example, you will create a new Random object to create random numbers, and then make use of a for loop to iterate through the range of cells you’d like to populate with values.
WorkBook workbook = WorkBook.Create(ExcelFileFormat.XLSX);
            var sheet = workbook.CreateWorkSheet("Result Sheet");
            /**
            Set Cell Value Dynamically
            **/
            Random r = new Random();
            for (int i = 2; i <= 11; i++)
            {
                sheet["A" + i].Value = r.Next(1, 100);
                sheet["B" + i].Value = r.Next(1, 100);
                sheet["C" + i].Value = r.Next(1, 100);
                sheet["D" + i].Value = r.Next(1, 100);
                sheet["E" + i].Value = r.Next(1, 100);
                sheet["F" + i].Value = r.Next(1, 100);
                sheet["G" + i].Value = r.Next(1, 100);
                sheet["H" + i].Value = r.Next(1, 100);
                sheet["I" + i].Value = r.Next(1, 100);
                sheet["J" + i].Value = r.Next(1, 100);
                sheet["K" + i].Value = r.Next(1, 100);
                sheet["L" + i].Value = r.Next(1, 100);
            }
            // Save Workbook
            workbook.SaveAs("Result Sheet.xlsx");
        }
Every cell from A2 to L11 contains a unique value that was randomly generated.
Let's run the program. It will create an excel file for us. Open this with Microsoft Excel to see the output.

I have created database named "Result" having one table "Marks" as shown below.
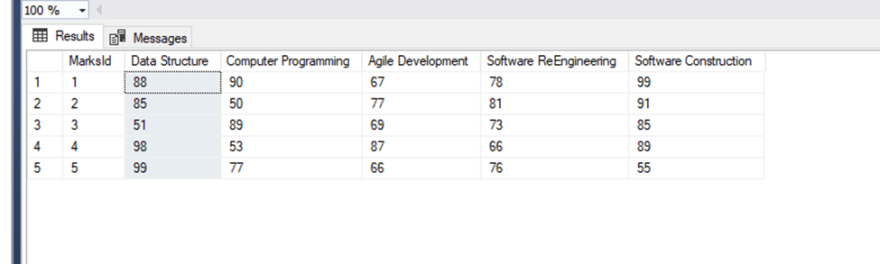
I will get the data from that tables and assign those values to the cells of my spreadsheet. Here is the snapshot of my Marks Table.
WorkBook workbook = WorkBook.Create(ExcelFileFormat.XLSX);
            var sheet = workbook.CreateWorkSheet("Result Sheet");
            //Create database objects to populate data from database
            string contring;
            string sql;
            DataSet ds = new DataSet("ResultSet");
            SqlConnection con;
            SqlDataAdapter da;
            //Set Database Connection string
            contring = @"data source = DESKTOP-FEP5MVS\SQLEXPRESS; Initial Catalog = Result; Integrated Security = True; ";
            //SQL Query to obtain data
            sql = "SELECT [Data Structure],[Computer Programming] , [Agile Development] , [Software ReEngineering] , [Software Construction]  FROM Marks";
            //Open Connection & Fill DataSet
            con = new SqlConnection(contring);
            da = new SqlDataAdapter(sql, con);
            con.Open();
            da.Fill(ds);
            //Loop through Column
            foreach (DataTable table in ds.Tables)
            {
                for (int j = 0; j < table.Columns.Count; j++)
                {
                    sheet["A1"].Value = table.Columns[j].ToString();
                    sheet["B1"].Value = table.Columns[j].ToString();
                    sheet["C1"].Value = table.Columns[j].ToString();
                    sheet["D1"].Value = table.Columns[j].ToString();
                    sheet["E1"].Value = table.Columns[j].ToString();
                }
            }

            //Loop through contents of dataset
            foreach (DataTable table in ds.Tables)
            {
                for (int j = 0; j < table.Rows.Count; j++)
                {
                    sheet["A" + (j + 2)].Value = table.Rows[j]["Data Structure"].ToString();
                    sheet["B" + (j + 2)].Value = table.Rows[j]["Computer Programming"].ToString();
                    sheet["C" + (j + 2)].Value = table.Rows[j]["Agile Development"].ToString();
                    sheet["D" + (j + 2)].Value = table.Rows[j]["Software ReEngineering"].ToString();
                    sheet["E" + (j + 2)].Value = table.Rows[j]["Software Construction"].ToString();
                }
            }
            // Save Workbook
            workbook.SaveAs("Result Sheet.xlsx");
        }
In the above code, I have first set the connection string of my database , after that I have read data from the table. Than I have assigned the column name to the excel spreadsheet in first for loop and values of the table in second for loop.
You simply have to set the Value property of the particular cell to the Field name to be entered into the cell.
Let's run the program. It will create an excel file for us. Open this with Microsoft Excel to see the output.

The IronXL allow us to generate new excel file in C#, create a new worksheet inside it, set its font size, use formulas and many more. I can't highlight and describe all the functionalities and details here. For more information and details please click here.
Iron software provides other libraries such as IronPdf for creating generating, Pdf documents, Iron Barcode, for generating, reading and manipulating barcode and so on. If you will purchase complete Iron suite than you will be able to get all 5 products for the price of just two. For more details, Please click here.
I hope this article was helpful and easy. Feel free to comment about your query and feedback.
You can download a file project from this link.
37