15
Securing the connectivity between a GKE application and a Cloud SQL database
In the previous part we created our Cloud SQL instance. In this part, we'll put them all together and deploy Wordpress to Kubernetes and connect it to the Cloud SQL database. Our objectives are to:
- Create the IAM Service Account to connect to the Cloud SQL instance. It will be associated to the Wordpress Kubernetes service account.
- Create 2 deployments: One for Wordpress and one for the Cloud SQL Proxy.
- Create the Cloud Armor security policy to restrict load balancer traffic to only authorized networks.
- Configure the OAuth consent screen and credentials to enable Identity Aware Proxy.
- Create SSL certificates and enable the HTTPs redirection.

With Workload Identity, you can configure a Kubernetes service account to act as a Google service account. Pods running as the Kubernetes service account will automatically authenticate as the Google service account when accessing Google Cloud APIs.
Let's create this Google service account. Create the file infra/plan/service-account.tf.
resource "google_service_account" "web" {
  account_id   = "cloud-sql-access"
  display_name = "Service account used to access cloud sql instance"
}

resource "google_project_iam_binding" "cloudsql_client" {
  role    = "roles/cloudsql.client"
  members = [
    "serviceAccount:cloud-sql-access@${data.google_project.project.project_id}.iam.gserviceaccount.com",
  ]
}

data "google_project" "project" {
}
And the associated Kubernetes service account in infra/k8s/data/service-account.yaml:
apiVersion: v1
kind: ServiceAccount
metadata:
  annotations:
    iam.gke.io/gcp-service-account: cloud-sql-access@<PROJECT_ID>.iam.gserviceaccount.com
  name: cloud-sql-access
Let's run our updated terraform:
cd infra/plan

terraform apply
And create the Kubernetes service account:
gcloud container clusters get-credentials private --region $REGION --project $PROJECT_ID

$ kubectl create namespace wordpress

sed -i "s/<PROJECT_ID>/$PROJECT_ID/g;" infra/k8s/data/service-account.yaml

$ kubectl create -f infra/k8s/data/service-account.yaml -n wordpress
The Kubernetes service account will be used by the Cloud SQL Proxy deployment to access the Cloud SQL instance.
Allow the Kubernetes service account to impersonate the created Google service account by an IAM policy binding between the two:
gcloud iam service-accounts add-iam-policy-binding \
  --role roles/iam.workloadIdentityUser \
  --member "serviceAccount:$PROJECT_ID.svc.id.goog[wordpress/cloud-sql-access]" \
cloud-sql-access@$PROJECT_ID.iam.gserviceaccount.comWe use the Cloud SQL Auth proxy to secure access to our Cloud SQL instance without the need for Authorized networks or for configuring SSL.
Let's begin by the deployment resource:
infra/k8s/data/deployment.yaml
apiVersion: apps/v1
kind: Deployment
metadata:
  labels:
    app: cloud-sql-proxy
  name: cloud-sql-proxy
spec:
  selector:
    matchLabels:
      app: cloud-sql-proxy
  strategy: {}
  replicas: 3
  template:
    metadata:
      labels:
        app: cloud-sql-proxy
    spec:
      serviceAccountName: cloud-sql-access
      containers:
        - name: cloud-sql-proxy
          image: gcr.io/cloudsql-docker/gce-proxy:1.23.0
          ports:
            - containerPort: 3306
              protocol: TCP
          envFrom:
            - configMapRef:
                name: cloud-sql-instance
          command:
            - "/cloud_sql_proxy"
            - "-ip_address_types=PRIVATE"
            - "-instances=$(CLOUD_SQL_PROJECT_ID):$(CLOUD_SQL_INSTANCE_REGION):$(CLOUD_SQL_INSTANCE_NAME)=tcp:0.0.0.0:3306"
          securityContext:
            runAsNonRoot: true
          resources:
            requests:
              memory: 2Gi
              cpu: 1
The deployment resource refers to the service account created earlier. Cloud SQL instance details are retrieved from a Kubernetes config map:
infra/k8s/data/config-map.yaml
apiVersion: v1
kind: ConfigMap
metadata:
  name: cloud-sql-instance
data:
  CLOUD_SQL_INSTANCE_NAME: <CLOUD_SQL_INSTANCE_NAME>
  CLOUD_SQL_INSTANCE_REGION: <CLOUD_SQL_REGION>
  CLOUD_SQL_PROJECT_ID: <CLOUD_SQL_PROJECT_ID>
We expose the deployment resource using a Kubernetes service:
infra/k8s/data/service.yaml
apiVersion: v1
kind: Service
metadata:
  labels:
    app: cloud-sql-proxy
  name: cloud-sql-proxy
spec:
  ports:
    - port: 3306
      protocol: TCP
      name: cloud-sql-proxy
      targetPort: 3306
  selector:
    app: cloud-sql-proxy
Let's create our resources and check if the connection is established:
cd infra/plan

sed -i "s/<CLOUD_SQL_PROJECT_ID>/$PROJECT_ID/g;s/<CLOUD_SQL_INSTANCE_NAME>/$(terraform output cloud-sql-instance-name | tr -d '"')/g;s/<CLOUD_SQL_REGION>/$REGION/g;" ../k8s/data/config-map.yaml

$ kubectl create -f ../k8s/data -n wordpress

$ kubectl get pods -l app=cloud-sql-proxy -n wordpress

NAME                              READY   STATUS    RESTARTS   AGE
cloud-sql-proxy-fb9968d49-hqlwb   1/1     Running   0          4s
cloud-sql-proxy-fb9968d49-wj498   1/1     Running   0          5s
cloud-sql-proxy-fb9968d49-z95zw   1/1     Running   0          4s

$ kubectl logs cloud-sql-proxy-fb9968d49-hqlwb -n wordpress

2021/06/23 14:43:21 current FDs rlimit set to 1048576, wanted limit is 8500. Nothing to do here.
2021/06/23 14:43:25 Listening on 0.0.0.0:3306 for <PROJECT_ID>:<REGION>:<CLOUD_SQL_INSTANCE_NAME>
2021/06/23 14:43:25 Ready for new connections
Ok! Let's move on to the Wordpress application
Let's begin by the deployment resource:
infra/k8s/web/deployment.yaml
apiVersion: apps/v1
kind: Deployment
metadata:
  name: wordpress
  labels:
    app: wordpress
spec:
  selector:
    matchLabels:
      app: wordpress
  strategy:
    type: Recreate
  template:
    metadata:
      labels:
        app: wordpress
    spec:
      containers:
        - image: wordpress
          name: wordpress
          env:
          - name: WORDPRESS_DB_HOST
            value: cloud-sql-proxy:3306
          - name: WORDPRESS_DB_USER
            value: wordpress
          - name: WORDPRESS_DB_NAME
            value: wordpress
          - name: WORDPRESS_DB_PASSWORD
            valueFrom:
              secretKeyRef:
                name: mysql
                key: password
          ports:
            - containerPort: 80
              name: wordpress
          volumeMounts:
            - name: wordpress-persistent-storage
              mountPath: /var/www/html
          livenessProbe:
            initialDelaySeconds: 30
            httpGet:
              port: 80
              path: /wp-admin/install.php # at the very beginning, this is the only accessible page. Don't forget to change to /wp-login.php
          readinessProbe:
            httpGet:
              port: 80
              path: /wp-admin/install.php
          resources:
            requests:
              cpu: 1000m
              memory: 2Gi
            limits:
              cpu: 1200m
              memory: 2Gi
      volumes:
        - name: wordpress-persistent-storage
          persistentVolumeClaim:
            claimName: wordpress
infra/k8s/web/service.yaml
apiVersion: v1
kind: Service
metadata:
  name: wordpress
  annotations:
    cloud.google.com/neg: '{"ingress": true}'
spec:
  type: ClusterIP
  ports:
  - port: 80
    targetPort: 80
  selector:
    app: wordpress
The
cloud.google.com/negannotation specifies that port 80 will be associated with a zonal network endpoint group (NEG). See Container-native load balancing for information on the benefits, requirements, and limitations of container-native load balancing.
We create a PVC for Wordpress:
infra/k8s/web/volume-claim.yaml
kind: PersistentVolumeClaim
apiVersion: v1
metadata:
  name: wordpress
spec:
  accessModes:
    - ReadWriteOnce
  resources:
    requests:
      storage: 5Gi
We finish this section by initializing our Kubernetes ingress resource. This resource will allow us to access the Wordpress application from the internet.
Create the file infra/k8s/web/ingress.yaml
apiVersion: networking.k8s.io/v1
kind: Ingress
metadata:
  annotations:
    kubernetes.io/ingress.global-static-ip-name: "wordpress"
    kubernetes.io/ingress.class: "gce"
  name: wordpress
spec:
  defaultBackend:
    service:
      name: wordpress
      port:
        number: 80
  rules:
  - http:
      paths:
      - path: /*
        pathType: ImplementationSpecific
        backend:
          service:
            name: wordpress
            port:
              number: 80
The
kubernetes.io/ingress.global-static-ip-nameannotation specifies the name of the global IP address resource to be associated with the HTTP(S) Load Balancer. [2]
Let's create our resources and test the Wordpress application:
cd infra/k8s

$ kubectl create secret generic mysql \
    --from-literal=password=$(gcloud secrets versions access latest --secret=wordpress-admin-user-password --project $PROJECT_ID) -n wordpress

gcloud compute addresses create wordpress --global

$ kubectl create -f web -n wordpress

$ kubectl get pods -l app=wordpress -n wordpress

NAME                         READY   STATUS    RESTARTS   AGE
wordpress-6d58d85845-2d7x2   1/1     Running   0          10m

$ kubectl get ingress -n wordpress
NAME        CLASS    HOSTS   ADDRESS         PORTS   AGE
wordpress   <none>   *       34.117.187.51   80      16m
Anyone can have access to the application. Let's create a Cloud Armor security policy to restrict traffic to the only authorized network.
We use Cloud Armor security policy to filter incoming traffic that is destined to external HTTP(S) load balancers.
Create the ìnfra/plan/cloud-armor.tf:
resource "google_compute_security_policy" "wordpress" {
  name = "wordpress"

  rule {
    action   = "allow"
    priority = "1000"
    match {
      versioned_expr = "SRC_IPS_V1"
      config {
        src_ip_ranges = var.authorized_source_ranges
      }
    }
    description = "Allow access to authorized source ranges"
  }

  rule {
    action   = "deny(403)"
    priority = "2147483647"
    match {
      versioned_expr = "SRC_IPS_V1"
      config {
        src_ip_ranges = ["*"]
      }
    }
    description = "default rule"
  }

}
Let's run our updated terraform:
cd infra/plan

terraform apply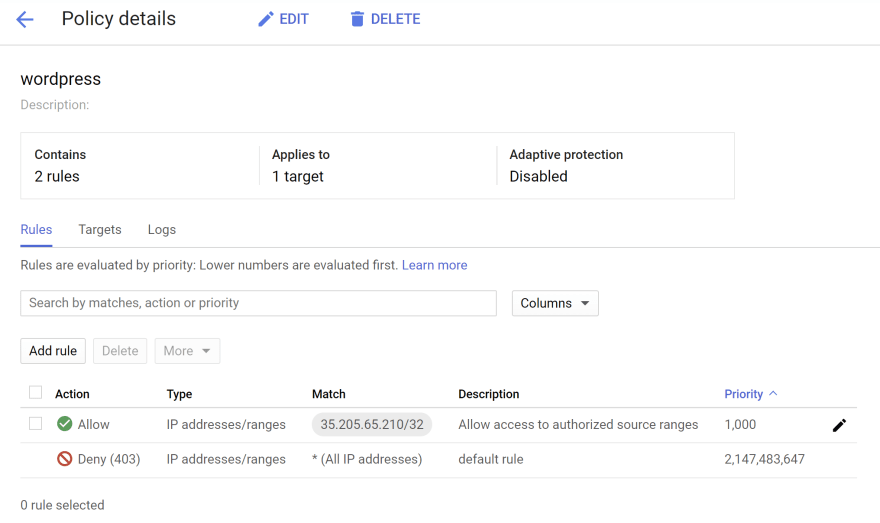
Now, let's create a backend config in Kubernetes and reference the security policy.
BackendConfig custom resource definition (CRD) allows us to further customize the load balancer. This CRD allows us to define additional load balancer features hierarchically, in a more structured way than annotations. [3]
infra/k8s/web/backend.yaml
apiVersion: cloud.google.com/v1
kind: BackendConfig
metadata:
  name: wordpress
spec:
  securityPolicy:
    name: wordpress
kubectl create -f infra/k8s/web/backend.yaml -n wordpressAdd the annotation cloud.google.com/backend-config: '{"default": "wordpress"}' in the wordpress service:
kubectl apply -f infra/k8s/web/service.yaml -n wordpressLet's check if the HTTP Load balancer has attached the security policy:
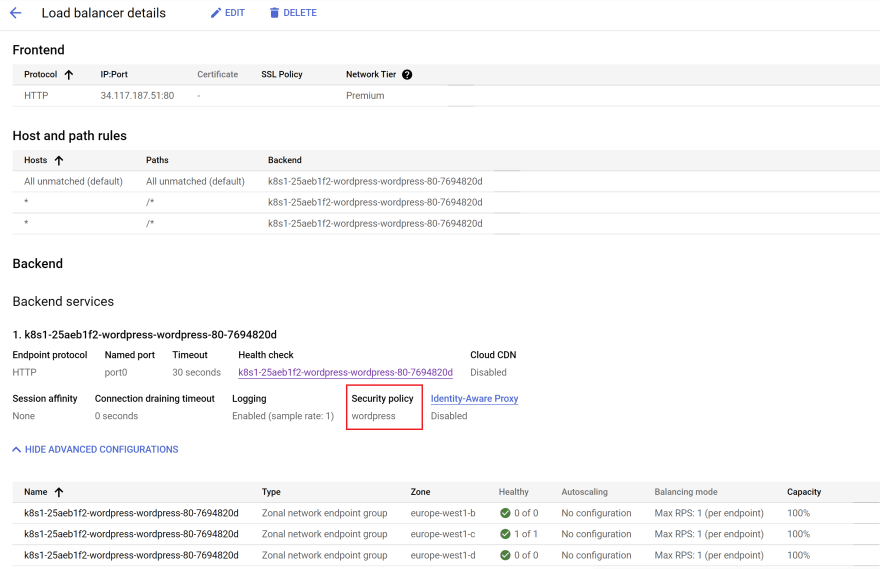
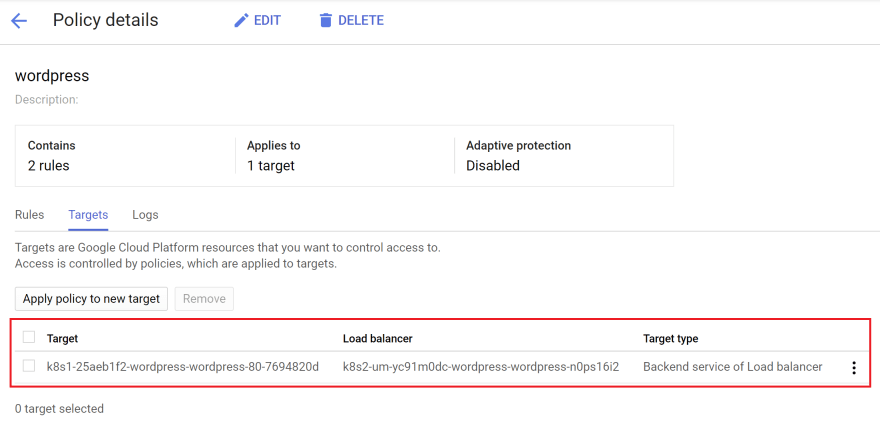
It looks nice. Let's do a test.
Put a bad IP to test if we are rejected
gcloud compute security-policies rules update 1000 \
    --security-policy wordpress \
    --src-ip-ranges "85.56.40.96"

curl http://34.117.187.51/

<!doctype html><meta charset="utf-8"><meta name=viewport content="width=device-width, initial-scale=1"><title>403</title>403 Forbidden
Let's put a correct IP
gcloud compute security-policies rules update 1000 \
--security-policy wordpress \
--src-ip-ranges $(curl -s http://checkip.amazonaws.com/)
curl http://34.117.187.51/
<!doctype html>
<html lang="en-GB" >
<head>
<meta charset="UTF-8" />
<meta name="viewport" content="width=device-width, initial-scale=1" />
<title>admin – Just another WordPress site</title>Ok!
With this Backend configuration, only employees in the same office can have access to the application. Now we want them to be authenticated to access the application as well. We can achieve this by using Identity Aware Proxy (Cloud IAP).
We use IAP to establish a central authorization layer for our Wordpress application accessed by HTTPS.
IAP is integrated through Ingress for GKE. This integration enables you to control resource-level access for employees instead of using a VPN. [1]
Follow the instructions described in the GCP documentation to:
Create a Kubernetes secret to wrap the OAuth client you created earlier:
CLIENT_ID_KEY=<CLIENT_ID_KEY>
CLIENT_SECRET_KEY=<CLIENT_SECRET_KEY>
kubectl create secret generic wordpress --from-literal=client_id=$CLIENT_ID_KEY \
    --from-literal=client_secret=$CLIENT_SECRET_KEY \
    -n wordpress
Let's update our Backend configuration
apiVersion: cloud.google.com/v1
kind: BackendConfig
metadata:
  name: wordpress
spec:
  iap:
    enabled: true
    oauthclientCredentials:
      secretName: wordpress
  securityPolicy:
    name: wordpress
Apply the changes:
kubectl apply -f infra/k8s/web/backend-config.yaml -n wordpress
Let's do a test

Ok!
If you have a domain name, you can enable Google-managed SSL certificates using the CRD ManagedCertificate.
Google-managed SSL certificates are Domain Validation (DV) certificates that Google Cloud obtains and manages for your domains. They support multiple hostnames in each certificate, and Google renews the certificates automatically. [4]
Create the file infra/k8s/web/ssl.yaml
apiVersion: networking.gke.io/v1
kind: ManagedCertificate
metadata:
  name: wordpress
spec:
  domains:
    - <DOMAIN_NAME>
We can create the domain name using Terraform or simply with the gcloud command:
export PUBLIC_DNS_NAME=
export PUBLIC_DNS_ZONE_NAME=

gcloud dns record-sets transaction start --zone=$PUBLIC_DNS_ZONE_NAME
gcloud dns record-sets transaction add $(gcloud compute addresses list --filter=name=wordpress --format="value(ADDRESS)") --name=wordpress.$PUBLIC_DNS_NAME. --ttl=300 --type=A --zone=$PUBLIC_DNS_ZONE_NAME
gcloud dns record-sets transaction execute --zone=$PUBLIC_DNS_ZONE_NAME

sed -i "s/<DOMAIN_NAME>/wordpress.$PUBLIC_DNS_NAME/g;" infra/k8s/web/ssl.yaml

kubectl create -f infra/k8s/web/ssl.yaml -n wordpress
Add the annotation networking.gke.io/managed-certificates: "wordpress" in your ingress resource.
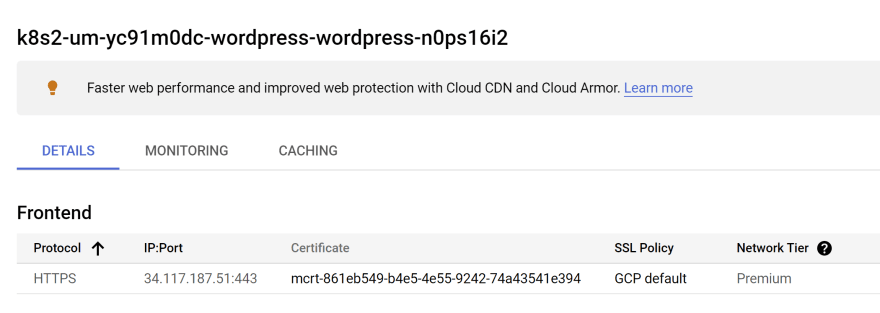
Let's do a test
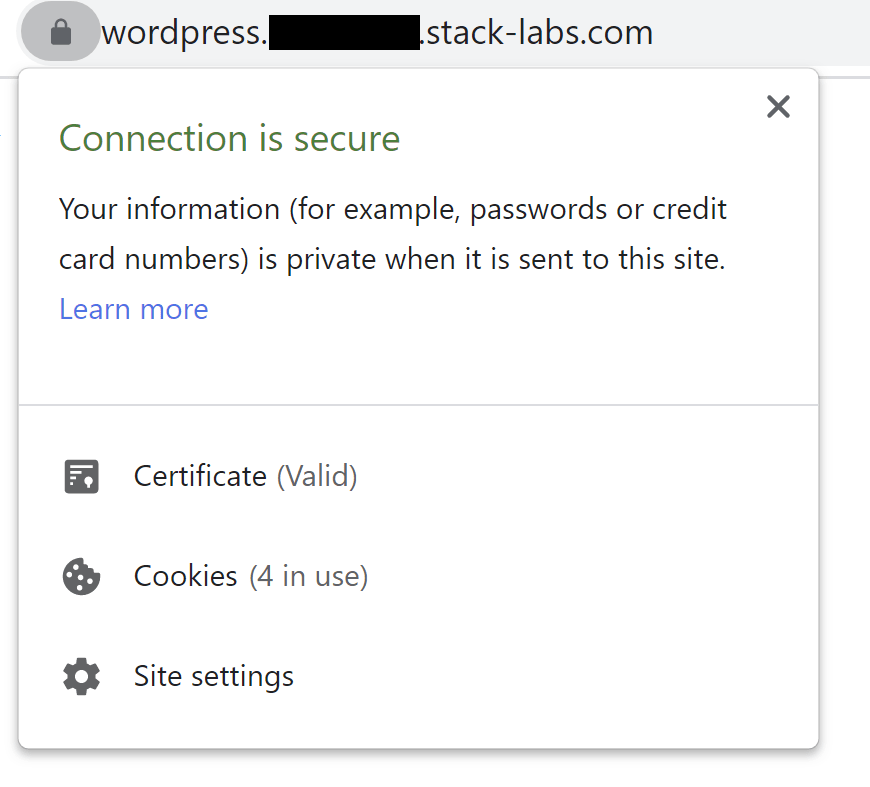
Ok!
To redirect all HTTP traffic to HTTPS, we need to create a FrontendConfig.
Create the file infra/k8s/web/frontend-config.yaml
apiVersion: networking.gke.io/v1beta1
kind: FrontendConfig
metadata:
  name: wordpress
spec:
  redirectToHttps:
    enabled: true
    responseCodeName: MOVED_PERMANENTLY_DEFAULT
kubectl create -f infra/k8s/web/frontend-config.yaml -n wordpressAdd the annotation networking.gke.io/v1beta1.FrontendConfig: "wordpress" in your ingress resource.

Let's do a test
curl -s http://wordpress.<HIDDEN>.stack-labs.com/

<HTML><HEAD><meta http-equiv="content-type" content="text/html;charset=utf-8">
<TITLE>301 Moved</TITLE></HEAD><BODY>
<H1>301 Moved</H1>
The document has moved
<A HREF="https://wordpress.<HIDDEN>.stack-labs.com/">here</A>.
</BODY></HTML>
Ok then!
Congratulations! You have completed this long workshop. In this series we have:
- Created an isolated network to host our Cloud SQL instance
- Configured an Google Kubernetes Engine Autopilot cluster with fine-grained access control to Cloud SQL instance
- Tested the connectivity between a Kubernetes container and a Cloud SQL instance database.
- Secured the access to the Wordpress application
That's it!
Remove the NEG resources. You will find them in Compute Engine > Network Endpoint Group.
Run the following commands:
terraform destroy

gcloud dns record-sets transaction remove $(gcloud compute addresses list --filter=name=wordpress --format="value(ADDRESS)") --name=wordpress.$PUBLIC_DNS_NAME. --ttl=300 --type=A --zone=$PUBLIC_DNS_ZONE_NAME
gcloud dns record-sets transaction execute --zone=$PUBLIC_DNS_ZONE_NAME

gcloud compute addresses delete wordpress

gcloud secrets delete wordpress-admin-user-passwordIf you have any questions or feedback, please feel free to leave a comment.
Otherwise, I hope I have helped you answer some of the hard questions about connecting GKE Autopilot to Cloud SQL and providing a pod level defense in depth security strategy at both the networking and authentication layers.
By the way, do not hesitate to share with peers 😊
Thanks for reading!
[1] https://cloud.google.com/iap/docs/enabling-kubernetes-howto
[2] https://cloud.google.com/kubernetes-engine/docs/tutorials/configuring-domain-name-static-ip
[3] https://cloud.google.com/kubernetes-engine/docs/how-to/ingress-features#configuring_ingress_features
[4] https://cloud.google.com/load-balancing/docs/ssl-certificates/google-managed-certs
15
