34
Implementing custom feature flags - Azure App Configuration
This is a continuation from the previous article on feature flags implemented using Azure App configuration service to maintain the flags. Just to reiterate, feature management can be implemented using config files but this article is trying to implement feature flags connecting to Azure App configuration service.
The previous article described about implementing a boolean feature flag to turn on/off a feature. In this article I am trying to implement a custom feature flag. Microsoft provides few predefined custom feature flags or feature filters (as they are called) Targeting, TimeWindow, and Percentage (more about it here), which covers most usecases, however, there might be situations where you find the predefined ones falling short. In this article I am building a filter ground up with a made up custom logic.
Create a customer filter is as simple as creating a class and implementing the Microsoft.FeatureManagement.IFeatureFilter, override the EvaluateAsync method add the logic to decide if feature should be enabled. Thats it! What i want to show is how do we wire up this class into the application flow and configure the flag in Azure app configurations.
Below is our feature filter class and some supporting class for logic implementation
//The feature filter will be known my this name in the configuration.
[FilterAlias("ShortTimeFeature")]
public class SecondsFeatureFilter : Microsoft.FeatureManagement.IFeatureFilter
    {
        private readonly IMinuteFeaturePropertyAccessor minuteFeatureContextAccessor;

        //The IMinuteFeaturePropertyAccessor is an implementation that I have used to capture first load
        // time of the application. The IMinuteFeaturePropertyAccessor is loaded as a singleton in DI.
        public SecondsFeatureFilter(IMinuteFeaturePropertyAccessor minuteFeatureContextAccessor)
        {
            this.minuteFeatureContextAccessor = minuteFeatureContextAccessor;
        }

        public Task<bool> EvaluateAsync(FeatureFilterEvaluationContext context)
        {
            //The logic is to disable the feature after configured seconds the user has used the application
            //The seconds is configured as parameter in the feature flag.
            var EnabledSeconds = int.Parse(context.Parameters.GetSection("EnabledSeconds").Value);
            if (DateTime.Now.Subtract(minuteFeatureContextAccessor.GetStartTime()).TotalSeconds > EnabledSeconds)
            {
                return Task.FromResult(false);
            }
            return Task.FromResult(true);
        }
    }

    public class MinuteFeturePropertyAccessor : IMinuteFeaturePropertyAccessor
    {
        readonly DateTime startTime;
        public MinuteFeturePropertyAccessor()
        {
            startTime = DateTime.Now;
        }

        public DateTime GetStartTime()
        {
            return startTime;
        }
    }

    public interface IMinuteFeaturePropertyAccessor
    {
        DateTime GetStartTime();
    }
Once the feature filter is create, it needs to be added into the feature management middleware. The middleware will make sure that the filter class is invoked when the flag check is triggers in the application flow (navigation link, action filter, filtermanager check).
Below the configure service method, where the feature filter is added as well as the supporting classes in my sample.
public void ConfigureServices(IServiceCollection services)
        {
            services.AddSession();
            services.AddHttpContextAccessor();
            services.AddControllersWithViews();
            services.AddSingleton<IMinuteFeaturePropertyAccessor, MinuteFeturePropertyAccessor>();
            services.AddFeatureManagement().AddFeatureFilter<SecondsFeatureFilter>();
            services.AddAzureAppConfiguration();
        }
The ways feature flag can be used in the app is exactly same as described in the previous article. The feature flag is going to called TimeLimit. example code is as below
[FeatureGate("TimeLimit")]
 public async Task<IActionResult> Index()
    {
        return View();
    }
Rest of the startup and program class will be same as the previous article, which basically implements Azure app configuration integration.
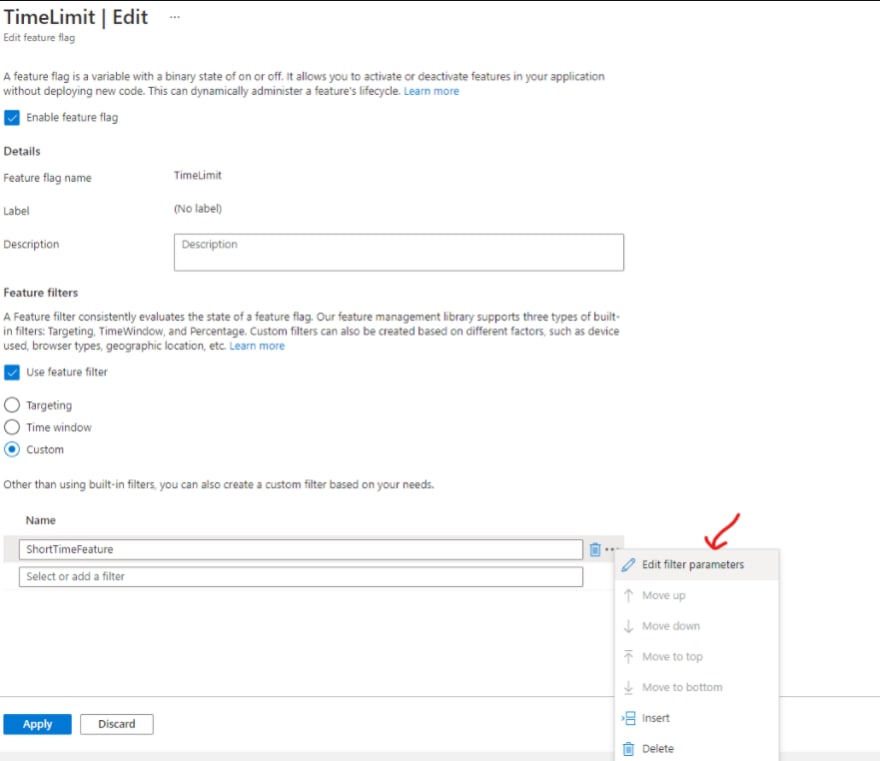
To create the configuration entry in Azure, we use the feature explorer in Azure App configuration service.
- Add a feature flag, enter a feature name same as what was used in the code TimeLimit and check Use feature filter and select Custom.
- In the custom feature filter name, enter the FeatureFilter name as given in the FeatureFilter alias attribute ShortTimeFeature.

- Click the three dots and edit parameters and enter the parameter name and value used in the feature filter implementation EnabledSeconds and 60

 Also, remember to have the Azure App Configuration connection string to be added/updated in the config filer of the application and make sure that the feature flag is enabled in the feature explorer.Now we have wired up the feature flag and dependent configurations and the app is ready to executed.
This code now will make your feature enabled for 60secs after the user has opened the application. Post 60secs the feature will get disabled, like short preview of a beta code. As mentioned earlier this is just to demonstrate how easy it is to implement a custom feature flag and control features based on different business needs.
34
