
50
RASA - Custom submit action
Eventually, we would like to do more than just print the user's responses to the screen.
In this article, we will learn how to send the form data to Airtable API.
Create an account on Airtable, if you already don't have one. A free account is enough.
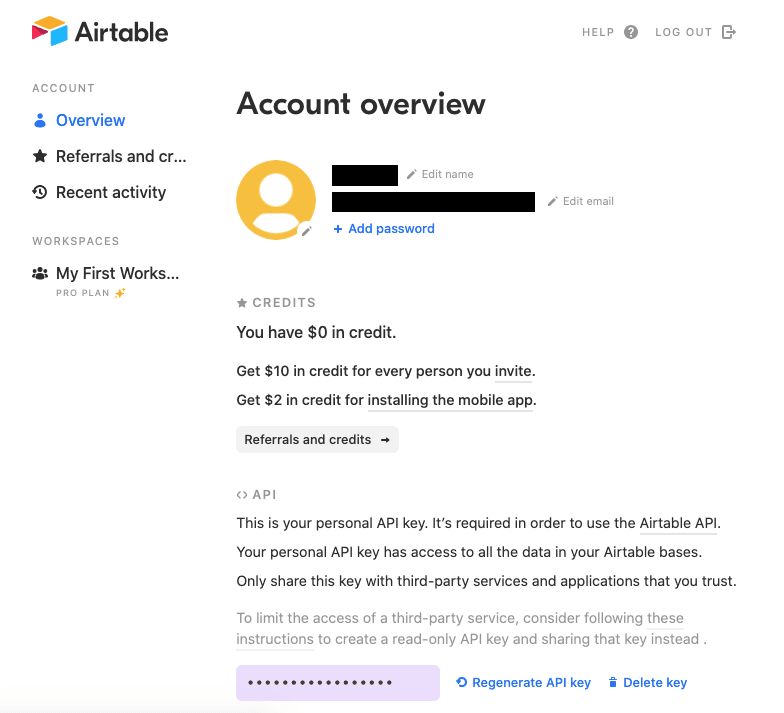
On the Account overview page, generate an API key. Note this key aside.
Then visit https://airtable.com/universe/exp3exFotfMOfr8dw/rasa-dev-tutorial. Click Copy base. This will create a new workspace named Rasa dev tutorial with one table named Table 1.
In the upper right corner, click Help, then click API documentation. This opens an autogenerated API documentation for the workspace.

Copy the base ID starting with app. You will need it soon.
In the project root, create a new .env file:
AIRTABLE_API_KEY=key*****
BASE_ID=app*****
TABLE_NAME=Table%201
The TABLE_NAME is the name of the table in your Rasa dev tutorial workspace. Because it contains a space, the space is encoded for URL as %20.
Put your own AIRTABLE_API_KEY and BASE_ID in.
These values should be kept secret. Add the .env file to .gitignore, so that you don't accidentaly commit it to your version control system.
Add the following to .gitignore.
# keep secret keys out of VCS
.env
We will load those variables in the actions/actions.py with this code:
# actions/actions.py
load_dotenv()

airtable_api_key = os.getenv("AIRTABLE_API_KEY")
base_id = os.getenv("BASE_ID")
table_name = os.getenv("TABLE_NAME")
Make sure you have your python virtual environment activated (source venv/bin/activate).
Install two new packages. We will use them soon.
pip install python-dotenv requestsAdd them to the requirements.txt file:
rasa==2.3.1
python-dotenv==0.15.0
requests==2.25.1
In actions/actions.py, you will need these imports:
# actions/actions.py
from typing import Text, List, Optional, Dict, Any
from rasa_sdk.forms import FormValidationAction
from rasa_sdk.executor import CollectingDispatcher
from rasa_sdk import Tracker, Action
from dotenv import load_dotenv
import os
import requests
import json
import uuid
In actions/actions.py, create a new method.
# actions/actions.py
def create_newsletter_record(email, frequency, notifications, can_ask_age, age):
    request_url = f"https://api.airtable.com/v0/{base_id}/{table_name}"

    headers = {
        "Content-Type": "application/json",
        "Accept": "application/json",
        "Authorization": f"Bearer {airtable_api_key}",
    }

    data = {
        "fields": {
            "Id": str(uuid.uuid4()),
            "Email": email,
            "Frequency": frequency,
            "Notifications?": notifications,
            "Can ask age?": can_ask_age,
            "Age": age,
        }
    }

    try:
        response = requests.post(
            request_url, headers=headers, data=json.dumps(data)
        )
        response.raise_for_status()
    except requests.exceptions.HTTPError as err:
        raise SystemExit(err)

    print(f"Response status code: {response.status_code}")
    return response
This method creates a URL, HTTP header and body and sends a POST request to Airtable API endpoint.
The body contains data we have obtained during the form loop from the user.
uuid.uuid4() is used to generate a unique identifier for the record.
Also in actions/actions.py, create a new class.
This class is a custom action. It extends an Action class. We can call this action in our rules and stories with - action: submit_newsletter_form, since submit_newsletter_form is what the name method returns.
# actions/actions.py
class SubmitNewsletterForm(Action):

    def name(self) -> Text:
        return "submit_newsletter_form"

    async def run(
            self, dispatcher, tracker: Tracker, domain: Dict[Text, Any],
    ) -> List[Dict[Text, Any]]:
        email = tracker.get_slot("email")
        frequency = tracker.get_slot("frequency")
        notifications = tracker.get_slot("notifications")
        can_ask_age = tracker.get_slot("can_ask_age")
        age = tracker.get_slot("age")

        response = create_newsletter_record(email, frequency, notifications, can_ask_age, age)

        dispatcher.utter_message("Thanks, your answers have been recorded!")

        return []
The run method is called when the action is called.
First, we get the slot values.
Then, we send them to the Airtable API using our previous method create_newsletter_record.
Lastly, we use dispatcher to utter a custom message.
The return value is a list of events that should follow. There are none in this case.
Don't forget to add this action to domain.yml.
# domain.yml
# ... previous content ...
actions:
  # ... previous actions ...
  - submit_newsletter_form
Call this action after the utter_subscribed action in the data/stories.yml and data/rules.yml.
# data/stories.yml
# ... previous content ...
stories:
  # ... previous stories ...
  - story: interactive_story_1
    steps:
      - intent: subscribe
      - action: newsletter_form
      - active_loop: newsletter_form
      - slot_was_set:
          - requested_slot: email
      - intent: chitchat
      - action: utter_ask_continue
      - intent: affirm
      - action: newsletter_form
      - slot_was_set:
          - requested_slot: email
      - slot_was_set:
          - requested_slot: frequency
      - intent: chitchat
      - action: utter_ask_continue
      - intent: affirm
      - action: newsletter_form
      - slot_was_set:
          - requested_slot: frequency
      - active_loop: null
      - action: utter_subscribed
      - action: submit_newsletter_form
# data/rules.yml
# ... previous content ...
rules:
# ... previous rules ...
- rule: submit form
condition:
- active_loop: newsletter_form
steps:
- action: newsletter_form
- active_loop: null
- action: utter_subscribed
- action: submit_newsletter_formAdd the action also to the tests.
Retrain the model: rasa train.
Start the actions server: rasa run actions.
In a new terminal window, start the rasa shell: rasa shell.

The submit action created a new record in the table.

You can learn more about actions in the documentation.
In the next chapter, we will look at messaging channels.
Please note that I needed to make some changes to the
notificationsslot. Those changes can be seen on GitHub.
Repository for this tutorial:
You can checkout the state of the repository at the end of this tutorial by running:
git clone --branch 18-custom-submit-action git@github.com:petr7555/rasa-dev-tutorial.git50