
35
Using GitHub OAuth with Next.js
Today, in this tutorial I'll be telling you how to implement OAuth in your Next.js application.
We'll be using GitHub OAuth in this example, but you can go ahead and add any OAuth provider you want later on.
The beauty of this approach is that you don't have to spend time configuring and setting up authentication all by yourself, and can rely on these providers. This won't require a database connection.
If you just want to check the code out, you can visit github.com/k4u5h4L/nextjs-oauth-demo
- Node.js installed.
- Any node.js package manager installed. I'm going to be using
yarn, but you can usenpmtoo.
- Go ahead and create a new next.js project
yarn create next-app next-oauth-demoAnd then open it in your favorite text editor.
- Let's install a packages called
next-authwhich will help us implement authentication very easily.
yarn add next-auth- Now, let's write some code which will set up the backend for
next-auth. Create a new file exactly like this in having the path:pages/api/auth/[...nextauth].js.
You need to have the brackets like that in order to service all requests going to /api/auth/ to let next-auth handle it.
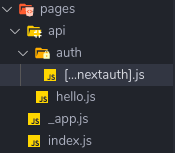
Your folder structure should look like this:
Now, open the [...nextauth].js file and add some configuration.
// pages/api/auth/[...nextauth].js
import NextAuth from "next-auth";
import Providers from "next-auth/providers";

export default (req, res) =>
    NextAuth(req, res, {
        providers: [
            Providers.GitHub({
                clientId: process.env.GITHUB_CLIENT_ID,
                clientSecret: process.env.GITHUB_CLIENT_SECRET,
            }),
        ],
        debug: process.env.NODE_ENV === "development",
        secret: process.env.AUTH_SECRET,
        jwt: {
            secret: process.env.JWT_SECRET,
        },
        callbacks: {
            async redirect(url, baseUrl) {
                return "/";
            },
        },
    });
Here in the file we have linked some environment variables which we will fill later on.
- Now, let's go to GitHub and get our ID and secret keys. Go to github.com/settings/developers. In the
OAuth Appstab click onNew OAuth App.

Now you'll need to fill in some details about your app. Except the Application name and the Application description keep everthing else the same as shown in the below picture.
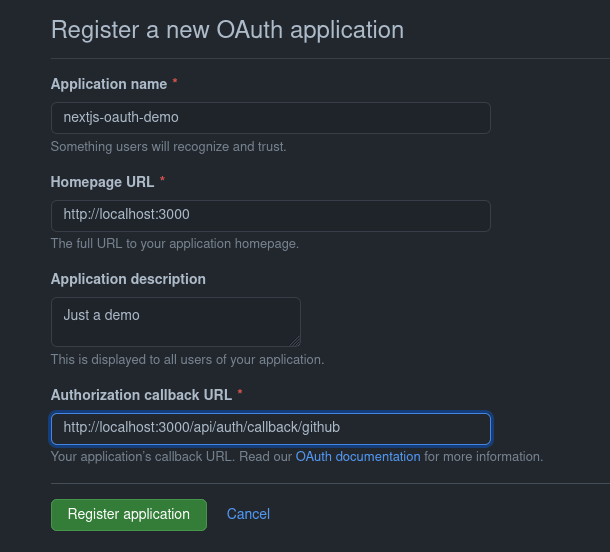
Hit Register application. Now, you'll be greeted with a screen with your Client ID. Click on the button to generate client secret.

Now you'll get your client secret key. Copy those two keys.

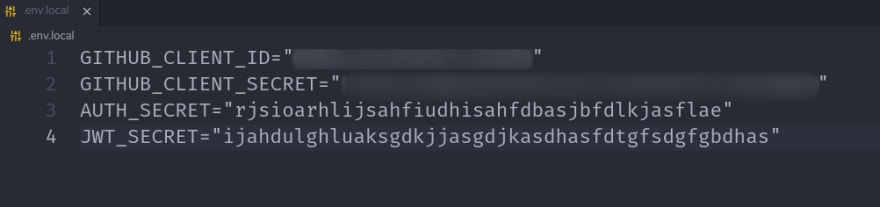
In the root of your project, create a file called .env.local and paste the tokens here.

Add the AUTH_SECRET and JWT_SECRET as well. Just hadjhjasdasdjasruhsfdghfgsdfsd away at your keyboard!
pro tip: Don't use the same keys I show here.
Now, your backend is configured!
Let's go ahead and make some login and secret pages utilizing some of next-auth's APIs.
We'll make the pages/index.js page as a login page. Paste the following code in it
import React from "react";
import { useSession, signIn, signOut } from "next-auth/client";

export default function Home() {
    const [session] = useSession();
    return (
        <div>
            <h1>Github OAuth Demo</h1>

            {!session ? (
                <>
                    <button onClick={() => signIn("github")}>
                        Sign in with Github
                    </button>
                </>
            ) : (
                <>
                    <p>
                        Not {session.user.name || session.user.email}? Then
                        Logout and login again
                    </p>
                    <button onClick={signOut}>Logout</button> <br />
                </>
            )}
        </div>
    );
}
Here, we're just checking if there already is an existing session. If there is, we want to tell the user the same and give the option to logout. Else, we will show a button to login using GitHub. Simple React stuff!
Now, run the dev server
yarn devYou should see a page like this.

Click on the Signin with GitHub button to be signed in!
After signing in, you'll be logged in using GitHub!
And that's all it takes to implement OAuth with GitHub in Next.js!
If you want to know more about next-auth, you can check out the docs here.
Hope this article helped you in some way. Cheers!
35