41
How to reduce your Amazon EKS costs by half in 15 minutes
Overprovisioning is the top reason why teams see their cloud bills constantly growing. But choosing the best instances from the hundreds of options AWS offers is a tough call.
How are you supposed to know which ones will deliver the performance you need?
Fortunately, you can find solutions on the market that can do that for you.
If you’re curious about how it all works, follow my journey and see how I slashed the costs of running my containers in EKS by half using CAST AI, in 15 minutes.
TL;DR
I started by provisioning an e-commerce app (here) on an EKS cluster with six m5 nodes (2 vCPU, 8 GiB) on AWS EKS. I then deployed an AI engine to analyze my application and suggest some optimizations. Finally, I activated the engine and watched the system self-optimize.
The initial cluster cost was $414 per month. Within 15 minutes, in a fully automated way, the cluster cost went to $207 (a 50% reduction), by reducing six nodes to three nodes. Then, 5 minutes later, the cluster cost went down to $138 per month, using spot instances (a 66% reduction).

Get your free CAST AI Savings Report to check how much you could potentially save. It’s the best starting point for any journey into cloud cost optimization.
Step 1: Deploying my app and running the Savings Report
I deployed my app in 6 nodes on EKS. Here’s what it looked like before - all the nodes were empty:

The cluster was created via eksctl:
eksctl create cluster --name boutique-blog-lg -N 6 --instance-types m5.large --managed --region us-east-2 |
And after deployment - the green rectangles are the pods:

I’m using kube-ops-view, a useful open-source project to visualize the pods.
Notice that with Kubernetes, the application’s pods (aka containers) are spread evenly across all the nodes by default. Kubernetes is a fair orchestration engine. The CPUs range between 40 and 50%.
Note: all EKS autoscalings have been disabled on purpose, as CAST AI will substitute EKS Cluster Autoscaling.
Now it’s time to connect my EKS cluster to CAST AI. I created a free account on https://cast.ai and selected the Connect your cluster option.
Click on ‘Connect cluster’:


I copied and ran the script successfully on my terminal (I use Lens, another free tool for this).
laurent@laurents-MacBook-Pro ~ % curl -H "Authorization: Token "https://api.cast.ai/v1/agent.yaml?provider=eks" | kubectl apply -f - |
The CAST AI agent went over my EKS cluster in read-only mode and generated this Savings Report:

If I switch my six m5.large to what CAST AI recommends - three c5a.large - I could slash my bill by almost 60%. Sounds like a plan!
With Spot Instances, I can get even higher savings (66.5%).

Step 2: Activating the cost optimization
To get started with cost optimization, I need to add my AWS access key ID and Secret access key to the platform.
Getting the access keys was easy. All it took was running this script:

Step 3: Enabling policies
Evictor is a CAST AI tool that constantly looks for inefficiencies in a setup and helps to maximize savings as fast as possible. Run this command to activate Evictor:
This is what Evictor in action looks like:

One node is deleted:

Here are the Evictor logs:
time="2021-06-14T16:08:27Z" level=debug msg="will try to evict node \"ip-192-168-66-41.us-east-2.compute.internal\"" |
And now the second and third nodes were evicted - 3 nodes remain:

After about 10 minutes, Evictor deleted 3 nodes and left 3 nodes running. Note that CPUs are now at a much healthier 80% rate.
The cost of this cluster is now $207.36 per month - half the initial cost of $414 per month.
I managed to achieve 80% of the projected savings. This is what I saw in my CAST AI dashboard:

Advanced savings
Step 4 (optional): Moving my app to new optimized nodes
Steps 1, 2, and 3 are fully automated. CAST AI gradually shrinks the cluster by eliminating waste and overprovisioning. It does so by bin-packing pods and emptying nodes one by one. From that moment, the cluster is optimized and Evictor will continuously look for further optimization opportunities over time.
Step 4 is an advanced optional step where CAST AI actively replaces the current nodes with more optimized nodes, such as Spot Instances. The concept is fairly simple: CAST AI cordons the cluster, drains nodes, and replaces them with more optimized nodes.
The nodes are cordoned:

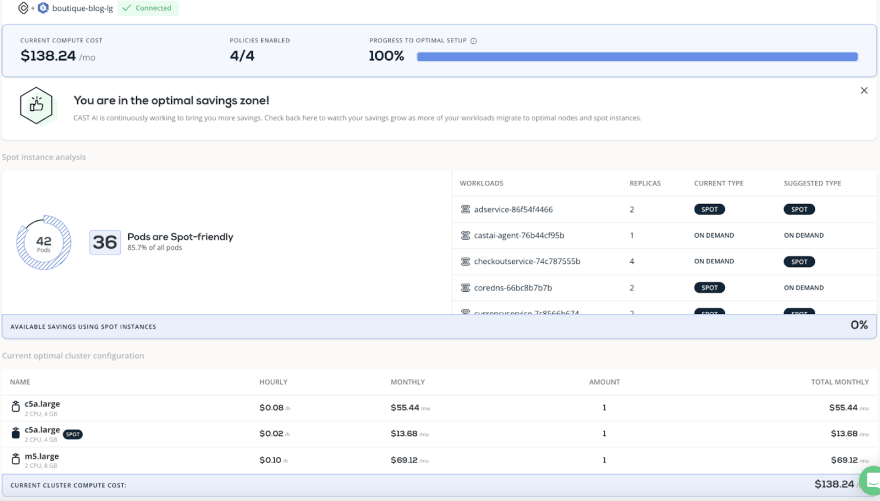
The first two nodes are drained, and the AI engine selects the most appropriate instances type for these nodes. This is what I saw in my CAST AI dashboard:

As you can see, my cluster now has only two nodes and costs $138 per month. It’s hard to imagine that I started out with a monthly EKS bill of $414.72!
Summary
Moving from a non-optimized setup to a fully-optimized one was a breeze. CAST AI analyzed my setup, found opportunities for savings, and swiftly optimized my cluster in 15 minutes. I cut my EKS bill by half in 15 minutes, from $414 to $207.
Then, I activated advanced savings by asking CAST AI to replace nodes with more optimized nodes and achieved further savings, ending up with a $138 bill.

Run the free CAST AI Savings Report to check how much you could potentially save. It’s the best starting point for any journey into cloud cost optimization.
41


