33
Using Strapi with Angular Universal Apps
Angular is a powerful feature-rich platform that you can use to create all kinds of single-page apps, ranging from simple sites to more intricate ones. With it, you can build efficient native, web, and mobile apps with a wide range of tools and libraries it integrates. However, there are still ways apps built with it can be improved. For example, using Angular Universal, you can render your apps server-side to speed up page loads and improve SEO and performance.
Server-side rendering involves converting an app to HTML on a server. When you send a request for a particular path to the server, it returns an entirely static HTML page as a response. No additional requests need to be made to populate the page with data and resources as it is all contained in the response. The page appears almost precisely how it would be rendered client-side in the DOM but may sometimes have limited functionality.
Angular Universal is a set of tools that render Angular apps server-side. On the server, the Universal template engine takes an Angular app and creates static pages when a request is made. The pages are then forwarded to the client. It's likely called universal since it executes on other platforms besides a browser.
Server-side rendered apps load quicker to users. A static page is shown to the user to engage them as the rest of the application loads. The static pages that Angular Universal provides are simple to index when search engine web crawlers access them. This server-side rendering improves the SEO score of a site. In addition, SSR pages offer a better user experience, especially on less capable devices that may have trouble running full Angular apps.
Strapi is an open-source content API. Data from it can be consumed using REST or GraphQL. With it, you can set up APIs relatively fast. It also provides an admin panel where you can manage the API and content. You can use it with several different databases such as SQLite, MySQL, PostgresSQL, MongoDB, etc. Additionally, it is highly customizable and offers numerous plugins to supplement the API.
This article will cover how to use Strapi with an Angular Universal app. First, you'll set up a Strapi server. Then you will create an Angular Universal app that will consume data from Strapi.
Before you begin, you need to have Node installed. You can find out how to get it here. The version of Node needs to be at minimum 12 and at most 14. You also have to have the Angular CLI installed. This guide will walk you through how to do this.
To illustrate how to use Strapi with an Angular Universal app, you will build an app called Tour Events. It will list the event dates and venues of a touring performer. Strapi will provide the data for the events, and the Angular Universal app will consume and display it.
To begin, you will install Strapi and create a new project. The project will be called tour-server.
npx create-strapi-app tour-server --quickstartOnce the server starts, head on over to the admin panel at http://localhost:1337/admin. You will be prompted to create a new administrator. Once you create one, you will be routed to the dashboard.
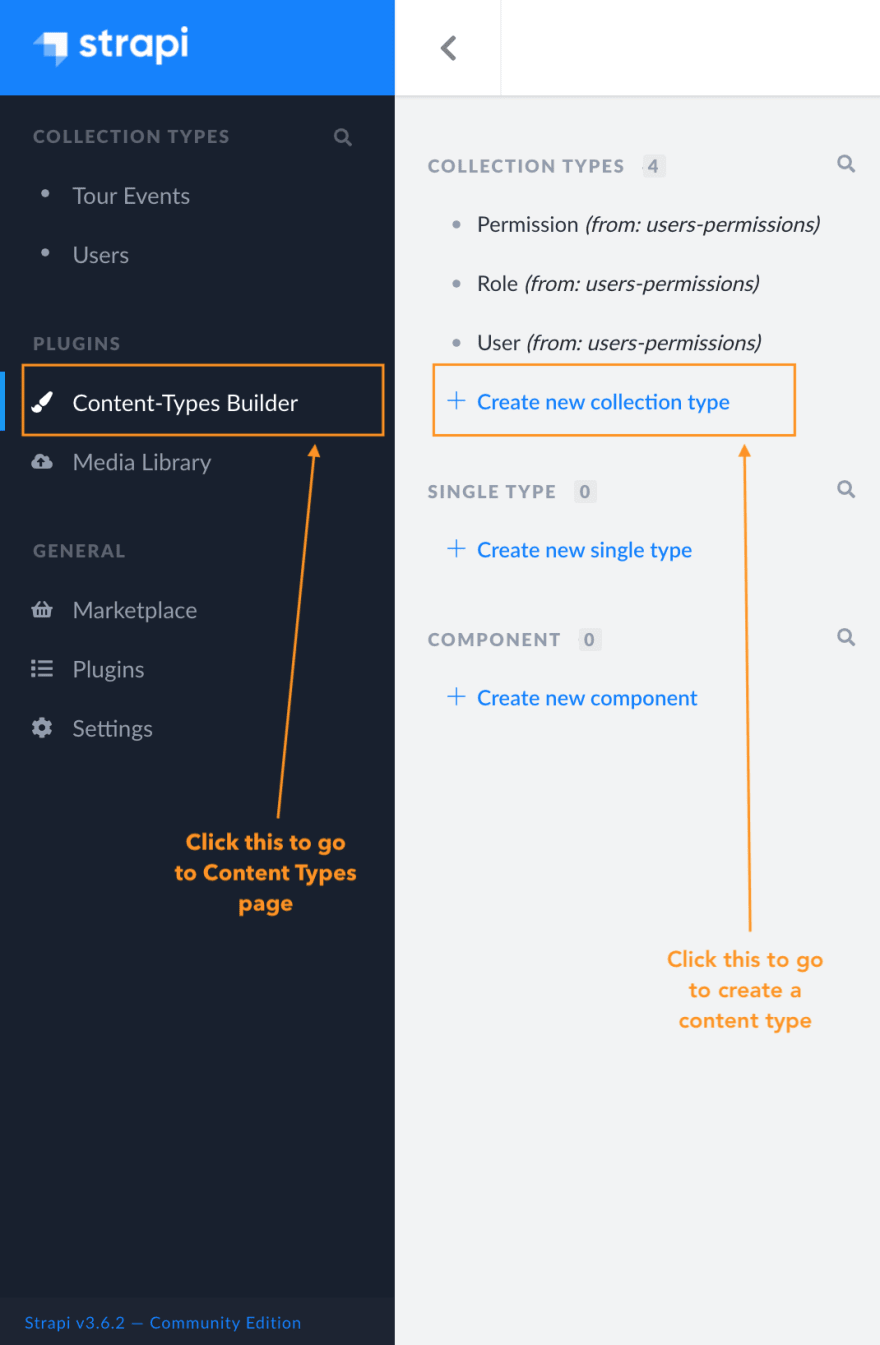
Next, you will create a Tour Event content type. This content type will serve as the structure for the event data you will add. Click the Content-Types Builder link in the side nav.

In the Content Types menu, click the Create new collection type link. You should see the pop-up below. Name the type Tour Events, then click the Continue button.

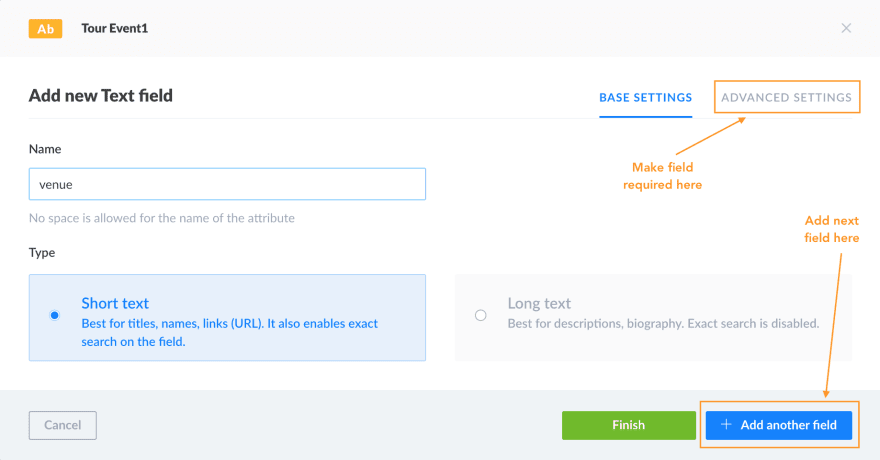
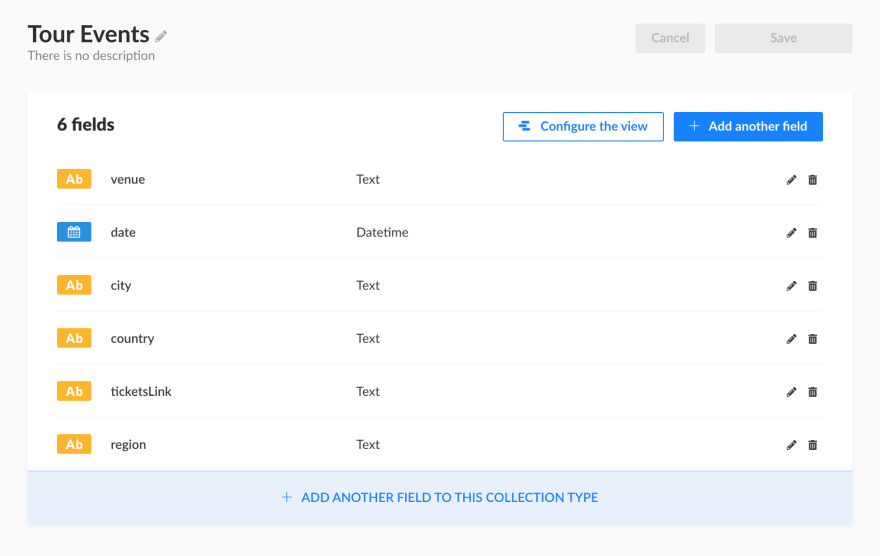
In the next dialog, you will be prompted to add a field and pick a type. For example, the Tour Events type will have six fields: venue, date, city, region, country, and ticket link. So, you'll begin by creating a venue field that will be of type text.

In the dialog, put in the venue like the name, then head on over to Advanced Settings.

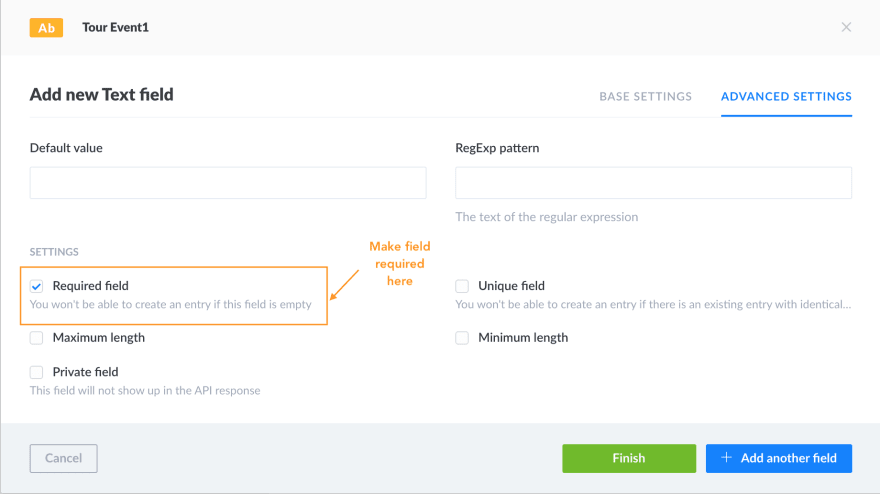
In the Advanced Settings, make the field required by clicking the checkbox.

After which, click the Add another field button to create the rest of the five fields. The Tour Events type should look something like the image below when completed. Once done adding all the fields, click the Finish button.

The Tour Events type will now appear in the side nav. To add new events, click on the Tour Events link in the nav. It will show you all the available tour events. Then, click the Add New Tour Events button to display the view that adds new events.

Once you click the button, a pop-up form will be shown where you would add new events. Add a couple to act as dummy data.

The last thing you will need to do is enable the API to consume the event data. You will do this by clicking the Settings link in the side nav. Then, in the settings page under the Users & Permissions Plugin, click the Roles link. Next, you should see this page.

Under Permissions, there will be a list of checkboxes for Tour Event. Click the find checkbox, then save. This option will enable you to make GET requests for tour events.

If you go to http://localhost:1337/tour-events, it will display a list of tour events you created.
In this section, you will create the Angular app that will display the tour events. It will be called tour-app. To create it, run:
ng new tour-appWhen prompted to add routing, select yes and pick CSS for styling. The app will only contain one component, but you will structure it to allow for more components in the future.
There will be two additional modules in the app: a features module and a core module. The core module will contain everything central to the app, like services and models. Finally, the features module will host the features of the app.
You can generate these modules by running:
ng g m core
ng g m features
Next, in the environments/environment.ts file, you will add an apiUrl to the environment constant. This URL will point to the Strapi server.
// src/environments/environment.ts
export const environment = {
  production: false,
  apiUrl: 'http://localhost:1337/'
};After setting up the app, you will add a TourEvent interface to the model's folder in the core module. You will generate it by running:
ng g interface core/models/tour-eventPopulate the file with the fields you created in the Strapi admin dashboard. This interface will be helpful when specifying return types for functions in different parts of the app.
// src/app/core/models/tour-event.ts
export interface TourEvent {
    id: string;
    city: string;
    country: string;
    date: Date;
    region: string;
    ticketsLink: string;
    venue: string;
}
To consume the Strapi API, you need to add the HttpClientModule as an import to AppModule.
// src/app/app.module.ts
import { HttpClientModule } from '@angular/common/http';
...

@NgModule({
  ...
  imports: [
    ...
    HttpClientModule
  ]
})
export class AppModule { }
Next, you'll create a service for tour events. You will generate it as follows:
ng g s core/services/tour-eventsIn the service file, you will create a getEvents method that will hit the http://localhost:1337/tour-events route and return all the events. This service will look like this:
// src/app/core/services/tour-events.service.ts
import { HttpClient } from '@angular/common/http';
import { Injectable } from '@angular/core';
import { environment } from 'src/environments/environment';
import { TourEvent } from '../models/tour-event';

@Injectable({
  providedIn: 'root'
})
export class TourEventsService {
  private eventsPath = 'tour-events';

  constructor(private http: HttpClient) { }

  getEvents(){
    return this.http.get<TourEvent[]>(environment.apiUrl+this.eventsPath);
  }
}Lastly, you will create the TourEventsComponent. This component will serve as the page that will display all the tour events from the service. You will generate it by running:
ng g c features/tour-eventsYou will then inject the TourEventsService in the constructor and call its getEvents method and assign the results to the events$ property, which you will use in the template.
// src/app/features/tour-events/tour-events.component.ts
import { Component } from '@angular/core';
import { TourEventsService } from 'src/app/core/services/tour-events.service';
@Component({
  selector: 'app-tour-events',
  templateUrl: './tour-events.component.html',
  styleUrls: ['./tour-events.component.css']
})
export class TourEventsComponent {
  events$ = this.eventService.getEvents();
  constructor(private eventService: TourEventsService) { }
}
In the template, create a table with five columns corresponding to the fields of an event. For the table data, you shall loop through the events.
<!-- src/app/features/tour-events/tour-events.component.html -->
<h1>Tour Events</h1>
<table *ngIf="events$ | async as events">
    <tr>
        <th>Date</th>
        <th>Venue</th>
        <th>City</th>
        <th>Time</th>
        <th>Tickets</th>
    </tr>
    <tr *ngFor="let event of events">
        <td>{{event.date | date: 'fullDate'}}</td>
        <td>{{event.venue | titlecase}}</td>
        <td>
            <span *ngIf="event.region">{{event.city | titlecase}}, {{event.region | uppercase}} ({{event.country |
                uppercase}})</span>
            <span *ngIf="!event.region">{{event.city | titlecase}} ({{event.country | uppercase}})</span>
        </td>
        <td>{{event.date | date: 'shortTime'}}</td>
        <td><a href="{{event.ticketsLink}}">Tickets</a></td>
    </tr>
</table>
This is how you would style the component.
/* src/app/features/tour-events/tour-events.component.css */
* {
    font-family: arial, sans-serif;
}

h1 {
  text-align: center;
}

table {
    border-collapse: collapse;
    width: 100%;
}

td, th {
  border-bottom: 1px solid lightgray;
  text-align: left;
  padding: 8px;
}

tr:nth-child(even) {
  background-color: #f5f5f5;
}
In the app routing module, add a route for the TourEventsComponent so you can preview it.
// src/app/app-routing.module.ts
...
import { TourEventsComponent } from './tour-events/tour-events.component';
import { Routes, RouterModule } from '@angular/router';

const routes: Routes = [
  { path: '', component: TourEventsComponent}
];

@NgModule({
  declarations: [
    TourEventsComponent
  ],
  imports: [
    ...
    RouterModule.forChild(routes)
  ]
})
export class FeaturesModule { }
Before you can run the app, be sure to replace the contents of app.component.html with just:
<!-- src/app/app.component.html -->
<router-outlet></router-outlet>
Now to run the app:
ng serveHead on over to http://localhost:4200 and you should see something similar to this:

The Angular CLI comes in handy when setting up server-side rendering. Angular Universal uses a Node.js Express server to create static HTML pages and respond to requests. Then, the pages are rendered using the Universal template engine.
It takes the path of a request, a module containing components, and a template page. It uses the path to decide what components to use, renders the view within the template, and generates an HTML page. The page is then served to the client.
To make the server-side app module, run:
ng add @nguniversal/express-engineRunning the above command will add required dependencies, a web server, a server module, and other settings needed for server-side rendering. To preview the SSR site, run:
npm run dev:ssrThe app will be available at http://localhost:4200 as before. The site should look the same as the screenshot above. The only difference is the view will be a complete HTML page.
Angular Universal sites are great for SEO, have fast load times and better performance. However, just because they are rendered server-side, it doesn't mean that consuming external APIs becomes more complex. Using Strapi, you can build APIs that Angular Universal apps can consume without much issue.
To read more about Angular Universal, head to this link. For more on what you can do with Strapi, check out their resource center. You can find the code for this project here.
This was originally published on the Strapi Blog.
33
