21
Installing Tailwind CSS in Vue3 Project
Tailwind CSS is a utility-first CSS framework, a great tool to create that eye catching interface all with inline styling (without a single line of your own css).
Tailwind CSS isn't the first utility-first CSS library, but at the moment it is safe to say it's becoming the most popular among developers.
Installing Tailwind varies depending on your project's framework (React, Nuxt.js, Vue.js, Next.js, Gatsby, Laravel) making it available over a pretty wide range of frameworks which I think even makes it cooler!.
This article is focused on installing Tailwind css in a Vue 3 project. To follow along, all you need is a Vue 3 project set up in your favorite code editor. (Know how to here).
That said, Let's get right to it!
Installing via CDN is an option but is not the best one according to the official documentation. To get the most out of Tailwind it is advised you install via npm.
In your project src folder create a css folder containing a file named tailwind.css.
Inside tailwind.css add the following code;
@tailwind base;
@tailwind components;
@tailwind utilities;
The three lines above are called the Tailwind Directives.
In your code editor, open up the terminal and run the below command to install tailwind css and its dependencies via npm.
npm install tailwindcss postcss autoprefixerIt is possible to get the below error message when you try to run the project;
Error: PostCSS plugin tailwindcss requires PostCSS 8.The simple explanation is, Vue 3 (as at the time this article is written) does not yet have PostCSS 8 support and the command above is trying to integrate Tailwind with a tool that relies on older version of PostCSS.
Run the following code to uninstall previous installation and fix the error
npm uninstall tailwindcss postcss autoprefixer
npm install tailwindcss@npm:@tailwindcss/postcss7-compat @tailwindcss/postcss7-compat postcss@^7 autoprefixer@^9
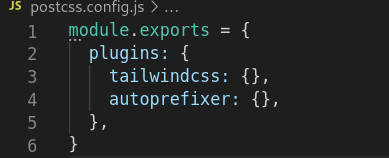
Next, you need to generate both Tailwind and PostCSS config files
npx tailwindcss init -pYour config files should look like this
Finally, open up your main.js file and import the tailwind.css file containing the tailwind directives i.e
import './css/tailwind.css'Tailwind CSS is up and ready to create beauty!
It is very important to note that alongside installing, there's a crucial part of tailwind that its users must be aware of and that's it's optimization.
Tailwind generates thousands of utility classes and upon building the project, these css files could be surprisingly large which no one would appreciate in the production bundle.
Tailwind CSS comes inbuilt with a tool - PurgeCSS. What this does is to scan your files for unused css styles and then 'purge' them. The files to purge are provided in the purge array inside your tailwind.config file.
There are two ways to go about it.
The first is to provide the path to each file consuming css styles like this;
module.exports = {
  purge: ["./src/App.vue",
          "./src/PageOne.vue",
          "./src/PageTwo.vue"
        ],
}
Or you use a glob like this;
module.exports = {
  purge:["./src/**/*.vue"],
}
This says look into the src folder slash any sub directory and then any file that ends in .vue. This covers pretty much all the sub folders and files as opposed to providing individual paths.
Pretty straight forward right? I hope you found this article useful.
21


