44
Building a Serverless API with Cloud Function and Fauna
In this article, you're going to learn about how to build a serverless rest API using Cloud Functions from Google Cloud Platform (GCP). Cloud Functions is a scalable function as a service that doesn't need you to provision a server. It's available in some programming languages, like Python, Node.js, Java, and so on. Fauna is a scalable transactional database available as an API, either as GraphQL or FQL.
To follow this article, you need an account in Fauna and a GCP account. You can create a new account in Fauna for free. If you give payment information to GCP, you can get a free $300 credit for the trial.
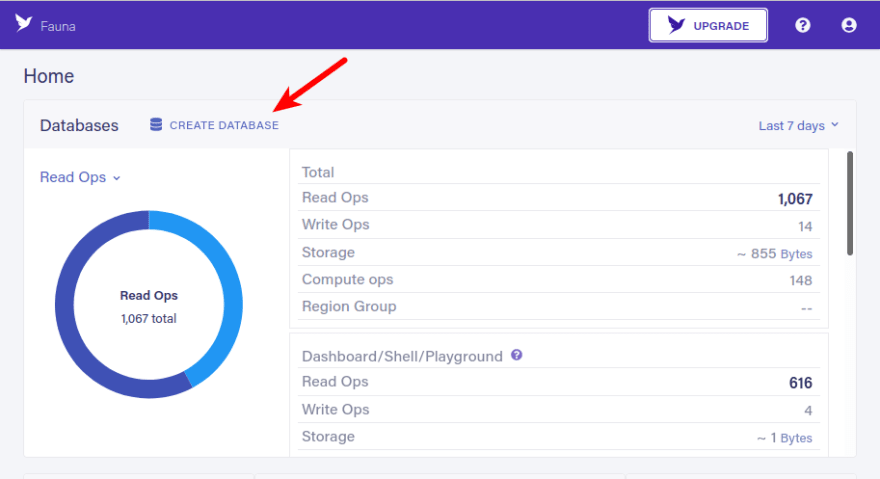
In Fauna's dashboard, click the CREATE DATABASE button to create a new database for your application.

You'll be presented with a form.

Fill cloud-functions-api as the name, choose Classic as the region group, and make sure the Use demo data field is unselected. Finally, click the CREATE button.
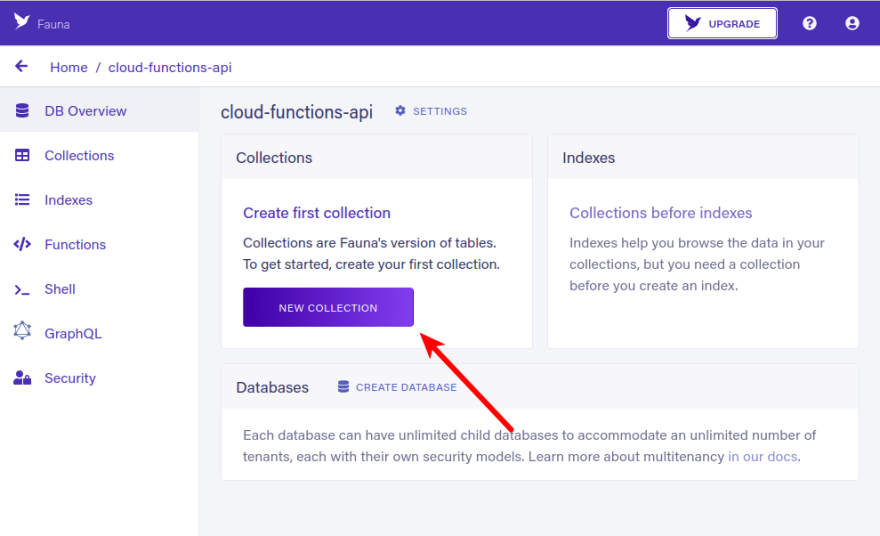
After the creation process, you'll see the option to create your first collection in this database.

Click the NEW COLLECTION button to create your first collection. A collection is like a table in a traditional database. You'll see a form to create a new collection.

Fill cryptocurrencies in the Collection Name field, 9 in TTL field. History days is how long you want to keep these documents. TTL means how many days you will keep these documents after the last write. Finally, click the SAVE button. You’ll see a collection page where you have an option to create a document for that collection. A document is similar to a row in a table.

Click the NEW DOCUMENT button. You’ll be redirected to the page where you can create a new document.

You can create a new document with JavaScript syntax—just create an object or a dictionary. In this example, you create an object that describes the name, the symbol, and the price of a cryptocurrency, Bitcoin. Finally, click the SAVE button.
You'll be redirected to the collection page. Create a new document again with another cryptocurrency. Use Ethereum this time. Here is the JavaScript object:
{
  name: "Ethereum",
  symbol: "ETH",
  price: 2000
}
After doing that, the page of the collection should have two documents.

To recap, your database name is cloud-functions-api, your collection name is cryptocurrencies, and you have two documents, as shown above.
To be able to access this database in your API, you need to create an API key. Click the Security menu item on the left menu. You’ll be on the Security page.

Click the NEW KEY button. Here, you are presented with the form to create a new key. The default values should do just fine.

Click the SAVE button. You'll be presented with your key's secret. Copy it to somewhere safe. Your API needs this.

Instead of embedding the key's secret in your source code, you'll store the secret in GCP's Secret Manager. It's good practice not to store the secret in code. Go to the GCP's Secret Manager landing page. Then click the Go to console button. Here, you are presented with the Secret Manager page, where you can see the list of your secrets. If this is your first time, then you'll see none.

Click the CREATE SECRET button. You'll see the form to store your secret.

Fill faunasecret in the Name field. Fill your Fauna API's secret in the Secret value field. Finally, click the CREATE SECRET button. You'll be redirected to the secret list page.

Later, you get your secret by referring to the secret's path, which is the one that is circled with a red color circle, as shown above.
To access the secret via API, you need a way to authorize your application. The way is to use a service account key file.
Go to the Getting started with authentication page and follow the guide on the page. Create a service account with the Owner role. Then for the service account you've created, create a new key. You'll get a JSON file. The name of the downloaded file is service-key.json. You're going to need it when you want to get the secret in your cloud function.
Now is the time to set up your API in Cloud Functions. Go to the Cloud Functions landing page. Then click the Go to console button.
You'll land on the console page. Click the burger menu so you can click the Cloud Functions menu item.

On the Cloud Functions page, you can see all the cloud functions you have built. If you just started, you'll see none.

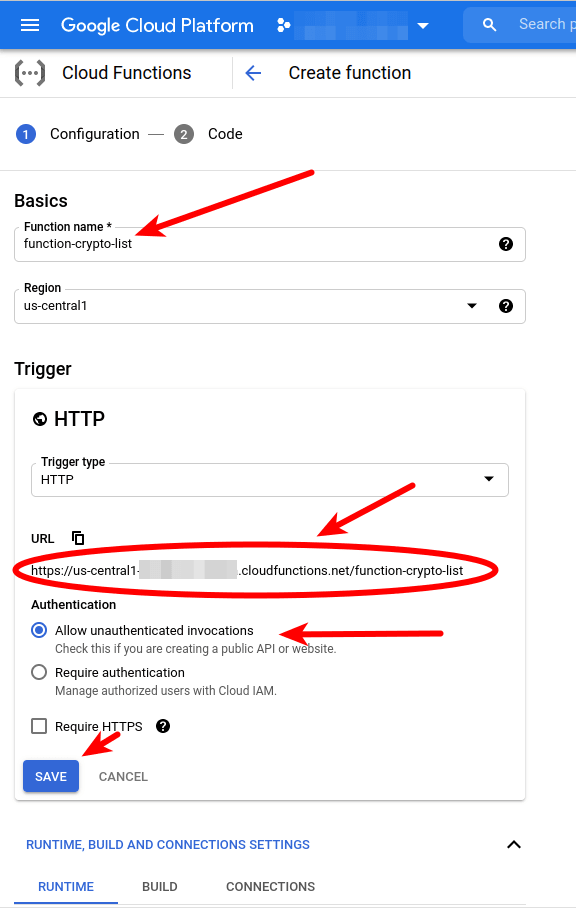
Click the CREATE FUNCTION button. You'll view the form to create a cloud function.

Fill function-crypto-list in the function name field. Copy the URL of this cloud function. You'll need it when you want to call the function. Select Allow unauthenticated invocations option. Then click the SAVE button.
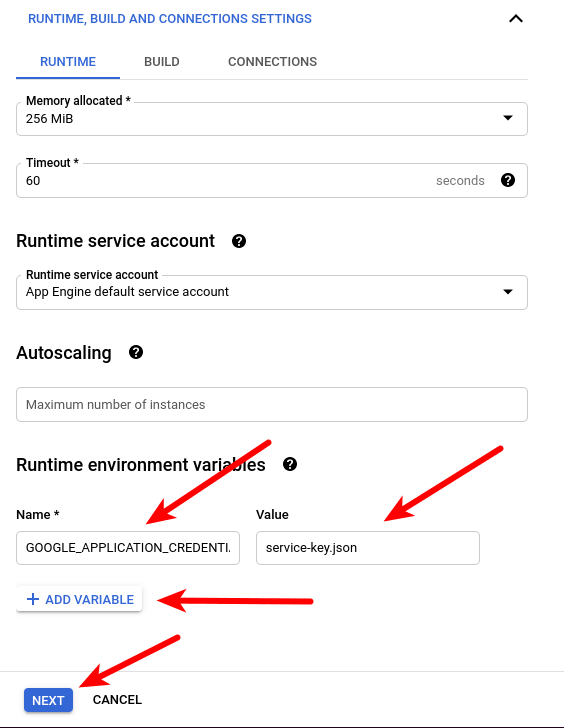
Clicking the SAVE button will collapse the Trigger section. Scroll to the bottom of the page to create an environment variable. In the Runtime environment variables section, click the ADD VARIABLE button.

Fill GOOGLE_APPLICATION_CREDENTIALS in the Name field, then fill the service-key.json in the Value field. Finally, click the NEXT button.
You'll see the form to edit the code. By default, you’ll get the Node.js runtime, and change it to Python 3.9.

In this form, you can see there are many parts other than the Runtime. You have the Entry point section. This is the entry function in the code that will be executed when you call your public URL. If your function needs third-party libraries, you’ll add third-party libraries in the requirements.txt file. If you need a new file, you'll click the + button.
Click the requirements.txt file to add two third-party libraries. Add these lines to the file:
google-cloud-secret-manager
faunadb
Your requirements.txt should look like this:

The Fauna library is needed to access your collection in the Fauna database. You need the google-cloud-secret-manager to retrieve your Fauna's API key that you stored in Google Secret Manager.
Then click the + button. You'll be presented with the small form to give a new name to the new file.

Name the new file service-key.json. You'll see empty content. Fill it with the content of the service-key.json file you downloaded previously. This is the way to authenticate your application to access your secret in GCP Secret Manager. Remember that you have set GOOGLE_APPLICATION_CREDENTIALS environment variable with service-key.json as the value. The content should look like this:

Go back to the main.py file. Fill index in the Entry point field. Then replace the content of the file with the code below:
from flask import request, jsonify
from faunadb import query as q
from faunadb.objects import Ref
from faunadb.client import FaunaClient
from google.cloud import secretmanager


def index(request):
  project_id = "<YOUR_PROJECT_ID>"
  secret_id = "faunasecret"
  secret_manager = secretmanager.SecretManagerServiceClient()
  response = secret_manager.access_secret_version(request={"name": f"projects/{project_id}/secrets/{secret_id}/versions/1"})
  payload = response.payload.data.decode("UTF-8")

  client = FaunaClient(secret=payload)
  doc = q.documents(q.collection("cryptocurrencies"))
  query = q.map_(lambda a: q.get(a), q.paginate(doc))
  result = client.query(query)
  cryptos = list(map(lambda a: a["data"], result["data"]))

  return jsonify(cryptos)
Don't forget to replace <YOUR_PROJECT_ID> with your GCP's project ID. Your screen should look like this:

You access your secret with the secret_version method of an instance of secret manager service client. You give the path of your secret to the method. The number 1 in the path refers to the first version of the secret.
After getting the secret which is your Fauna’s key secret, you create a Fauna client. Then you construct a query to get all documents from the cryptocurrencies collection. You execute this query with the query method of your Fauna client.
Then click the DEPLOY button. It takes a while before your public API goes live.
After it goes live, you can test it with curl.
$ curl --header "Content-Type: application/json" YOUR_CLOUD_FUNCTION_URLYou’ll get this output:
[{"name":"Bitcoin","price":38000,"symbol":"BTC"},{"name":"Ethereum","price":2200,"symbol":"ETH"}]You've created a cloud function to view the list of the cryptocurrencies collection. Let's create another function to create a document.
For creating a document:
- Do the same steps as before. You can give function-crypto-create as the name to the function.
- Make sure you allow the unauthenticated invocation.
- Create an environment variable just like before.
- Remember to change the entry point for the cloud function's code, add necessary third-party libraries, and create a service-key.json file.
Then replace the content of the source code with the code below:
from flask import request, jsonify
from faunadb import query as q
from faunadb.objects import Ref
from faunadb.client import FaunaClient
from google.cloud import secretmanager


def index(request):
  project_id = "<PROJECT ID>"
  secret_id = "faunasecret"
  secret_manager = secretmanager.SecretManagerServiceClient()
  response = secret_manager.access_secret_version(request={"name": f"projects/{project_id}/secrets/{secret_id}/versions/1"})
  payload = response.payload.data.decode("UTF-8")

  client = FaunaClient(secret=payload)
  crypto = request.get_json()
  create = q.create(q.collection("cryptocurrencies"), {"data": crypto})
  result = client.query(create)
  if "ref" in result:
    return "Success"
  else:
    return "Failed"
In this creating document method, you create a query to create a document with the create method of the q object. The method needs a collection and data for the document. Then you execute this query with the query method of your Fauna client.
After deploying your cloud function, you can test it:
$ curl --header "Content-Type: application/json" --request POST --data '{"name": "Uniswap", "symbol": "UNI", "price": 21}' YOUR_CLOUD_FUNCTION_URLYou'll get this output:
SuccessYou can confirm your newly created document in Fauna's dashboard.
You've created a cloud function to create a cryptocurrency document. Let's create another function to update the document.
For updating the document, do the same steps as before. You can give the function-crypto-update name to the function.
After doing the necessary steps, replace the content of the source code with the code below:
from flask import request, jsonify
from faunadb import query as q
from faunadb.objects import Ref
from faunadb.client import FaunaClient
from google.cloud import secretmanager


def index(id):
  project_id = "<YOUR_PROJECT_ID>"
  secret_id = "faunasecret"
  secret_manager = secretmanager.SecretManagerServiceClient()
  response = secret_manager.access_secret_version(request={"name": f"projects/{project_id}/secrets/{secret_id}/versions/1"})
  payload = response.payload.data.decode("UTF-8")
  client = FaunaClient(secret=payload)

  crypto = request.get_json()
  crypto_id = crypto["id"]
  data = crypto["data"]

  collection = q.documents(q.collection("cryptocurrencies"))
  page = q.map_(lambda a: q.get(a), q.paginate(collection))

  result = client.query(page)

  ref = result["data"][crypto_id]["ref"]
  got = q.update(ref, {"data": data})
  result = client.query(got)
  if "ref" in result:
    return "Success"
  else:
    return "Failed"
In the method to update the document, you need a reference. So you retrieve the list of all documents first from the collection, then you get the reference of the document you want to update. With the reference in hand, you create a query to update the document with the update method of the q object. The method needs a reference and the new data. Finally, you execute the query with the query method of your Fauna client.
After deploying your cloud function, you can test it:
$ curl --header "Content-Type: application/json" --request POST --data '{"data": {"name": "Bitcoin", "symbol": "BTC", "price": 40000}, "id": 0}' YOUR_CLOUD_FUNCTION_URLYou'll get this output:
SuccessYou can confirm your document has been updated by checking it in Fauna's dashboard.
You've created a cloud function to update the cryptocurrency document. Let's create another function to delete the document.
For deleting the document, do the same steps as before. You can give the function-crypto-delete name to the function.
After doing the necessary steps, replace the content of the code of the function with the code below:
from flask import request, jsonify
from faunadb import query as q
from faunadb.objects import Ref
from faunadb.client import FaunaClient
from google.cloud import secretmanager


def index(id):
  project_id = "<YOUR_PROJECT_ID>"
  secret_id = "faunasecret"
  secret_manager = secretmanager.SecretManagerServiceClient()
  response = secret_manager.access_secret_version(request={"name": f"projects/{project_id}/secrets/{secret_id}/versions/1"})
  payload = response.payload.data.decode("UTF-8")
  client = FaunaClient(secret=payload)

  crypto = request.get_json()
  crypto_id = crypto["id"]
  data = crypto["data"]

  collection = q.documents(q.collection("cryptocurrencies"))
  page = q.map_(lambda a: q.get(a), q.paginate(collection))

  result = client.query(page)

  ref = result["data"][crypto_id]["ref"]
  got = q.delete(ref, {"data": data})
  result = client.query(got)
  if "ref" in result:
    return "Success"
  else:
    return "Failed"
In the method to delete the document, you need a reference. So you retrieve the list of all documents first from the collection, then you get the reference of the document you want to delete. With the reference in hand, you create a query to delete the document with the delete method of the q object. The method needs a reference only. Finally, you execute the query with the query method of your Fauna client.
After deploying your cloud function, you can test it:
$ curl --header "Content-Type: application/json" --request POST --data '{"id": 2}' YOUR_CLOUD_FUNCTION_URLYou'll get this output:
SuccessYou can confirm your document has been deleted by checking it in Fauna's dashboard.
This tutorial demonstrates how quickly you can build a serverless application with the Fauna database as your data storage. However, the application is still barebone. You need to add authentication, monitoring, validation, and so on. For authentication, you can use a Google-generated ID token in the Authorization header of your request. Head to the Authenticating for Invocation page to see the complete guide on invocation authentication. GCP Cloud Functions also provide monitoring solutions. You can go to the Monitoring Cloud Functions page to read the documentation about monitoring cloud functions.
In this post, you've learned how to create a database, a collection, and some documents on Fauna. Then you stored Fauna's API key as a secret to GCP Secret Manager. Finally, you built an API on GCP Cloud Functions. In this API, you retrieved the Fauna's API key from GCP Secret Manager, then created a query to the Fauna database to list the documents on the collection, create a new document, update the document, and delete the document.
Start building with Fauna and GCP today!
44
