62
Creating an Airbnb clone
Airbnb is one of the most successful products and is widely used across the world. It fits under the marketplace category and therefore we decided to recreate it on Canonic. The goal was simple:
- Allow users to sign up/log in
- Show a list of various Airbnb's available
- Show details of the listing
- Allow users to make a reservation
- Allow users to review a listing
- Allow hosts (users who make the listing) to review the guests (users who book the listing)
- Allow users to create a wishlist
We'll show how easy, fast and flexible it is to build your production-ready backend in less than 25 minutes. What are we waiting for then! Go to app.canonic.dev and Log In. If you don't have an account, Signup! It's free to use under very generous limits! After you log in, you'll come straight to the dashboard.
Create a New Project *by clicking on the *+ Create New button on the top.

After you click, you'll be presented with the options to name your project, select which category it belongs to, etc.
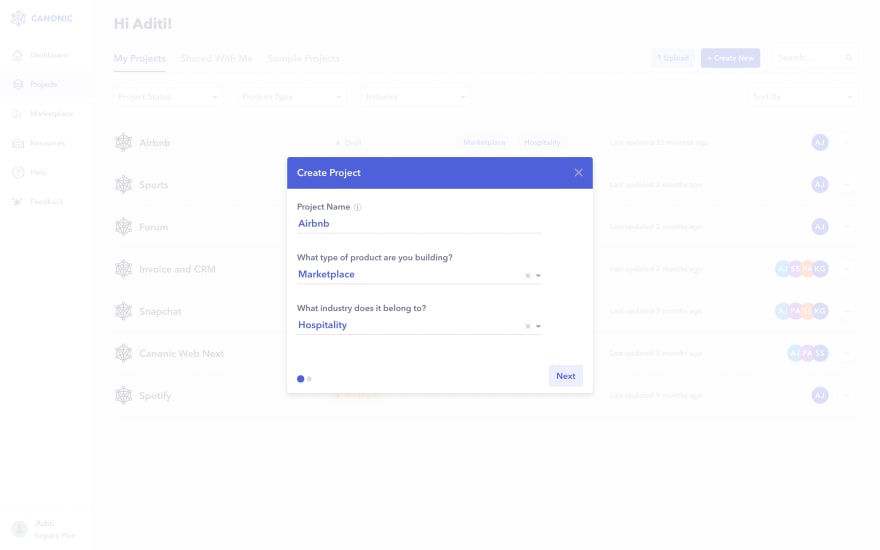
After filling in the details, click Next. It'll present you with 3 options for the Database Configurations. Since we are making a new project from the start, we'll select the first option Create, where canonic will automatically provision a database for your project!
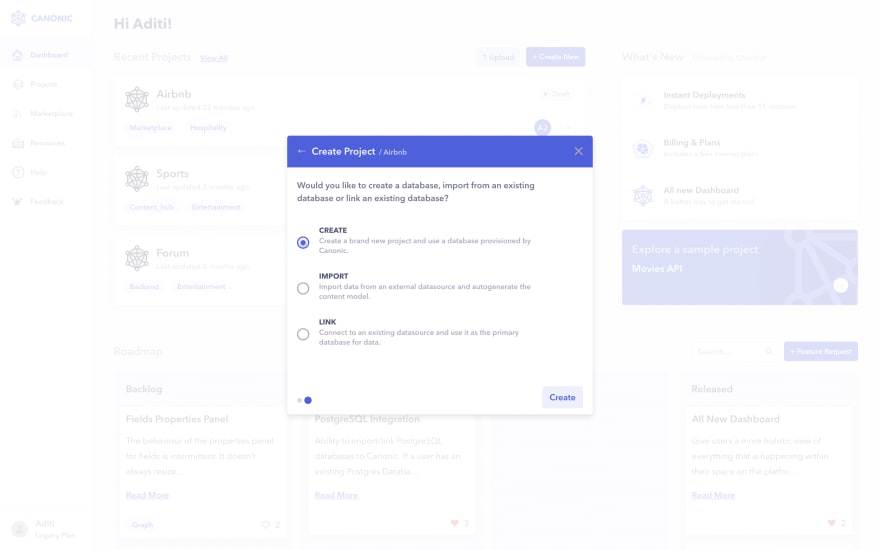
Hit Create, and your new project is created! You can find more about creating a project here.
- Defining your Model: How the data structure is gonna look like for your database, your schema!
- Feeding Data: After you define the structure/model of your database, entering data into it.
- Fetching Data: Getting the data over REST or GraphQL APIs for your frontend to consume and show!
- Defining business logic:
- Integrating with 3rd party applications:
Now as per our requirements, we have 5 main points of information that we need to make the backend for our Airbnb marketplace:
- User: Our frontend will need to fetch the information of the user who host or book
- Reservations: Our frontend will need to fetch all the bookings made via Airbnb
- Listing: Our frontend will need to fetch all the various places available on Airbnb for users to book
- Listing Review: Our frontend will need to fetch the review of the guest who made a reservation at a listing
- Guest Review: Our frontend will need to fetch the review of the user who books their listing
- Wishlist - Our frontend will need to fetch the Wishlist created by the users
In database terms, we can think of them as tables that will hold all the information related to them respectively. Let's start defining them! Once you fill in all the information, you'll see an option to create a table:
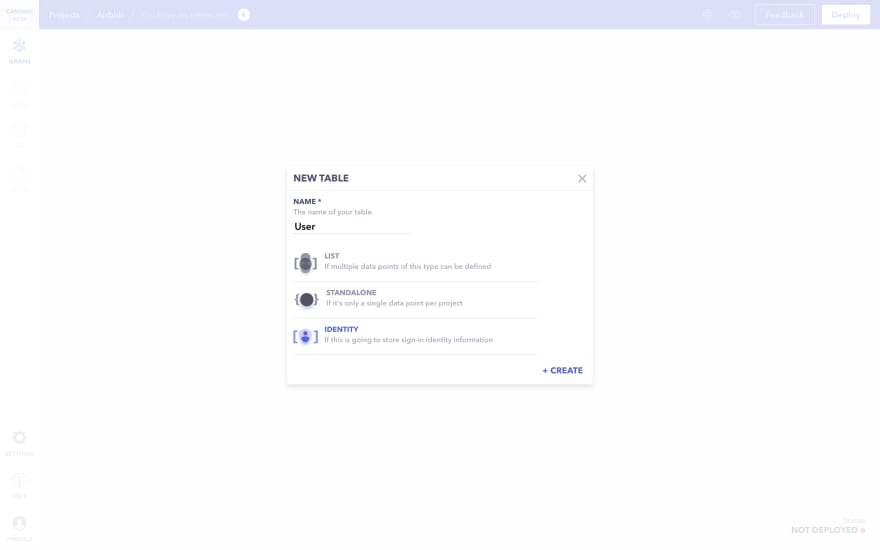
Enter the name: User. We'll choose the type of the table as Identity since we want to allow users to login via Facebook, Google, etc, and store all user information in one place. Hit Create!
Click on the + Field option to add attributes to our table. A panel will come up from below, where you can set, what type the field should be, its name, etc. Different types are available for different needs like: TEXT, NUMBER, DATE, IMAGE, etc. You can see some system-generated fields automatically for you! + Fieldset option allows you to group certain fields for better structuring of the CMS.
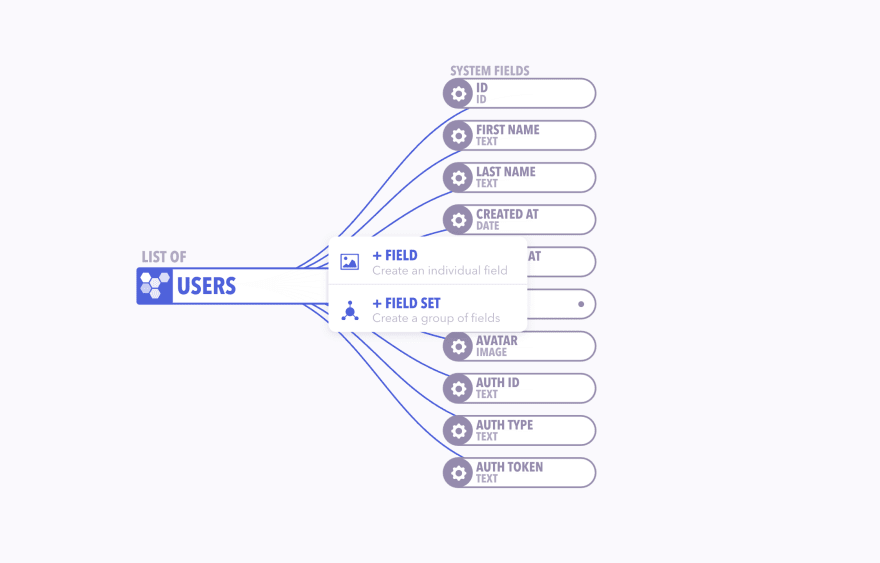
We'll define 4 additional attributes to our table, the rest are pre-created and available on Canonic as system fields: You can also set default values for your fields, setup validations if you like, etc.
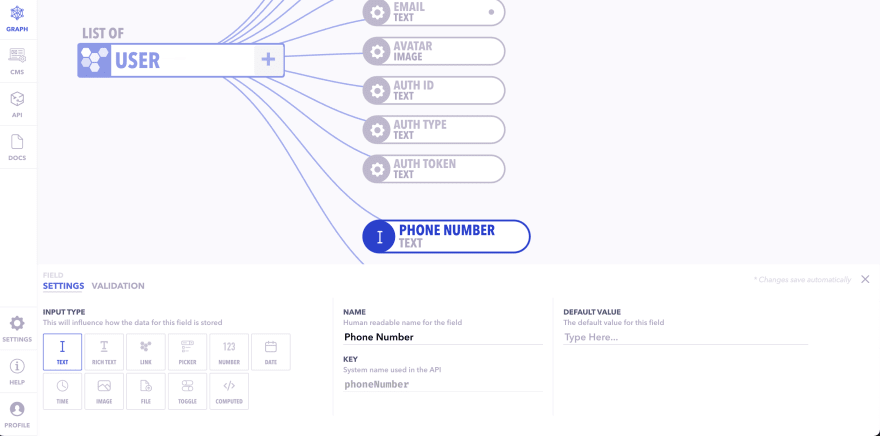
- Phone Number of the ticket - TEXT
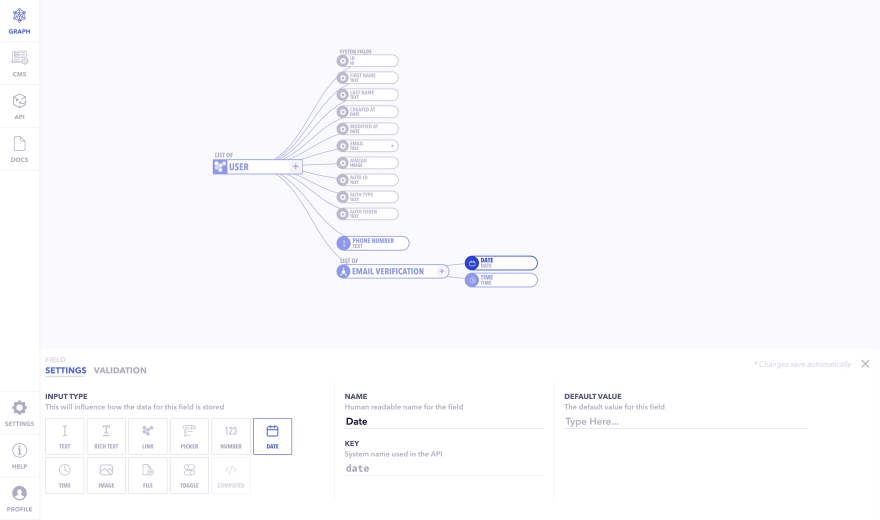
- Email Verification of the user - FIELDSET
- Date of email verification - DATE
- Time of email verification - TIME
Here is how to create a TEXT field type under the name Phone Number.
Create Email Verification as a FIELD SET and then add the Date and Time fields as DATE and TIME field types. Your graph should look like this:
Next, you can click on the + Table option and create a table called Listing and set table type as a LIST

Listed below are the attributes required apart from System Fields pre available in the Listing Table.
- Title of the Listing. - TEXT
- Hosted By - LINK (USER Table)
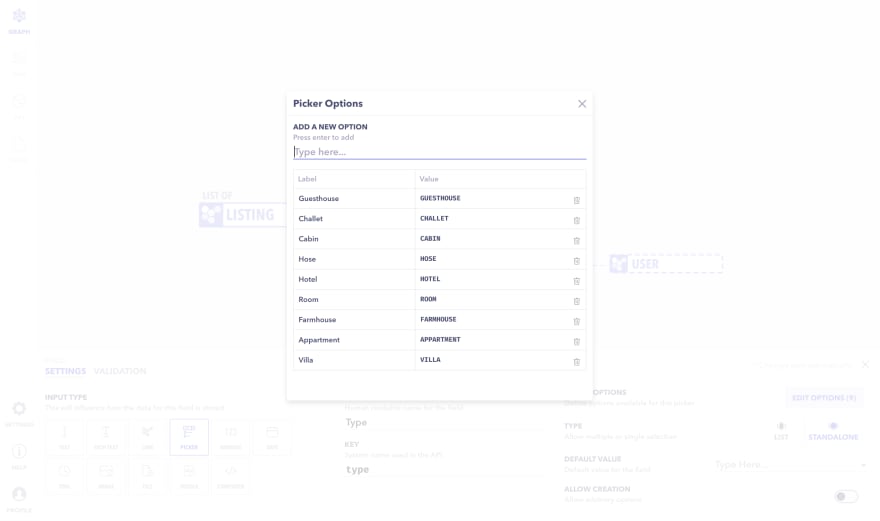
- Type of Listing - PICKER
- Total Occupancy possible at the Listing - TEXT
- No. of bedrooms available at the Listing - TEXT
- No. of beds available at the Listing - TEXT
- No. of bathroom available at the Listing - TEXT
- Summary about the Listing - TEXT
- Location of the Listing - TEXT
- Address of the Listing - TEXT
- Kitchen Availability at the Listing - TOGGLE
- Wifi Availability at the Listing - TOGGLE
- Free Parking Availability at the Listing - TOGGLE
- Air Conditioning Availability at the Listing - TOGGLE
- Price of the listing/night - TEXT
Click on the + Field option to add all the above-mentioned attributes to the Listing table. I'm sure you have an idea of how to create and choose field types by now.
Here's how to create a PICKER field type for the Type of Listing attribute.

Click the edit options button on the bottom left to add types of listing
Here's how to add a TOGGLE functionality to your table for some of the properties
- Kitchen Availability at the Listing - TOGGLE
- Wifi Availability at the Listing - TOGGLE
- Free Parking Availability at the Listing - TOGGLE
- Air Conditioning Availability at the Listing - TOGGLE

This is what the final Listing Table should look like.

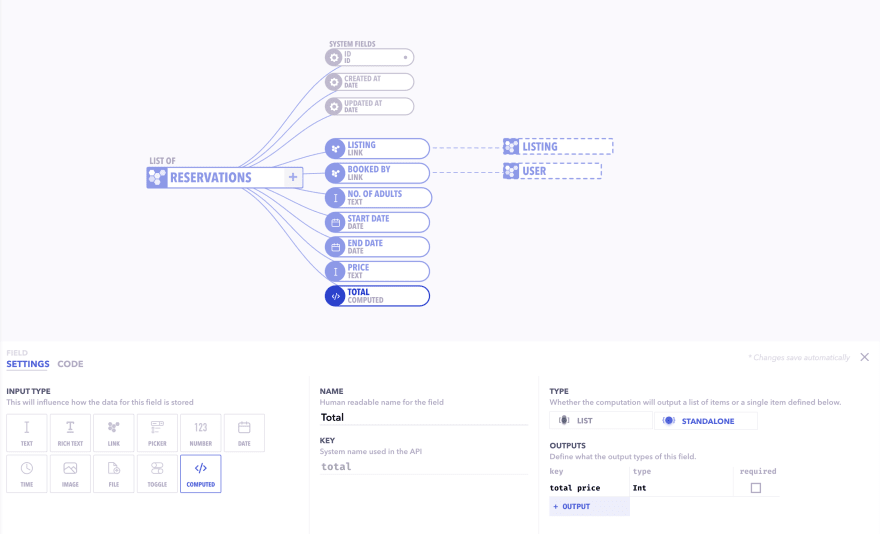
Next, you can click on the + Table option and create a table called Reservation and set table type as a LIST.
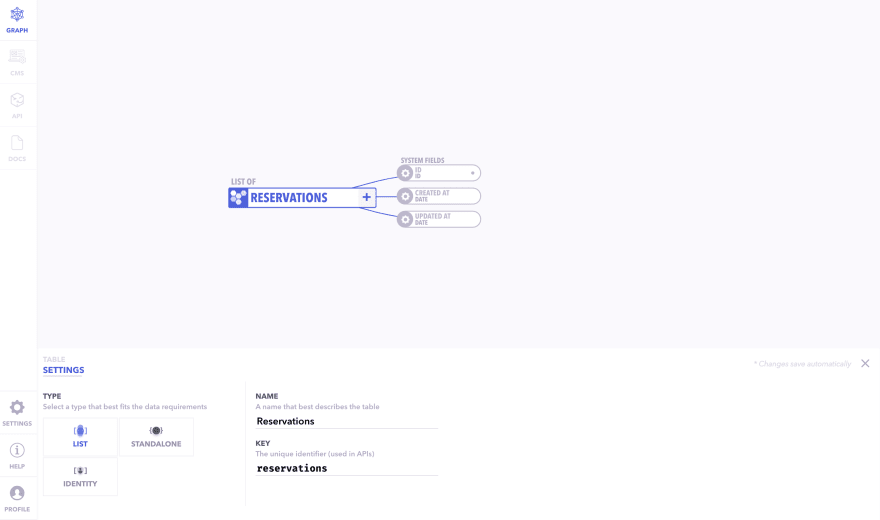
Listed below are the various field types you can define for
the Reservations Table. You can also set default values for your fields, set up validations if you like, etc.
- Listing booked by a user. - LINK (LISTING Table)
- Booked by - LINK (USER Table)
- Start Date of the Reservation - DATE
- End Date of the Reservation - DATE
- Price of the Reservation - TEXT
- Total Price of the Reservation - COMPUTED
- No. of Adults staying - TEXT
This is how your graph will look like:
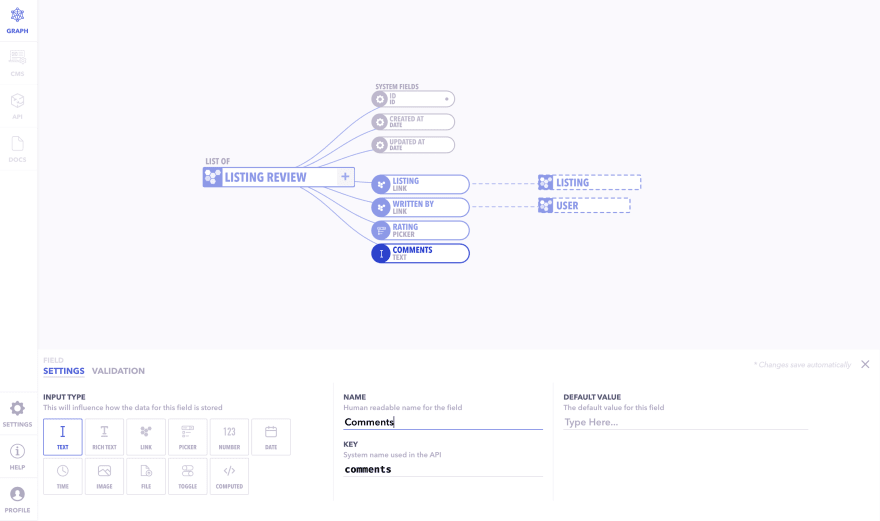
Next, you can click on the + Table option and create a table called Listing Review and set table type as a LIST

Listed below are the attributes required apart from System Fields pre available in the Listing Review Table.
- Listing for which the review is provided - LINK (LISTING Table)
- Written by - LINK (USER Table)
- Rating provided by the User - PICKER
- Comments added by the User - TEXT
This is how your graph will look like:
Next, you can click on the + Table option and create a table called Guest Review and set table type as a LIST. Listed below are the attributes required apart from System Fields pre available in the Listing Review Table.
- Written for - LINK (USER Table)
- Written by - LINK (USER Table)
- Rating provided by the Host - PICKER
- Comments added by the User - TEXT
This is how your graph will look like:

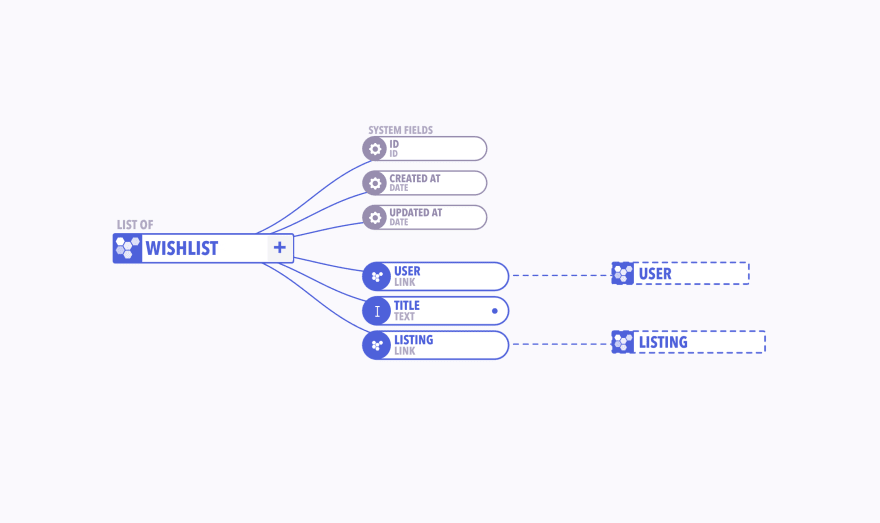
Next, you can click on the + Table option and create a table called Wishlist and set table type as a LIST. Listed below are the attributes required apart from System Fields pre available in the Wishlist Table.
- Wishlist Owner - LINK (USER Table)
- Title of the Wishlist- TEXT
- Listings inside the Wishlist - LINK (LISTING Table)
This is how your graph will look like:
Once your graph is complete just go ahead and hit Deploy
Canonic will:
- Deploy your project
- Give you a CMS (Content Management System) tailored for your project so that you can start adding data into your tables immediately!
- Spit out the CRUD (Create, Read, Update, Delete) APIs, both REST and GraphQL for all the tables you've defined to consume your data by your frontend.
- Generate documentation for your APIs for you to get started immediately!
You can find more documentation on modeling your content here.
Navigate to the CMS to start entering or managing the data!

Once you deploy your project, all the CRUD APIs are also deployed and are there to use straight-up for you. If you head to the DOCS tab, you'll be able to see all necessary information needed to fetch your data over REST and GraphQL Endpoints. You'll be able to see:
- The endpoint you need to call to fetch the data
- The request and response parameters
- Example requests and responses for all of the available APIs
Hope this guide was helpful and we are excited to see you built your Airbnb App using Canonic. If you want you can also duplicate this project from Canonic's sample app and easily get started by customising it as per your experience. Check it out app.canonic.dev.
You can also check out our other guides here.
Join us on discord to discuss or share with our community. Write to us for any support requests at support@canonic.dev. Check out our website to know more about Canonic.
62
