29
Django - Update User Profile
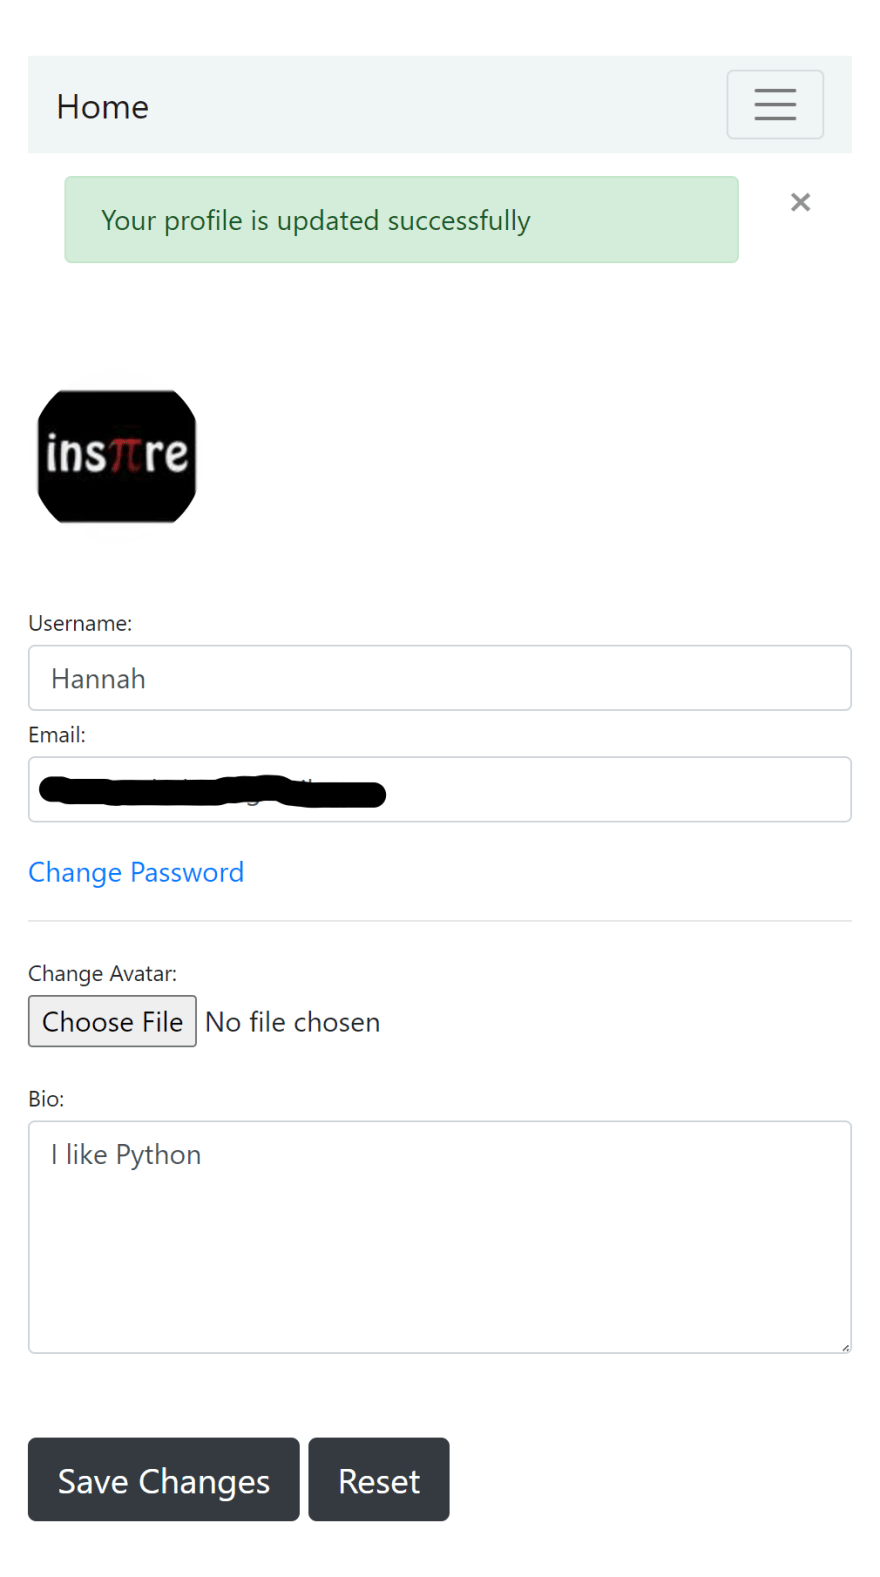
In this final part of the series, we are going to create and display a form where users can update their profile. This is what the profile page will look like by the end of this tutorial.

To create the forms, we are going to use
ModelForm. ModelForm allows us to create forms that interact with a specific model inside the database.forms.py
from django import forms

from django.contrib.auth.models import User
from .models import Profile


class UpdateUserForm(forms.ModelForm):
    username = forms.CharField(max_length=100,
                               required=True,
                               widget=forms.TextInput(attrs={'class': 'form-control'}))
    email = forms.EmailField(required=True,
                             widget=forms.TextInput(attrs={'class': 'form-control'}))

    class Meta:
        model = User
        fields = ['username', 'email']


class UpdateProfileForm(forms.ModelForm):
    avatar = forms.ImageField(widget=forms.FileInput(attrs={'class': 'form-control-file'}))
    bio = forms.CharField(widget=forms.Textarea(attrs={'class': 'form-control', 'rows': 5}))

    class Meta:
        model = Profile
        fields = ['avatar', 'bio']
UpdateUserForm interacts with the user model to let users update their username and email.UpdateProfileForm interacts with the profile model to let users update their profile.Now let's update the view to add the forms we just created.
views.py
from django.shortcuts import render, redirect
from django.contrib import messages
from django.contrib.auth.decorators import login_required

from .forms import UpdateUserForm, UpdateProfileForm


@login_required
def profile(request):
    if request.method == 'POST':
        user_form = UpdateUserForm(request.POST, instance=request.user)
        profile_form = UpdateProfileForm(request.POST, request.FILES, instance=request.user.profile)

        if user_form.is_valid() and profile_form.is_valid():
            user_form.save()
            profile_form.save()
            messages.success(request, 'Your profile is updated successfully')
            return redirect(to='users-profile')
    else:
        user_form = UpdateUserForm(instance=request.user)
        profile_form = UpdateProfileForm(instance=request.user.profile)

return render(request, 'users/profile.html', {'user_form': user_form, 'profile_form': profile_form})request.FILES so we need to pass in that too.instance=request.user while for the profile form we pass in an instance of the profile model by saying instance=request.user.profile.Finally let's update the template to display the forms
profile.html
{% extends "users/base.html" %}
{% block title %}Profile Page{% endblock title %}
{% block content %}
<div class="row my-3 p-3">
<img class="rounded-circle account-img" src="{{ user.profile.avatar.url }} " style="cursor: pointer;"/>
</div>
{% if user_form.errors %}
<div class="alert alert-danger alert-dismissible" role="alert">
<div id="form_errors">
{% for key, value in user_form.errors.items %}
<strong>{{ value }}</strong>
{% endfor %}
</div>
<button type="button" class="close" data-dismiss="alert" aria-label="Close">
<span aria-hidden="true">×</span>
</button>
</div>
{% endif %}
<div class="form-content">
<form method="post" enctype="multipart/form-data">
{% csrf_token %}
<div class="form-row">
<div class="col-md-5">
<div class="form-group">
<label class="small mb-1">Username:</label>
{{ user_form.username }}
<label class="small mb-1">Email:</label>
{{ user_form.email }}
</div>
<div class="form-group">
<a href="#">Change Password</a>
<hr>
<label class="small mb-1">Change Avatar:</label>
{{ profile_form.avatar }}
</div>
<label class="small mb-1">Bio:</label> {{ profile_form.bio }}
</div>
</div>
<br><br>
<button type="submit" class="btn btn-dark btn-lg">Save Changes</button>
<button type="reset" class="btn btn-dark btn-lg">Reset</button>
</form>
</div>
{% endblock content %}Having large images saved only to show a scaled/smaller version of it on the profile page might cause our app to run slow. We can mitigate this problem by using
pillow to resize the large image and override it with the resized/smaller image.Now, in order to save this resized image we need to override the
save() method which is a method that exists for all models and it is used to save an instance of the model. Why do we need to override this method?
It is because we need a customized saving behavior.
Open models.py and add the following inside the
Profile model.models.py
from PIL import Image

# resizing images
def save(self, *args, **kwargs):
    super().save()

    img = Image.open(self.avatar.path)

    if img.height > 100 or img.width > 100:
        new_img = (100, 100)
        img.thumbnail(new_img)
        img.save(self.avatar.path)
What the above code does is:

Usually in the profile page, users should be able to change their password. This is going to be really simple because we have discussed how users can reset their password if they forget it, and the process is going to be pretty much similar.
Django has a view called
PasswordChangeView which allows users to change their password. Let's create our own view which will extend from this and override some of the class's attributes. views.py
from django.urls import reverse_lazy
from django.contrib.auth.views import PasswordChangeView
from django.contrib.messages.views import SuccessMessageMixin


class ChangePasswordView(SuccessMessageMixin, PasswordChangeView):
    template_name = 'users/change_password.html'
    success_message = "Successfully Changed Your Password"
success_url = reverse_lazy('users-home')Now go to the project's urls.py and create the route for this view.
user_management/urls.py
from django.urls import path
from users.views import ChangePasswordView

urlpatterns = [
    path('password-change/', ChangePasswordView.as_view(), name='password_change'),
]
Finally create the template for the view.
change_password.html
{% extends "users/base.html" %}
{% block content %}
<div class="form-content my-3 p-3">
<div class="container">
<div class="row justify-content-center">
<div class="col-lg-5">
<div class="card shadow-lg border-0 rounded-lg mt-0 mb-3">
<div class="card-header justify-content-center">
<h3 class="font-weight-light my-4 text-center">Change Your Password</h3>
</div>
{% if form.errors %}
<div class="alert alert-danger alert-dismissible" role="alert">
<div id="form_errors">
{% for key, value in form.errors.items %}
<strong>{{ value }}</strong>
{% endfor %}
</div>
<button type="button" class="close" data-dismiss="alert" aria-label="Close">
<span aria-hidden="true">×</span>
</button>
</div>
{% endif %}
<div class="card-body">
<form method="POST">
{% csrf_token %}
<div class="form-row">
<div class="col-md-10 offset-md-1">
<div class="form-group">
<label class="small mb-1" for="id_old_password">Old Password</label>
<input type="password" name="old_password" autocomplete="new-password"
class="form-control" required id="id_old_password"
placeholder="Enter Old Password"/>
<span>
</span>
</div>
</div>
</div>
<div class="form-row">
<div class="col-md-10 offset-md-1">
<div class="form-group">
<label class="small mb-1" for="id_new_password1">New Password</label>
<input type="password" name="new_password1" autocomplete="new-password"
class="form-control" required id="id_new_password1"
placeholder="Enter New Password"/>
<span>
</span>
</div>
</div>
</div>
<div class="form-row">
<div class="col-md-10 offset-md-1">
<div class="form-group">
<label class="small mb-1" for="id_new_password2">New Password Confirmation</label>
<input type="password" name="new_password2" autocomplete="new-password"
required id="id_new_password2" class="form-control"
placeholder="Confirm New Password"/>
</div>
</div>
</div>
<div class="form-row">
<div class="col-md-10 offset-md-1">
<div class="form-group mt-0 mb-1">
<button type="submit" class="col-md-12 btn btn-dark" id="reset">Update Password</button>
</div>
</div>
</div>
</form>
</div>
</div>
</div>
</div>
</div>
</div>
{% endblock content %}<a href="{% url 'password_change' %}">Change Password</a>
python manage.py runserver in your terminal.That's it for the series. I'm glad I was able to write this here. I thank you all for your time and feedback!
You can find the finished app in github
29
