27
Learning Python- Intermediate course: Day 22, Bold or Italics !
Today we are going to make a simple program which displays text in bold or italics, or both. This is a standered example for learning checkboxes. The layout will be a simple one. There will be a label which displays the word 'text'. There will be two checkboxes for bold as well as italics. When the checkboxes are clicked, then the label text must become bold or italics or both depending on the checkboxes.


Just as we made a hello world label yesterday, we will make one label today. The label will have the text "text".
from tkinter import *

window=Tk()
#create a window frame called master
window.title("Checkboxes")
window.geometry("250x100")

label=Label(window,text="text")
#create a label with text 'empty' and put it in the window frame
label.pack() #pack the label into the frame
window.mainloop() #halt execution and display the widgets.
Yesterday we had used the place attribute to place the label in the position. But as the checkbox program has many widgets to be placed, we will use the pack() method. This method packs the label widget into the frame and the mainloop() displays them. More abot window.mainloop() here

We will now make a function named
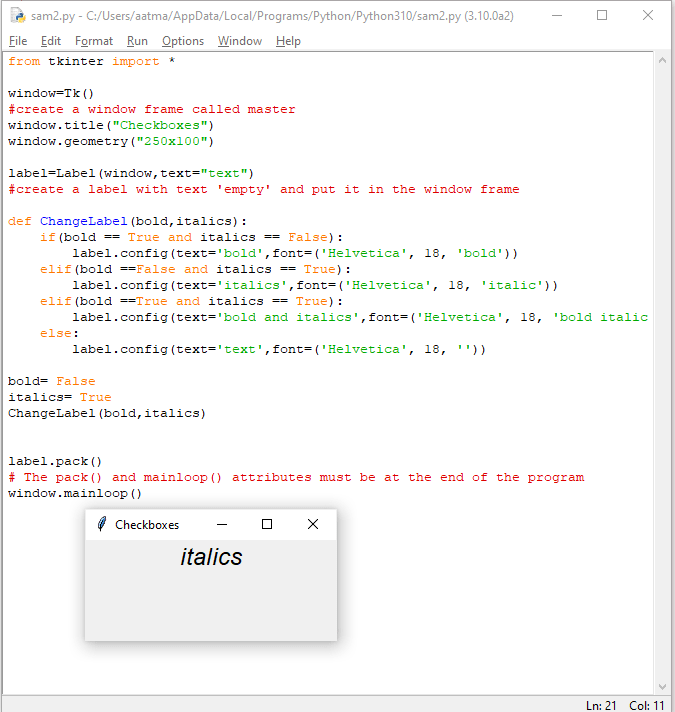
ChangeLabel to change the values of the label. For that we make two Boolean attributes, bold and italics. The function must take two Booleans as inputs and must change the value of the label. The values of the label can be changed using the
config() function. label.config(text='hello') changes the text value to hello. Similarly we can change the bold or the italics using the font attribute. font=('Helvetica', 18, 'bold')After making the function, we test it for all combinations.
from tkinter import *

window=Tk()
#create a window frame called master
window.title("Checkboxes")
window.geometry("250x100")

label=Label(window,text="text")
#create a label with text 'empty' and put it in the window frame

def ChangeLabel(bold,italics):
    if(bold == True and italics == False):
        label.config(text='bold',font=('Helvetica', 18, 'bold'))
    elif(bold ==False and italics == True):
        label.config(text='italics',font=('Helvetica', 18, 'italic'))
    elif(bold ==True and italics == True):
        label.config(text='bold and italics',font=('Helvetica', 18, 'bold italic'))
    else:
        label.config(text='text',font=('Helvetica', 18, ''))

bold= False
italics= True
ChangeLabel(bold,italics)


label.pack()
# The pack() and mainloop() attributes must be at the end of the program
window.mainloop()
Note pack() and mainloop() attributes must be at the end of the program, else the program won't function as expected.


We can make checkboxes with the following parameters.
Boldcheckbox= Checkbutton(window,text="Bold", variable=bold,onvalue=1, offvalue=0,command=ChangeLabel)window : Set the window frame instance into the checkboxtext="Bold" : Set the text of the checkboxvariable=bold : give the checkbox a variable to change. When the button is on, the value of the bold will be set 1 and when it is off, the value will be 0.onvalue=1, offvalue=0 : Set the on and off values.command=ChangeLabel : The command to be executedWe cannot parametrize any function in the command checkboxes. This means we cannot do
The only workaround for this is to use global variables bold and italics
Boldcheckbox= Checkbutton(window,text="Bold",........,command=ChangeLabel(bold,italics))The only workaround for this is to use global variables bold and italics
You cannot directly change the values of the boolean variables through the buttons.
Boldcheckbox= Checkbutton(window,text="Bold", variable=bold,onvalue=True, offvalue=False,command=ChangeLabel) fails!!But Tkinter has a special object for handling Boolean types known as
BooleanVar(). The BooleanVar() is an object which returns the Boolean value using the BooleanVar.get() method and we can set the value using the BooleanVar.set() method. The BooleanVar represents 1 for true and 0 for false.So we will now make our function use global objects bold and italics and change the if statement. The new function is as shown.
def ChangeLabel():
    if(bold.get() == 1 and italics.get() == 0):
        label.config(text='bold',font=('Helvetica', 18, 'bold'))
    elif(bold.get() ==0 and italics.get() == 1):
        label.config(text='italics',font=('Helvetica', 18, 'italic'))
    elif(bold.get() ==1 and italics.get() == 1):
        label.config(text='bold and italics',font=('Helvetica', 18, 'bold italic'))
    else:
        label.config(text='text',font=('Helvetica', 18, ''))

bold= BooleanVar()
italics= BooleanVar()
BooleanVar() and other such objects will be explained in more depth in the next session
The entire program will become-
from tkinter import *

window=Tk()
#create a window frame called master
window.title("Checkboxes")
window.geometry("250x100")

label=Label(window,text="text")
#create a label with text 'empty' and put it in the window frame

def ChangeLabel():
    if(bold.get() == 1 and italics.get() == 0):
        label.config(text='bold',font=('Helvetica', 18, 'bold'))
    elif(bold.get() ==0 and italics.get() == 1):
        label.config(text='italics',font=('Helvetica', 18, 'italic'))
    elif(bold.get() ==1 and italics.get() == 1):
        label.config(text='bold and italics',font=('Helvetica', 18, 'bold italic'))
    else:
        label.config(text='text',font=('Helvetica', 18, ''))

bold= BooleanVar()
italics= BooleanVar()
Boldcheckbox= Checkbutton(window,text="Bold", variable= bold, onvalue=1,offvalue=0,command=ChangeLabel)
Italicscheckbox= Checkbutton(window,text="Italics", variable= italics, onvalue=1,offvalue=0,command=ChangeLabel)

label.pack()
Boldcheckbox.pack()
Italicscheckbox.pack()
#pack in the order of appearance.

# The mainloop() attributes must be at the end of the program
window.mainloop()
Let us continue this journey of Python programming together! Tomorrow we will cover radio buttons, and next to next part will be about making the application colorful! So stay tuned by following me ;-)
27
