30
Building a Wallet System with Django and Wallets Africa API
Django is a Python framework for rapid web development. It takes care of much of the hassle of web development, so you can focus on writing your app without needing to reinvent the wheel. Wallets Africa helps Africans and African owned businesses send money, receive money, make card payments and access loans.
A good number of applications today use digital wallets to enable users pay for services like electricity, tickets or even transfer money. Wallets Africa API makes it easy for developers to manage users' wallets and enable users to receive and withdraw money on your application.
Let's create and activate a virtual environment for our project. A virtual environment helps to keep our project dependencies isolated.
MacOS/Linux
python -m venv env
source env/bin/activate
Windows
python -m venv env
env\scripts\activate
You should see the name of your virtual environment (env) in brackets on your terminal line.
Next, we install django and create a django project
pip install django
django-admin startproject django_wallets
and change your directory to the project folder
cd django_walletsWe'd be having two applications in this project.
An accounts app to handle user authentication and authorization, then a wallets app to handle deposits and withdrawals for each user.
Let's create our accounts and wallets applications:
python manage.py startapp accounts && python manage.py startapp walletsThis will create two folders; accounts and wallets in our project folder. Now, we need to register our apps with the project. Open the settings file in our django_wallets folder and find the INSTALLED APPS section, you should find this:
# Application definition

INSTALLED_APPS = [
    'django.contrib.admin',
    'django.contrib.auth',
    'django.contrib.contenttypes',
    'django.contrib.sessions',
    'django.contrib.messages',
    'django.contrib.staticfiles',
]
Add the newly created apps by replacing it with this:
# Application definition

INSTALLED_APPS = [
    'django.contrib.admin',
    'django.contrib.auth',
    'django.contrib.contenttypes',
    'django.contrib.sessions',
    'django.contrib.messages',
    'django.contrib.staticfiles',
    'accounts.apps.AccountsConfig',
    'wallets.apps.WalletsConfig'
]
Now let's build our accounts application. By default, Django uses usernames to unique identify users during authentication. In this project however, we'd use emails instead. To do this, we'd create a custom user model by subclassing Django's AbstractUser model. First, we create a managers.py file in the accounts folder for our CustomUser Manager:
from django.contrib.auth.base_user import BaseUserManager
from django.utils.translation import gettext_lazy as _

class CustomUserManager(BaseUserManager):
    def create_user(self, email, password, **extra_fields):
        if not email:
            raise ValueError(_("email address cannot be left empty!"))
        email = self.normalize_email(email)
        user = self.model(email=email, **extra_fields)
        user.set_password(password)
        user.save()
        return user

    def create_superuser(self, email, password, **extra_fields):
        extra_fields.setdefault("is_staff", True)
        extra_fields.setdefault("is_superuser", True)
        extra_fields.setdefault("is_active", True)
        extra_fields.setdefault("user_type", 'ADMIN')

        if extra_fields.get("is_staff") is not True:
            raise ValueError(_("superuser must set is_staff to True"))
        if extra_fields.get("is_superuser") is not True:
            raise ValueError(_("superuser must set is_superuser to True"))

        return self.create_user(email, password, **extra_fields)
A Manager is the interface through which database query operations are provided to Django models. By default, Django adds a Manager with the name objects to every Django model class. We would be overriding this custom User Manager with this CustomUserManager which uses email as the primary identifier instead.
Next, We'd create our custom user model:
from django.contrib.auth.models import AbstractUser
from django.db import models
from django.utils.translation import gettext_lazy as _

from .manager import CustomUserManager

import uuid


class CustomUser(AbstractUser):

    username = None
    uid = models.UUIDField(primary_key=True, default=uuid.uuid4, editable=False)
    email = models.EmailField(_("email address"), blank=False, unique=True)
    first_name = models.CharField(_("first name"), max_length=150, blank=False)
    last_name = models.CharField(_("last name"), max_length=150, blank=False)
    date_of_birth = models.DateField(_("date of birth"), max_length=150, blank=False)
    verified = models.BooleanField(_("verified"), default=False)


    USERNAME_FIELD = "email"
    REQUIRED_FIELDS = []

    objects = CustomUserManager()

    def __str__(self):
        return self.email
Here, we removed the username field and made email field unique and, then set the email as the USERNAME_FIELD, which defines the unique identifier for the User model. We also used a UUID_FIELD as our unique identifier and used the Python's uuid library to generate random objects as default values.
Then, we add this to our settings.py file so Django recognize the new User model:
AUTH_USER_MODEL = "accounts.CustomUser"Now, let's migrate our database (We'd be using the default sqlite database for the purpose of this tutorial)
python manage.py makemigrations && python manage.py migrateNow let's run our application
python manage.py runserverOpen http://127.0.0.1:8000/ on your browser and the response should be similar as the image below:

Now let's create our registration and login forms. Create a forms.py file in the accounts folder and copy this:
from django import forms
from django.forms.widgets import PasswordInput, TextInput, EmailInput, FileInput, NumberInput
from .models import CustomUser


from .models import CustomUser


class UserRegistrationForm(forms.ModelForm):
    password1 = forms.CharField(widget=PasswordInput(attrs={'class':'form-control', 'placeholder':'Password', 'required':'required'}))
    password2 = forms.CharField(widget=PasswordInput(attrs={'class':'form-control', 'placeholder':'Confirm Password', 'required':'required'}))

    class Meta:
        model = CustomUser
        fields = ('first_name','last_name','email','date_of_birth')
        widgets = {
        'first_name':TextInput(attrs={'class':'form-control', 'placeholder':'First Name', 'required':'required'}),
        'last_name':TextInput(attrs={'class':'form-control', 'placeholder':'Last Name', 'required':'required'}),
        'email': EmailInput(attrs={'class':'form-control', 'placeholder':'Email', 'required':'required'}),
        'date_of_birth': DateInput(attrs={'class':'form-control', 'placeholder':'Date of Birth', 'required':'required','type': 'date'}),
    }

    def clean_password2(self):
        password1 = self.cleaned_data.get("password1")
        password2 = self.cleaned_data.get("password2")
        if password1 and password2 and password1 != password2:
            raise forms.ValidationError("Passwords don't match")
        return password2

    def save(self, commit=True):
        user = super().save(commit=False)
        user.set_password(self.cleaned_data["password1"])
        if commit:
            user.save()
        return user

class CustomAuthForm(forms.Form):
    email = forms.CharField(widget=EmailInput(attrs={'class':'form-control', 'placeholder':'Email', 'required':'required'}))
    password = forms.CharField(widget=PasswordInput(attrs={'class':'form-control','placeholder':'Password', 'required':'required'}))
You should notice the custom CSS classes added to form fields. We'd be using Bootstrap to style the forms. Bootstrap is a CSS framework directed at responsive, mobile-first front-end web development. Next, we create our registration view:
from django.shortcuts import render

from .forms import UserCreationForm


def register(request):
    form = UserRegistrationForm(request.POST or None)
    if request.method == 'POST':
        if form.is_valid():
            new_user = form.save()
            return redirect('accounts:register')
    return render(request, "accounts/register.html", context = {"form":form})
We have created a templates folder in our project directory. You can copy the html templates from Github here. Go to the settings.py and update the TEMPLATES section:
TEMPLATES = [
    {
        'BACKEND': 'django.template.backends.django.DjangoTemplates',
        'DIRS': [BASE_DIR / 'templates'],
        'APP_DIRS': True,
        'OPTIONS': {
            'context_processors': [
                'django.template.context_processors.debug',
                'django.template.context_processors.request',
                'django.contrib.auth.context_processors.auth',
                'django.contrib.messages.context_processors.messages',
            ],
        },
    },
]
This tells Django to load the templates from the templates folder in the project directory. Add the registration url to the app:
from django.urls import path

from .views import register
app_name = "accounts"

urlpatterns = [
    path('register/', register, name="register"),
]
Then we include the accounts app urls to the project:
from django.contrib import admin
from django.urls import path, include

urlpatterns = [
    path('admin/', admin.site.urls),
    path('account/', include('accounts.urls', namespace='accounts'))
]
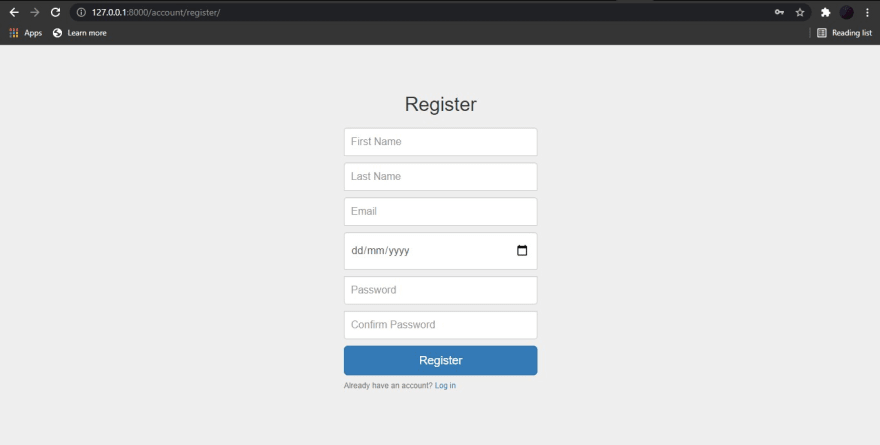
Open 127.0.0.1:8000/account/register/ on your browser, this should show up:

Users can now register. Now let's create our login view:
def login_user(request):
    form = CustomAuthForm(request.POST or None)
    if request.method == 'POST':
        if form.is_valid():
            cd = form.cleaned_data
            user = authenticate(request, email = cd['email'], password=cd['password'])
            if user is not None:
                login(request, user)
                return redirect('accounts:dashboard')
            else:
                messages.error(request, 'Account does not exist')
    return render(request, "accounts/login.html", context = {"form":form})

@login_required
def dashboard(request):
    return render(request, "dashboard.html", context={})
Then, we add the urls:
urlpatterns = [
    path('register/', register, name="register"),
    path('login/', login_user, name="login"),
    path('', dashboard, name="dashboard"),
]
Now, our login and registration routes should be working. After successful login, the user should be redirected to the dashboard. You might have noticed the verified field on the CustomUser model is set to False by default. After the user have provided their bvn and a wallet has been created, the verified field is changed to True. But before then, let's update our register route to redirect to login after successful registration:
def register(request):
    form = UserRegistrationForm(request.POST or None)
    if request.method == 'POST':
        if form.is_valid():
            new_user = form.save()
            messages.success(request, 'Account succesfully created. You can now login')
            return redirect('accounts:login')
    return render(request, "accounts/register.html", context = {"form":form})
Let's create our Wallet model:
from django.db import models, transaction
from django.utils.translation import gettext_lazy as _
from accounts.models import CustomUser

import uuid

class Wallet(models.Model):
    uid = models.UUIDField(primary_key=True, default=uuid.uuid4, editable=False)
    user = models.OneToOneField(CustomUser, on_delete=models.SET_NULL, null=True)
    balance = models.DecimalField(_("balance"), max_digits=100, decimal_places=2)
    account_name = models.CharField(_("account name"), max_length=250)
    account_number = models.CharField(_("account number"), max_length=100)
    bank = models.CharField(_("bank"), max_length=100)
    phone_number = models.CharField(_("phone number"), max_length=15)
    password = models.CharField(_("password"), max_length=200)
    created = models.DateTimeField(auto_now_add=True)
Then, run migrations for the application. The user field's on_delete is set to null because we don't want to delete a wallet even after a user's account has been deleted. A user can only have a wallet after he has been verified. Now let's create our wallet_creation form and view.
Form:
class BVNForm(forms.Form):
bvn = forms.CharField(widget=NumberInput(attrs={'class':'form-control', 'placeholder':'Your BVN', 'required':'required'}))View:
from wallets.api import WalletsClient
from wallets.models import Wallet

from cryptography.fernet import Fernet


wallet = WalletsClient(secret_key="hfucj5jatq8h", public_key="uvjqzm5xl6bw")
fernet = Fernet(settings.ENCRYPTION_KEY)


@login_required
def create_wallet(request):
    form = BVNForm(request.POST or None)
    if request.method == 'POST':
        if form.is_valid():
            cd = form.cleaned_data
            user = request.user
            bvn = cd["bvn"]
            new_wallet = wallet.create_user_wallet(
                    first_name= user.first_name,
                    last_name= user.last_name,
                    email=user.email,
                    date_of_birth= user.date_of_birth.strftime('%Y-%m-%d'),
                    bvn= str(bvn)
                )
            if new_wallet["response"]["responseCode"] == '200':
                user.verified = True
                user.save()
                Wallet.objects.create(
                    user = user,
                    balance = new_wallet["data"]["availableBalance"],
                    account_name = new_wallet["data"]["accountName"],
                    account_number = new_wallet["data"]["accountNumber"],
                    bank = new_wallet["data"]["bank"],
                    phone_number = new_wallet["data"]["phoneNumber"],
                    password = fernet.encrypt(new_wallet["data"]["password"].encode())
                )
                messages.success(request, "Account verified, wallet successfully created")
                return redirect("accounts:dashboard")
            else:
                messages.error(request, new_wallet["response"]["message"])

    return render(request, "accounts/bvn.html", context = {"form":form})
I have written a simple API wrapper for Wallets Africa API, you can check it out on Github. For the purpose of this tutorial, we used a test keys and token provided by Wallets Africa, you need to create a Wallets Africa account for your secret and public keys for production:

from cryptography.fernet import Fernet

key = Fernet.generate_key()
ENCRYPTION_KEY = key
Now, let's add a permission that prevents unverified users from accessing the dashboard. Create a decorators.py file in the accounts folder:
from functools import wraps
from django.shortcuts import redirect
from django.contrib import messages

def verified(function):
  @wraps(function)
  def wrap(request, *args, **kwargs):

        if request.user.verified:
             return function(request, *args, **kwargs)
        else:
            messages.error(request, "Your account hasn't been verified")
            return redirect("accounts:verify")

  return wrap
This is a custom decorator that redirects a user to the verification page if the account hasn't been verified. We can now add our custom decorator to the dashboard view:
from .decorators import verified

@login_required
@verified
def dashboard(request):
    wallet = get_object_or_404(Wallet, user=request.user)
    return render(request, "dashboard.html", context={"wallet":wallet})
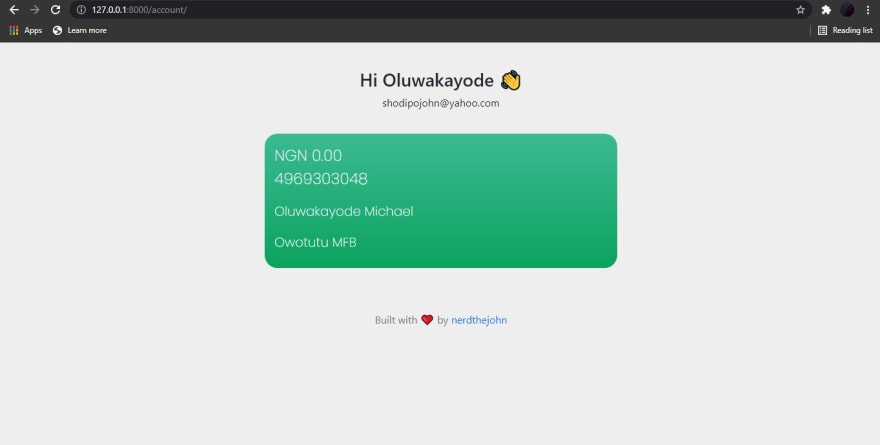
I also added the user's wallet to be rendered on the dashboard. Visit 127.0.0.1:8000/account on your browser, it should redirect you to the verification page if you're unverified or to the dashboard if you are vefiried. The dashboard page should be similar to this:

Let's add our logout view:
@login_required
def logout_user(request):
    logout(request)
    return redirect("accounts:login")
Then, add the logout url:
urlpatterns = [
    ...
    path('logout/', logout_user, name="logout"),

]
Now, users can fund their wallets by making a bank transfer to the account linked to their wallets. We need to update their wallet balance as soon as the transfer is successful. This can be done through webhooks. A webhook is a URL on your server where payloads are sent from a third party service (Wallets Africa in this case) whenever certain transaction actions occur on each wallets. First, we create a WalletTransaction model to save each transactions:
class WalletTransaction(models.Model):
    class STATUS(models.TextChoices):
        PENDING = 'pending', _('Pending')
        SUCCESS = 'success', _('Success')
        FAIL = 'fail', _('Fail')

    class TransactionType(models.TextChoices):
        BANK_TRANSFER_FUNDING = 'funding', _('Bank Transfer Funding')
        BANK_TRANSFER_PAYOUT = 'payout', _('Bank Transfer Payout')
        DEBIT_USER_WALLET = 'debit user wallet', _('Debit User Wallet')
        CREDIT_USER_WALLET = 'credit user wallet', _('Credit User Wallet')

    transaction_id = models.CharField(_("transaction id"), max_length=250)
    status = models.CharField(max_length=200, null=True,
        choices=STATUS.choices,
        default=STATUS.PENDING
    )
    transaction_type = models.CharField(max_length=200, null=True,
        choices=TransactionType.choices
        )
    wallet = models.ForeignKey(Wallet, on_delete=models.SET_NULL,
        null=True
    )
    amount = models.DecimalField(_("amount"), max_digits=100, decimal_places=2)
    date = models.CharField(_("date"), max_length=200)
We are saving the date in string data because of the uncertain data type in the payload.
Next, we create the view that will consume the webhook:
from django.db import transaction
from django.http import HttpResponse, HttpResponseForbidden
from django.shortcuts import render, get_object_or_404
from django.views.decorators.csrf import csrf_exempt
from django.views.decorators.http import require_POST

from ipaddress import ip_address, ip_network
import json

from .models import Wallet, WalletTransaction


@csrf_exempt
@require_POST
def webhook(request):
    whitelist_ip = "18.158.59.198"
    forwarded_for = u'{}'.format(request.META.get('HTTP_X_FORWARDED_FOR'))
    client_ip_address = ip_address(forwarded_for)

    if client_ip_address != ip_network(whitelist_ip):
        return HttpResponseForbidden('Permission denied.')

    payload = json.loads(request.body)

    if payload['EventType'] == "BankTransferFunding":
        wallet = get_object_or_404(Wallet, phone_number = payload["phoneNumber"])
        wallet.balance += payload["amount"]
        wallet.save()
        transaction =  WalletTransaction.objects.create(
            transaction_id = payload["transactionRef"],
            transaction_type = "funding",
            wallet = wallet,
            status = "success",
            amount = payload["amount"],
            date = payload["DateCredited"]
        )
    else:
        pass
    return HttpResponse(status=200)
This view checks if the webhook is from a trusted IP address (All Wallets Africa webhook comes from the host IP: 18.158.59.198) then updates the wallet balance and also create a wallet transaction. Let's add the webhook to our app urls:
from django.urls import path

from .views import webhook

urlpatterns = [
    path(
        "webhooks/wallets_africa/aDshFhJjmIalgxCmXSj/",
         webhook,
         name = "webhook"
    ),
]
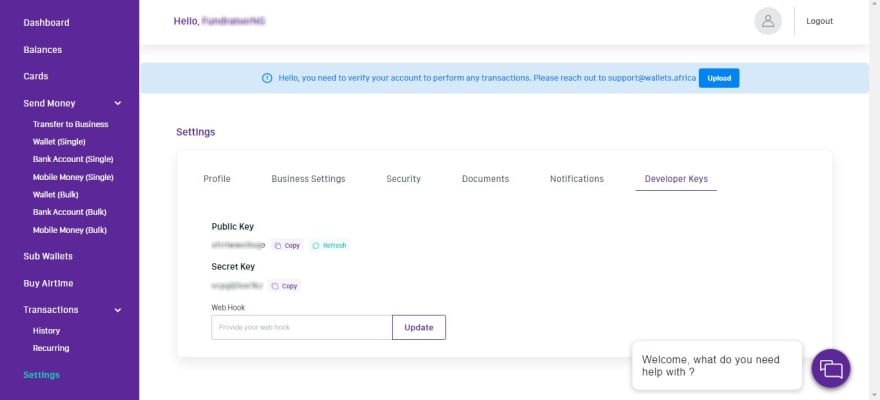
We added a random string to the url for a bit of security , add the webhook url to your Wallets Africa dashboard:

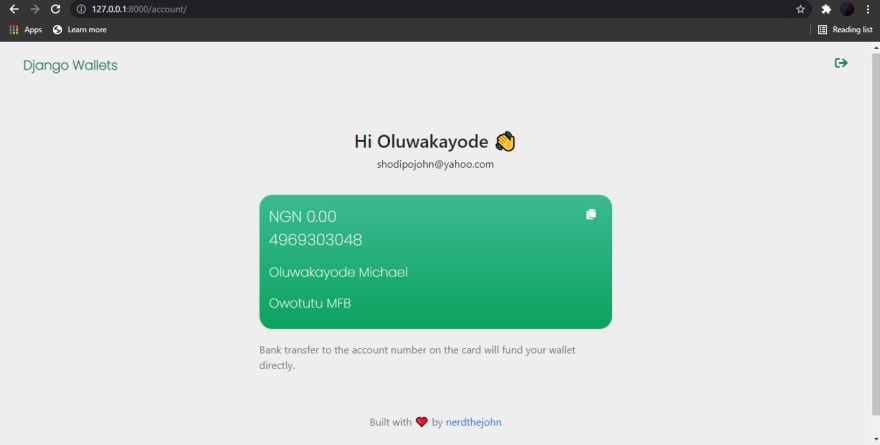
Our wallets app is now ready:

By integrating Wallets Africa with Django, we built a wallet application that allows user to fund their digital wallets by making a bank transfer. We also went through Django's Custom User Manager features that allows us use emails rather than usernames for authentication.
30
