27
Built-In Angular Pipes - Part 1
Today we will be learning on a very important concept provided by Angular - Pipes
The main use of Pipe is to transform the appearance of the data before showing to the user.
The analogy which comes to my mind when ever I talk about Pipe is the water filter. A water filter takes water as input and as an output it provides us clean water, so it basically does some transformation to the water inside it.
Similarly the Angular Pipes also takes the data as input and does some transformation and sends out the transformed data.
At this point you might be thinking but why do need to transform?
The main reason is to improve the readability.
Angular already provided thirteen (13) built in pipes. Lets see each of them one by one -
- AsyncPipe - (Will discuss when I will be covering Observables)
- CurrencyPipe
- DatePipe
- DecimalPipe
- I18nPluralPipe
- I18nSelectPipe
- JsonPipe
- KeyValuePipe
- LowerCasePipe
- PercentPipe
- SlicePipe
- TitleCasePipe
- UpperCasePipe
So first lets create a separate component and name it pipe-demo
If you are not aware of how to create a component I would highly suggest to quickly go through this_post
CurrencyPipe
It is used to format the currency value as per the given country code/ currency/ decimal/ locale information.
use-case
Suppose you have an e-commerce application where you store only the price of the products, but before showing to the user you need to add the currency value (either at the beginning or at the end).
In this scenario currency pipe is the best choice.
The Syntax
{{ value_expression | currency [ : currencyCode [ : display [ : digitsInfo

[ : locale ] ] ] ] }}
Lets understand the syntax before diving into the example -
value_expression - The input value that needs to be formatted
| - The pipe operator
currency - The name of the pipe
currencyCode - ISO 4217 currency code (its a standard)
It is Optional.
It is of String type.
Default value is USD.
display - This determines the way to display the currency.
It can be of type symbol (the currency symbol eg $)
or code or symbol-narrow or our own custom string.
It is Optional.
Default value is Symbol.
digitsInfo - It is the digital representation of currency
value. Keeps track of how many digits to be displayed before and after decimal point if any.
It is of String type.
It is Optional.
Default value is undefined.
locale - It It represents the locale format rules.
Default value is the project locale if set else its undefined. It is also optional .
Now lets dive into the practical part of it.
Lets create a variable in the component.ts file and name it expense, and initialize it with the value 786.4589
import { Component, OnInit } from '@angular/core';

@Component({
  selector: 'app-pipe-demo',
  templateUrl: './pipe-demo.component.html',
  styleUrls: ['./pipe-demo.component.css']
})
export class PipeDemoComponent implements OnInit {

  expense = 786.4589;

  constructor() { }

  ngOnInit(): void {
  }

}
Now, lets jump into the component template file and paste in the very simple code to start with -
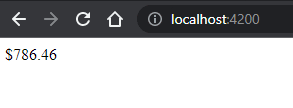
{{ expense | currency }}Now if you start the application and navigate to localhost:4200 in your browser then you must see the following output -

Now say if you want to change it to your currency unit, say I am putting as INR (that's Indian Rupee), then the code will become like
{{ expense | currency: "INR" }}Then the corresponding output will become like -
So here we are passing a valid currency code (here its INR) then the corresponding symbol will be displayed (here ₹)
If you are not passing a valid currency code then instead of the symbol the currency code will only be displayed.
NOTE
If you want to display any specific value as the default currency symbol then you have to pass it as the display parameter.
The display parameter can be code, symbol or symbol-narrow or any other custom value too.
Now lets paste the below code in the component template file -
<hr />
<h3>{{ expense | currency: "INR":"code" }}</h3>
<h3>{{ expense | currency: "CAD":"symbol" }}</h3>
<h3>{{ expense | currency: "CAD":"symbol-narrow" }}</h3>
<h3>{{ expense | currency: "INR":"symbol-narrow" }}</h3>
<h3>{{ expense | currency: "INR":"Indian Rupee" }}</h3>
You will see the output as -

{{ expense | currency: "CAD":"symbol" }}
Here we are passing the currency code as CAD that is Canadian Dollar and asking to print the Symbol of it. So the output is
CA$
expense | currency: "CAD":"symbol-narrow"
There are countries like Canada have 2 currency codes like symbol CA$ and symbol-narrow $.
expense | currency: "INR":"symbol-narrow"
Indian rupee does not have symbol-narrow so the default rupee symbol is displayed.
expense | currency: "INR":"Indian Rupee"
If you want to display a custom value then that is also possible. You can pass as a parameter
We can also customize the decimal points of the currency value. For that we need to pass the digitsInfo parameter.
Lets paste in the below code -
<hr />
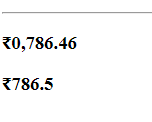
<h3>{{ expense | currency: "INR":"symbol":"4.2-2" }}</h3>
<h3>{{ expense | currency: "INR":"symbol":"3.1-1" }}</h3>{{ expense | currency: "INR":"symbol":"4.2-2" }}
Here 4 signifies the number of digits before the decimal point.
Since we have just 3 digits before the decimal in the example that is why a 0 is also appended at the beginning.
2-2 means that after the decimal point minimum 2 characters should be there and maximum allowed is also 2.
The minimum should not be greater than the maximum
<h3>{{ expense | currency: "INR":"symbol":"4.2-1" }}</h3>
else you will get the below error -
If decimal points are not needed then we need to pass digitInfo parameter fractions as 0.
I will walk you through the locale part once I cover the internationalization and localization part.
Hope you enjoyed the post.
If yes please do like, share and comment.
Stay tuned for the remaining Pipes available in Angular.
Cheers!!!
Happy Coding
27


