
36
Your first tailwindcss setup with webpack
While ago in my first internship i was integrated into a project in which i have to use tailwindcss, i used ended loving it, all i did was just write bunch of class to make sure everything looked nice, the one thing i didn't do is to setup tailwindcss and the dependencies it need to work properly, and that's what i'm going to explain in this article.
the easiest and the quickest way to get going with tailwindcss is to use a CDN.
<link href="https://unpkg.com/tailwindcss@^2/dist/tailwind.min.css" rel="stylesheet">However by using a CDN you will be missing on tailwindcss great features,you wont be able to customize it, you won't be able to use directives such as @apply and @variantes etc, you won't be able to use plugins and more...
in order to leverage all these great features you have to incorporate tailwind into you build process.
In order to use npm you gotta have node and npm installed in your machine.
First thing we need is to create a package.json file to do that open terminal and type npm init -y this command will create a package.json file for you then in your terminal again type these commands to install the packages needed for tailwindcss to work
$ npm install webpack webpack-cli postcss postcss-loader css-loader tailwindcss mini-css-extract-pluginif you took a look at project file you will notice a bunch of files added and a folder with node_modules name on it, in that folder there is all the code for the packages you installed including tailwind
to set everythings up we need to create a file with the webpack.config.js and in that file we write the following :
first we gonna require path we write const path=require('path')
path is node module provides utilities for working with file and directory paths
second we gonna require mini-css-extract-plugin which is a plugin we installed earlier this plugin helps us to output a standalone css file,
so for our webpach.config.js will look like this
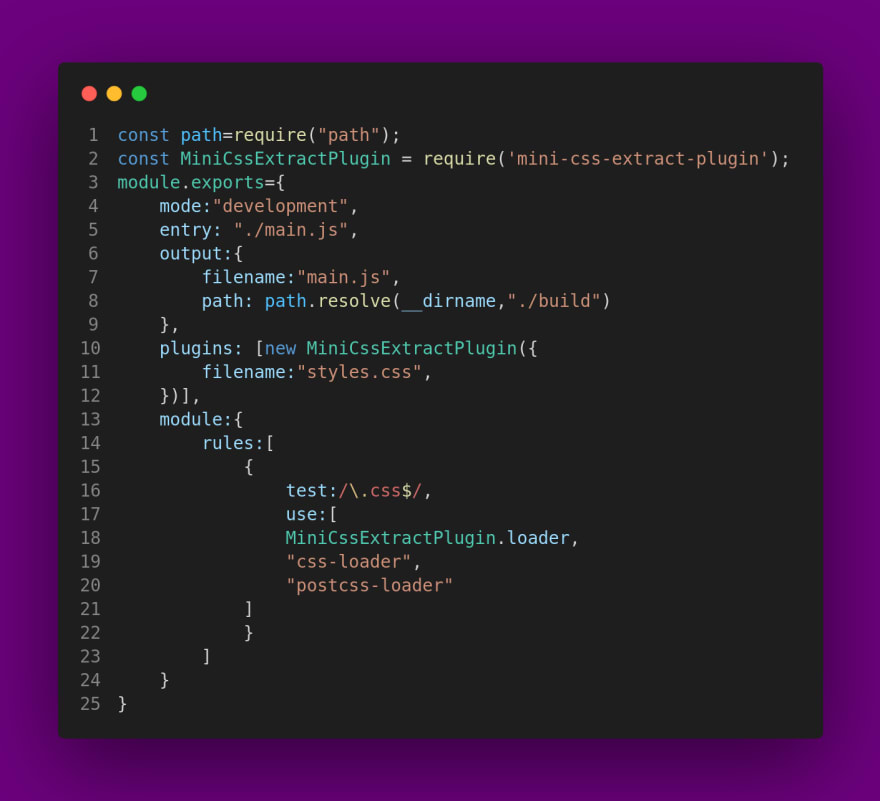
const path=require("path");
const MiniCssExtractPlugin = require('mini-css-extract-plugin');
after that write the following
module.exports={set the mode to developpement
mode:"development",then you need to create an entry point file with the .js extension the entry point is where webpack looks to start building the output files, i will call my entry point main.js and i will set it in the root directory
let's add the entry point in our webpack config file
entry: "./main.js",now create a css file i will name main styles.css and put these tailwind directives in it
@tailwind base;
@tailwind components;
@tailwind utilities;
now go to main.js file and import your css file import "styles.css"
on to our webpack config again
and add the following
output:{
        filename:"main.js",
        path: path.resolve(__dirname,"./build")
    },
    plugins: [new MiniCssExtractPlugin({
        filename:"styles.css",
    })],
the output object will generate javascripts and css files for us it will translate tailwindcss into regulare css for you and javascript files, also it will bundle all the files for into one single file you will be able to link to in your html
the plugins options will use mini-css-extract-plugin to help us output a css file
last thing we need to set is rules for our css for that you need to write the following
module:{
        rules:[
            {
                test:/\.css$/,
                use:[
                MiniCssExtractPlugin.loader,
                "css-loader",
                "postcss-loader"
            ]
            }
        ]
    }
what will this do tell webpack how to process files with .css extension it specifies with loader to be used since tailwind is postcss blugin it will start by poscss then translating it to css then it will use MiniCssExtractPlugin.loader to put the css in an external css file.
this is how your webpack.config.js will look
Ok this is all you need for your webpack config now lets build and see what happens, to do go to package.json and add the build script, under the script object in package.json add the following
"scripts": {
    "build": "webpack --config webpack.config.js"
  },
your package.config.json file will look somthing like this

now open terminal and run npm run build
now this bundle all files and generate a build folder in witch you'll find two files a javascript one and css one those are the files we told webpack to generate here
output:{
        filename:"main.js",
        path: path.resolve(__dirname,"./build")
    },
    plugins: [new MiniCssExtractPlugin({
        filename:"styles.css",
    })],
no go on and include the generated css file in your html file
through the link tag like how you do to any css file, add some tailwind classes too to test if its working and open it in the browser. you'll notice no css is being applied that's because we still need one last thing which a postcss.config.js file
and add tailwindcss as a plugin your postcss config file will look like this

now run npm run build again and congrats tailwind is working and you can start writing tailwind classes and designing your
next i advise to read more about webpack npm and postcss i'll be writing more tutorials about these topics in the future.
i hope you found this tutorial helpful see you in the next one.
36