33
Ordering Espresso with DialogFlow : Part I
This blog post introduces you to the concept of Entities on DialogFlow, and shows you how entities can be used to collect information from your customers in an incredibly common use case: ordering food online.
DialogFlow is Google's Natural Language Understanding platform, and runs on the mighty Google Cloud Platform. DialogFlow is incredibly powerful, allowing you to interface with almost anything that can hit a REST endpoint (your potato has WiFi? DialogFlow got you covered!).
One common use case for DialogFlow is for the purpose of building automated chatbots. As of recent these nifty automated scripts have been gaining popularity with rise in work-from-home and an increasing number of services
According to the official documentation, entities dictate exactly how data from an end-user expression is extracted. In other terms, an entity is used to extract some sort of data from a user expression.
Let's break that down by means of a hypothetical situation. Say you want to build a bot to take orders for your coffee shop, and you want users to be able to specify two main things:
Type of Drink
This includes espresso, cappucino or chiller
Type of Milk
The number of different types of milk deserve its own post, so we'd assume you're offering either coconut, almond or cow's milk
(Yes I know there are a GAZILLION more types of coffee drink ranging from the delectable espresso affogato to the questionable flat white and the not-coffee Frappucino. However, for the purposes of this example, I'm assuming that we only serve three different types as above)
Let's say a ludicrous user types the following:
I want an espresso with almond milk.
(who drinks espresso with milk?!)
The two pieces of information you'd want to retrieve are espresso and almond milk. Accordingly you'd want to create Entities to store both of these items to capture this data. S
Log in to your DialogFlow console and expand the menu bar on the left. Click the little plus icon next to entities (image on the left) where it gives you the option to name the entity. This entity will be used to capture the type of coffee, hence I name as such below (image on the right)

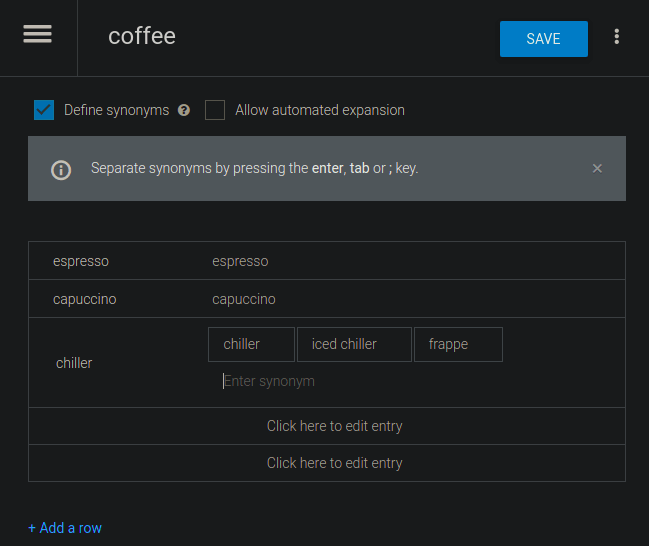
Now we want to provide a list of entries for this entity. Entries are a list of options of possible values that our entity can assume. In the image below, you can see that our coffee entity can be one of three choices. Additionally, you can specify synonyms for a given entity option.
For example, some persons refer to an iced coffee drink as a 'Chiller' whilst other may call it a 'Frappe'. In order to account for this, we specify a list of synonyms for any entry that may have multiple names for the same item.

As seen below, we do the same for milk, and provide entries to capture three types of milk offered at your shop.

We must now create an 'intent' to handle user phrases. An intent is used to describe the intention of a user for one turn of conversation (hence the name).We go to the Intents tab (using the menu bar) and click Create intent.

This brings up a form for you to define your intent parameters

We set our intent name to orderCoffee (since this is the end-goal or intention of your user) and provide a few training phrases. Training phrases are what DialogFlow uses to prepare to respond to user queries.
If a training phrase is matched (if a user inputs a phrase that roughly matches a training phrase), the intent for that given training phrase is activated.
The phrase above, whilst accurate, does not allow us to capture the relevant data required to make your customer's desired coffee drink. In order to do this, we need to make the words coffee and milk, parameters of the training phrase.
To do this, highlight the word coffee and scroll down until you see the name of the entity you created to handle types of coffees and select it. (Repeat the process for milk)

After doing the above, your training phrases should look like the below; both of your desired terms should be higlighted, with the name of their respective entities displayed both in the table directly below, as well as in the Actions and Parameters section

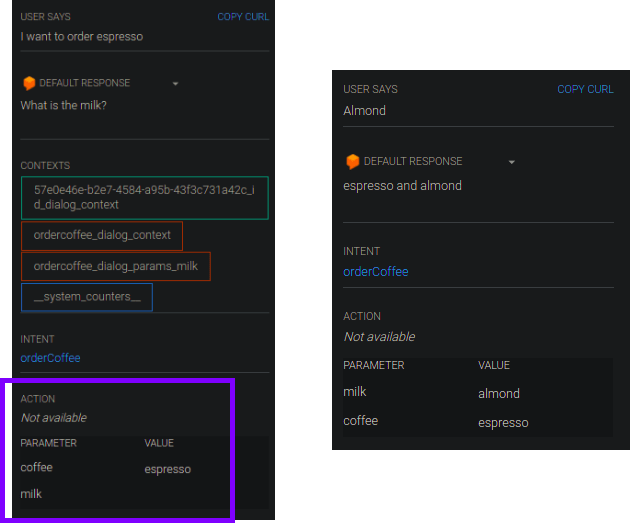
As shown below, if I enter the phrase 'I want to order espresso', DialogFlow automatically fills the parameter coffee with the value espresso (see image on the left). Additionally, an automatic prompt is generated to ask the user (your customer) for their desired milk, and updates the value of the milk parameter accordingly (see image on the right)

That's it! Now you can go on to use Webhooks or any other form of DialogFlow Fullfillment to store your captured entity values. This is an incredibly common use case, and in the next post I'd be showing you how to connect this bot to a Firebase backend to store customer orders
33

