30
Cloud cost reporting alone isn’t going to cut your AWS bill
As containerization rises in popularity, traditional cost optimization methods like monitoring and reporting are put to the test.
Getting a detailed report of your cloud spend is just one side of the coin. The other - and arguably more important one - is doing something about these findings.
Keep on reading to find out why adding automated optimization techniques to the mix makes all the difference (and generates some serious savings).
Cloud cost reporting is a must-have, there’s no doubt about it
Teams usually use Kubernetes in dynamic and multi-tenant environments. Since increasing resources is so easy, losing control over cloud spend is even easier. If left unchecked, a missed bug or architecture oversight might easily snowball into a massive expense.
Consider this story:
One of Adobe’s development teams once burned $80,000 per day because of a computing job left running on Azure. Before someone discovered it and pulled the plug, the bill snowballed to more than half a million dollars. One simple alert would be enough to prevent this.
That’s why users need a solid cost reporting tool that brings them cost visibility in detailed reports and sends alerts when certain parts of the infrastructure go beyond the set thresholds.
Cost reporting is incredibly important, but like I said - it’s just one side of the cost optimization coin.
But cost reporting alone doesn’t cut the chase
You need more than cost reports to make a real difference in your setup. After all, what cost monitoring and reporting tools give you are static recommendations that require a human to implement them.
If you have a small environment, a human engineer can make it work. But think about the scale of a mid-sized company or enterprise.
Applying all the recommendations manually and on a regular basis translates into time, which translates into cost (not to mention all the lost optimization opportunities for sudden traffic spikes and such).
What you need is to add automated cost optimization to the mix.
If you’re wondering how the combination of Kubernetes cost reporting and optimization works in practice, here’s a case study that shows it step by step.
How automated cost optimization helped reduce Amazon EKS costs in 15 minutes

TL;DR
I provisioned an e-commerce app (see it here) on an EKS cluster with 6 m5 nodes (2 vCPU, 8 GiB) on the Amazon EKS platform. Then, I deployed an AI engine to go through my application and suggest some optimizations. I got some pretty interesting recommendations in the Savings Report, so I activated the automated optimization feature.
Here are the results:
- Initial cluster cost: $414 / month.
- Within 15 minutes after turning the automation on, the cluster cost got down to $207 (a 50% reduction) by eliminating 3 nodes.
- And 5 minutes later, the solution added Spot Instances which made the cluster costs go down to $138 per month (a 66% reduction!).
Here’s a more detailed take on this case study
Step 1: Generating the Savings Report
After creating and deploying my EKS cluster, I connected it to CAST AI by creating a free account and selecting Connect your cluster.


I then copied and ran the script successfully in my terminal.
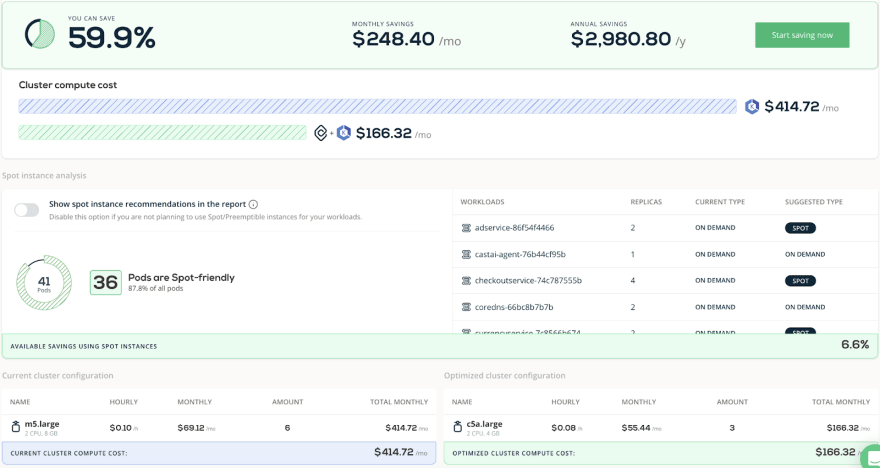
The CAST AI agent analyzed my EKS cluster in read-only mode and generated this Savings Report:

As it turns out, if I switched my 6 m5.large to 3 c5a.large, I could slash my bill by almost 60%.
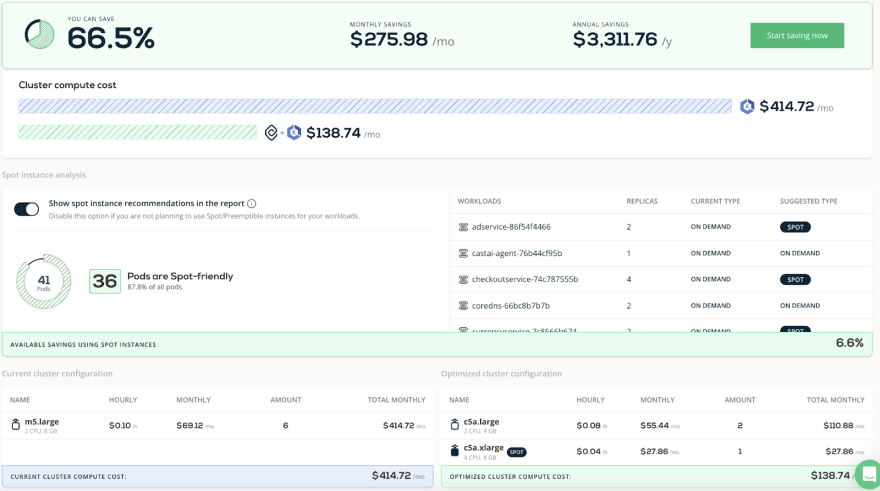
And I could get even higher savings (66.5%!) if I decided to use Spot Instances:

Step 2: Activating the cost optimization
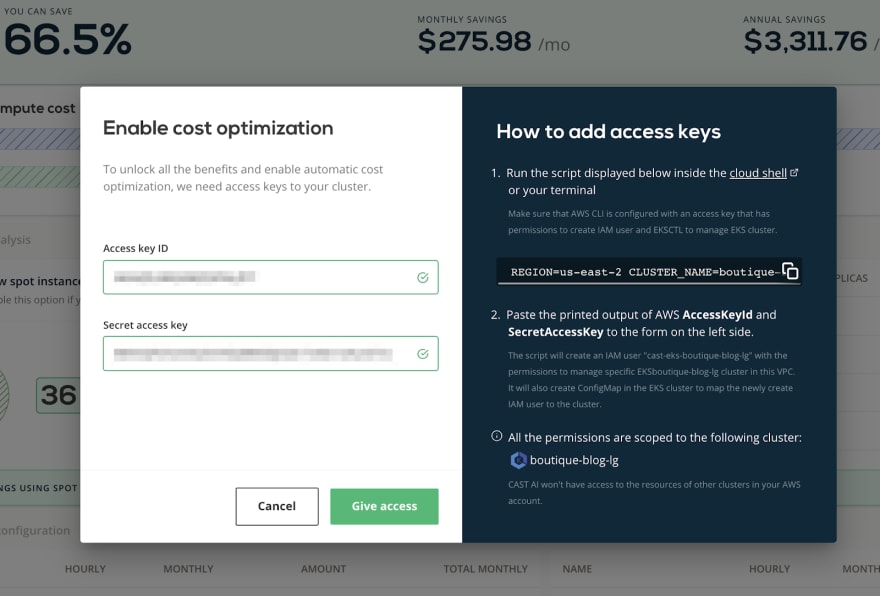
Turning automated optimization on made a lot of sense, so I had to grab my AWS access key ID and Secret access key, and add both to the platform.
To get the access keys, I had to run this script:

Step 3: Enabling cost policies
To achieve maximum cost savings, I turned on all the policies available in CAST AI:
- CPU Policy: I used this policy to set the maximum budget of 200 CPUs.
- Node autoscaler: Whenever I get unscheduled pods, CAST AI will start looking for a place to run them - starting with Spot Instances (if they’re Spot Instance-friendly) or On-Demand instances.
- Node Deletion + Evictor: Evictor is a background process that continuously reduces the cluster to the minimum number of nodes by bin-packing pods. Once a node becomes empty, it’s instantly deleted.
Step 4: Running Evictor
This is what the last policy and Evictor tool look like in action:
- One node (marked in red) is identified as a good candidate for eviction.
- Evictor automatically moves pods to other nodes for “bin-packing.”
- Once the node becomes empty, it’s deleted from the cluster.
- Evictor returns to step 1 and keeps on looking for other nodes that could be deleted to cut costs.
After about 10 minutes, Evictor deleted 3 nodes and left just 3 nodes running. CPUs were at a much healthier 80% rate.
The cost of my cluster is now $207.36 per month - so, 50% of the initial cost ($414 per month_.
Step 5: Moving workloads to new optimized nodes
This is a more advanced and optional step where CAST AI actively replaced my current nodes with more optimized ones - for example, Spot Instances. To do that, CAST AI cordons the cluster, drains nodes, and then replaces them with more optimized nodes.
So, my nodes were cordoned:

The first two nodes were drained, and the AI engine selected the best instance type for these nodes. Here’s what I saw in my CAST AI dashboard:

As you can see, my cluster is now running on 2 nodes that cost me $138 per month. It’s hard to believe that I initially got a monthly EKS bill of $414.72!
Running clusters on Amazon EKS? Give automated optimization a try
Run the free CAST AI Savings Report to check how much you could potentially save. It also gives you actionable steps to reduce the bill that other tools ask you to pay for. And when you’re ready, turn automated cost optimization on to see how your cloud bill shrinks with every minute.
30
