
27
Setting up Google Maps API
In order to create a Google Developer account, you'll need to have a credit card on hand. Don't worry, Google are kind enough to provide $200 of free credit each month, which is more than enough for what we're doing here. Just be aware though that with each load of the map and call to various APIs those credits will be charged meaning the bigger your app gets, the higher the likelihood that you'll have to pay for usage.
Before we jump into creating our map component, there's a few things we need to do. Google Maps is a feature-rich API with a whole lot of options for developers to tap into but you need a unique key to be able to make calls to their API. It's a fairly straightforward process which I'll walk you through.
First, make sure you're logged in to a valid Google account - you'll need it to get access to the tools we'll need. Next, head to the Google Cloud Platform dashboard.
API keys are unique which means that for each new application or project you create, you also have to make a new project from this platform. In the navigation bar you can create a new project or choose an existing one:

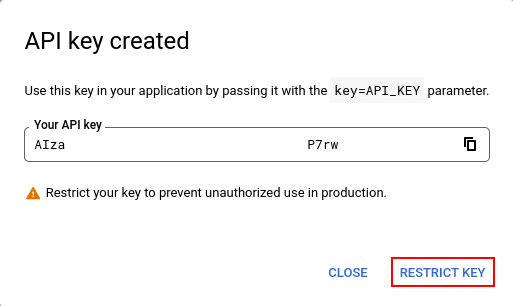
Once your project has been created go to the credentials tab on the left navigation and click CREATE CREDENTIALS at the top of the page:

Do this process twice. For the first key, don't worry about restricting it, just click CLOSE. For the second key we'll need to add some restrictions as we'll be using this later in a way that will display it in the browser.
On the next page, choose HTTP referrers (web sites) as the application restriction and add click ADD AN ITEM. This input allows us to choose which websites have access to the key - in this case we need to set localhost:3000/* to give access to our local development environment. If you plan to push this project to a live repository, add the link to the hosted site in here as well.
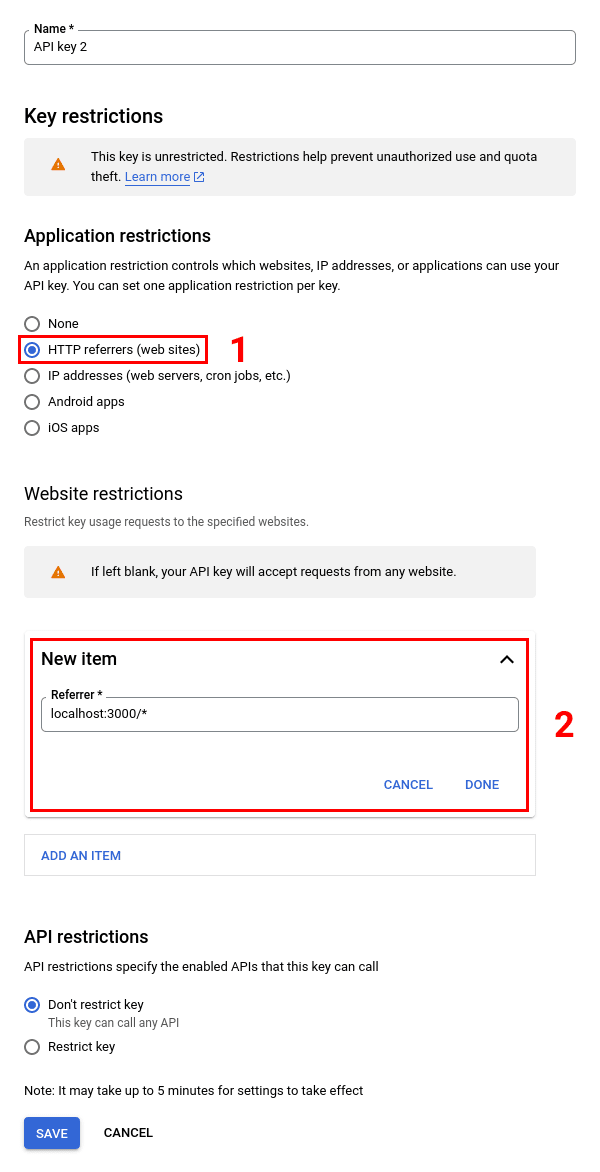
Leave API restrictions at the bottom for now, we'll only add a select group of Google APIs next.
The final step of our API key setup is to give them unique names as they'll each be used for different purposes (server and browser). The restricted key will be used for the browser so you could name them as follows:

Google Maps has a lot of APIs on offer that can give us all of the functionality that the product itself has to offer built into our own projects. You can add as many as you like but for our core functionality we'll only be using two:
- Maps JavaScript API
Add a map to your website, providing imagery and local data from the same source as Google Maps. Style the map to suit your needs. Visualize your own data on the map, bring the world to life with Street View, and use services like geocoding and directions.
- Geocoding API
Convert addresses into geographic coordinates (geocoding), which you can use to place markers or position the map. This API also allows you to convert geographic coordinates into an address (reverse geocoding).
In the side navigation click on Library. This will take you to a new page where you can search for the APIs:
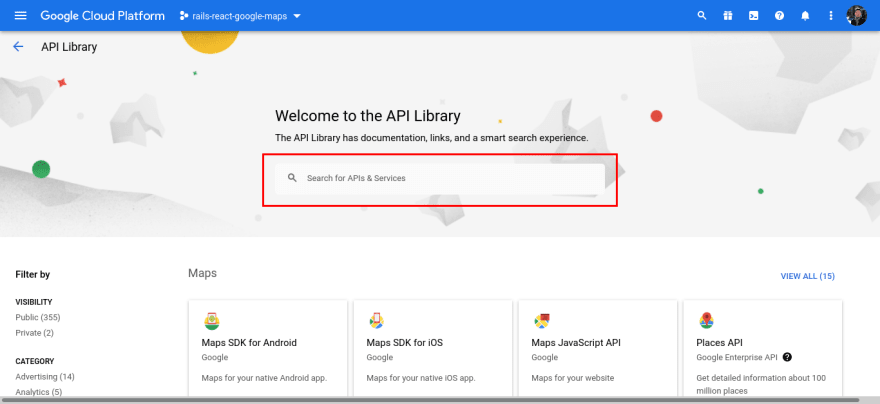
In the search box, enter Maps JavaScript API and open the top result. On the API page, click ENABLE. You'll be redirected to an API dashboard that shows which APIs you have enabled. Go back to the library page and repeat the same process for Geocoding API.
Now we're all set to put our keys into our project!
API keys are considered sensitive data. Remember when I mentioned that Google charges for each call of their APIs? Well imagine if someone got hold of your key and used it for their own purposes - you might wake up to an unpleasant surprise bill from Google at the end of the month.
To prevent your keys, or any other sensitive data in your project, from being accessible where it shouldn't you'll need what we call environment variables. These are a way for you to reference this data from anywhere in your project without exposing it at each point. It's both safe and convenient!
Before we go ahead and create our .env file, we'll need to do a bit of setting up to make it readable in our development environment. We'll be using the dotenv gem. We only want to use this locally so let's go back to our Gemfile, find the development and test group, and add the gem there. Replace it with the following:
group :development, :test do
  # Call 'byebug' anywhere in the code to stop execution and get a debugger console
  gem 'byebug', platforms: [:mri, :mingw, :x64_mingw]
  gem 'dotenv-rails'
end
Next, close your server if it's running (Ctrl+C) and run the Rails gem install command:
bundle installYou should have a long list of installed gems - no need to read through them so long as there aren't any errors! Now our local environment is set up and ready to read environment variables.
In Rails there are gems such as dotenv available, as well as other technical ways of managing environment variables as showcased in this video. For the sake of simplicity we'll create our own for now but, if you're working on bigger projects or particularly sensitive data then it's worth exploring other options to find the right one for your use case.
This part is fairly simple. In the root directory of your project (/rails-react-google-maps) create a new file called .env (it mustn't have a file extension on the end).
Before we place anything in it we need to make sure it won't be shared if we push to any online repository (e.g. GitHub). In your root folder should be a file named .gitignore - open it up and add the following at the bottom:
.envIf you did this correctly the name of the file should now be greyed out in your code editor's file explorer.

All that's left to do is add our Google Maps API keys to the .env file to make them accessible throughout our app. Naming conventions for environment variables are as follows:
NAME_OF_VARIABLE=valueSo if we add our keys with descriptive names it'd look something like this (replace [your_key_here] with your own API keys):
GMAPS_API_SERVER_KEY=[your_key_here]
GMAPS_API_BROWSER_KEY=[your_key_here]
Then when you want to access these values in your app you call them using:
ENV['GMAPS_API_BROWSER_KEY']Just like that we have secure environment variables which, along with the key restrictions on your browser key, should keep your sensitive API keys safe from prying eyes!
With that out of the way we're ready for the last step - building our map component! We'll be exploring our controller again and revisiting React components and props in the next step.
27